
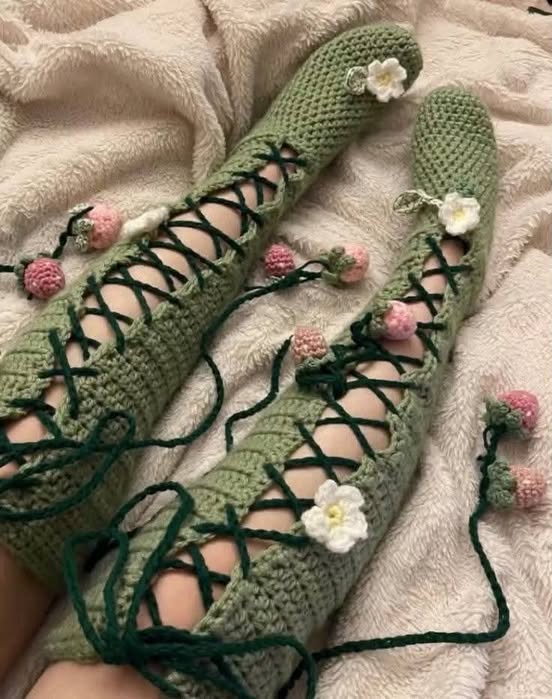
If you are looking for a cozy and fun project, the Tubey Slipper Socks – Crochet Pattern is the perfect choice. These adorable slipper socks are not only practical but also incredibly comfortable.
Whether you are relaxing at home or searching for a thoughtful handmade gift, this pattern offers warmth, style, and satisfaction.
The beauty of the Tubey Slipper Socks – Crochet Pattern lies in its simplicity and versatility. Designed to fit snugly around your feet, these slipper socks are made using basic crochet stitches combined with a clever tube-like construction. This means they are quick to make and adaptable to various foot sizes.
In this detailed guide, you will learn everything you need to know about making your own pair of Tubey Slipper Socks – Crochet Pattern, from gathering the right materials to mastering each step.
Whether you are a beginner or an experienced crocheter, this pattern is accessible, fun, and highly rewarding.
1. Materials and Tools You Will Need
To get started with the Tubey Slipper Socks – Crochet Pattern, it is essential to gather all the necessary materials. The right supplies will make the process smooth and enjoyable.
First, choose a yarn that is soft, warm, and durable. Worsted weight yarn or chunky yarn works beautifully for slipper socks, offering the perfect balance between coziness and structure.
A suitable crochet hook is key to achieving the right tension. For most worsted-weight yarns, a 5.0mm (H-8) crochet hook is ideal, but always check the yarn label for recommendations to ensure the best results.
You will also need a yarn needle to weave in the ends. This helps give your Tubey Slipper Socks – Crochet Pattern a clean, professional finish without loose threads.
Scissors are another must-have tool for trimming yarn during your project. A sharp pair designed for crafts will make the task easier and neater.
Optional materials include stitch markers, which are helpful for keeping track of your rounds or sections, especially if you’re adjusting the size of the slipper socks.
Consider adding non-slip fabric paint or grip dots to the sole of your socks to prevent slipping, especially if you have hardwood or tile floors.
2. Understanding the Tubey Slipper Socks Construction
One of the best features of the Tubey Slipper Socks – Crochet Pattern is its simple yet clever construction. The design uses a tubular structure that wraps around the foot comfortably.
The pattern begins by creating a long rectangle or tube that forms the main body of the slipper. This section is worked in rows or rounds, depending on your preferred method.
The toe area is created by gathering one end of the tube. This forms a snug and rounded front that fits nicely over your toes, providing warmth and a comfortable fit.
The heel is shaped by folding and sewing the back of the tube, which creates a cup-like area for your heel to sit securely. This step is simple but crucial for the overall fit.
Elasticity comes from the choice of stitches, often using half double crochet or single crochet combined with slip stitches to create stretch and flexibility.
The cuff or top edge of the sock is finished with a ribbed stitch or a simple border. This not only enhances the look but also helps keep the socks from slipping off your feet.
Once the basic structure is complete, you can customize the Tubey Slipper Socks – Crochet Pattern with embellishments, stripes, color changes, or textured stitches for a personalized touch.
3. Step-by-Step Guide to Crochet Tubey Slipper Socks
Let’s walk through the process of making the Tubey Slipper Socks – Crochet Pattern step by step. This method is beginner-friendly yet results in a high-quality finished product.
Start by creating a foundation chain that matches the length needed to fit around the widest part of your foot. This measurement is important for the perfect snug fit.
Work in rows of half double crochet or your chosen stitch until you reach the length that wraps comfortably from the toe to the heel. This creates the “tube” shape of the slipper.
Once the rectangle or tube is finished, gather one end tightly to form the toe. You can do this by threading a yarn needle through the stitches at one end and pulling it tight, then securing it with a knot.
For the heel, fold the open end of the tube in half and seam it about halfway up. This forms a heel pocket while leaving an opening for the foot to slip in.
Add a ribbed cuff by working single crochet or front-post/back-post double crochet stitches around the ankle opening. This step adds elasticity and keeps the socks secure on your feet.
Finish your Tubey Slipper Socks – Crochet Pattern by weaving in all loose ends. Check for any gaps in the seams and reinforce them if needed to ensure durability.
4. Customization and Styling Ideas
The Tubey Slipper Socks – Crochet Pattern is highly versatile, offering endless opportunities for personalization. You can adjust colors, textures, and finishes to suit your taste.
Try using multiple yarn colors to create stripes or color-blocked designs. This is a great way to use up leftover yarn while adding visual interest to your slipper socks.
Add textured stitches like bobbles, popcorn, or puff stitches along the top of the foot for extra dimension and a fun, playful look.
Consider embellishing the cuff with buttons, bows, or crochet flowers. These small details can turn a simple pair of slipper socks into a delightful handmade gift.
If you prefer extra warmth, line the inside with a layer of fleece fabric. Simply cut fleece to the same shape as the tube and hand-sew it inside before finishing the heel.
Make matching pairs for the whole family. The Tubey Slipper Socks – Crochet Pattern is easy to adjust for different sizes by changing the length of the starting chain or the number of rows.
For safety on slippery floors, apply fabric-safe grip paint or glue small pieces of felt to the soles. This not only adds function but also a cute handmade look.
FAQ About Tubey Slipper Socks – Crochet Pattern
1. Is the Tubey Slipper Socks – Crochet Pattern suitable for beginners?
Yes, absolutely! The pattern uses basic stitches like chain, single crochet, and half double crochet. The construction is simple, making it perfect for beginners.
2. What is the best yarn to use for slipper socks?
Worsted weight yarn or chunky yarn is ideal. Look for soft but durable yarn that holds its shape well, such as acrylic, cotton blends, or wool blends.
3. How do I adjust the size for different feet?
Simply change the length of the starting chain to fit around the foot and adjust the number of rows to match the length from toe to heel.
4. Are these slipper socks washable?
Yes, if you use machine-washable yarn. Always check the yarn label for washing instructions to ensure your Tubey Slipper Socks – Crochet Pattern stays in great condition.
5. Can I add non-slip grips to the bottom?
Definitely. You can use fabric paint, hot glue dots, or sew on pieces of felt to create non-slip soles, especially useful on hardwood or tile floors.
6. Can I sell finished slipper socks made from this pattern?
Yes, you can sell the finished products made using the Tubey Slipper Socks – Crochet Pattern. Just remember to credit the pattern designer if required, but selling the pattern itself is not permitted.
Conclusion
The Tubey Slipper Socks – Crochet Pattern is a delightful project that combines comfort, creativity, and practicality. Whether you are making them for yourself, for family members, or as thoughtful gifts, these cozy slipper socks are always appreciated.
In this article, you’ve learned how to select the right materials, understand the construction, follow a step-by-step guide, and add your own creative flair. The flexibility of this pattern allows you to make countless variations to suit any style or need.
I hope you found this guide helpful and inspiring. If you enjoyed it, please leave your honest opinion and share any suggestions or ideas you have for future patterns. Your feedback means a lot and helps keep this crochet community thriving. Happy crocheting!


