VERY EASY CROCHET SHOE – PATTERN projects are some of the most satisfying ways to explore your love for crochet while creating something useful and cozy.
Whether you’re looking for a quick project to make at home or you’re just learning how to crochet, creating a pair of crochet shoes is a fun, functional, and creative task that anyone can enjoy.
This VERY EASY CROCHET SHOE – PATTERN is beginner-friendly and requires only a few basic stitches, making it perfect for those new to crochet.
With simple tools and minimal yarn, you can make a soft and stylish pair of slippers or casual shoes that will keep your feet warm and comfortable. Plus, they make thoughtful handmade gifts for friends and family.
In this comprehensive guide, we’ll walk through everything you need to know to complete a pair of shoes using the VERY EASY CROCHET SHOE – PATTERN, including the necessary materials, step-by-step instructions, customization tips, and common troubleshooting solutions. By the end, you’ll have all the confidence you need to complete your own pair with pride.
Before starting your VERY EASY CROCHET SHOE – PATTERN, it’s important to gather all the required materials. Using the right type of yarn and hook will help you achieve the correct shape, fit, and texture.
First, select a medium-weight yarn—also known as worsted weight or category 4 yarn. This thickness is ideal because it offers durability while keeping your crochet shoes soft and breathable. Cotton yarn is a popular choice for crochet footwear because of its strength and comfort.
Next, choose a crochet hook that suits the yarn. Typically, a 4.0 mm to 5.5 mm crochet hook works well for this type of project. If you crochet loosely, consider going down a hook size for a snugger fit.
You’ll also need stitch markers to help keep track of your rows and ensure even shaping for both shoes. A yarn needle will help you weave in the ends neatly and invisibly once the shoes are completed.
Optional materials include non-slip fabric or rubber soles if you plan to wear your crochet shoes on slippery floors. These additions can be sewn or glued onto the bottom of the finished shoes for extra safety.
Finally, keep a measuring tape handy. Proper sizing is essential, especially if you’re gifting the shoes or making them for someone else. Measuring your foot length and width before starting is always a good idea.
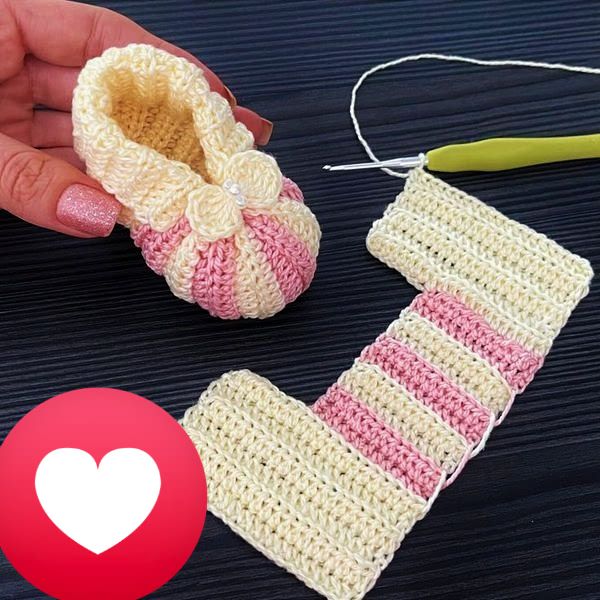
Starting your VERY EASY CROCHET SHOE – PATTERN begins with the sole, which acts as the base of your shoe. Begin with a chain that matches the length of the foot, then work in rounds using half double crochet or single crochet stitches to build up the sole’s thickness.
Once the sole is complete, the sides of the shoe are formed by working in rounds directly into the outer edge of the sole. This creates the structure of the upper part of the shoe. You can adjust the height by adding or reducing rows as needed.
For a slipper-style shoe, continue shaping the sides until you reach the top of the foot. Then, create the toe section by decreasing stitches gradually in the front portion. This gives the shoe a rounded and snug shape that hugs the toes comfortably.
If you prefer a more open or sandal-like design, you can stop building up the sides early and create straps or decorative finishes instead. This makes the VERY EASY CROCHET SHOE – PATTERN adaptable to different styles and seasons.
Fasten off your yarn securely once the main shape is complete. Use a yarn needle to weave in any loose ends, and double-check that all stitches are tight and uniform to maintain structure and durability.
Repeat the entire process for the second shoe, ensuring consistency in stitch count and tension to make a matching pair. If needed, block the shoes to shape them better and give them a clean, professional finish.
One of the most exciting things about the VERY EASY CROCHET SHOE – PATTERN is how customizable it is. From colors to embellishments, you can easily turn a simple pair into something truly unique and personal.
To begin with, experiment with different yarn colors or mix multiple yarns for a multicolor effect. Stripes, ombré patterns, or contrasting soles are fun ways to personalize the shoes and make them stand out.
You can also add buttons, bows, or small appliqués such as flowers or hearts to the top or sides of the shoes. These small details add charm and make your shoes perfect for gifts, especially for babies or toddlers.
If you’re making shoes for colder weather, consider using a thicker yarn or adding a lining for extra warmth. Fleece fabric can be cut to size and sewn inside for a plush, cozy feel.
For a more elegant style, crochet lace details around the opening of the shoes or add beaded trim. This transforms the VERY EASY CROCHET SHOE – PATTERN into a fashionable accessory suitable for lounging or casual outings.
To make your shoes more functional for walking indoors, add felt or rubber soles. You can find pre-made soles online or cut your own. This helps protect the bottom of your shoes from wear and improves grip.
Lastly, always remember to size your shoes accurately. Try them on during the process if you’re making them for yourself. If gifting, refer to size charts and adjust your chain count or row length accordingly.
While working through your VERY EASY CROCHET SHOE – PATTERN, you may run into a few common problems. Thankfully, most of these are easy to fix with some practice and attention to detail.
One common issue is mismatched shoes—where one shoe is slightly larger or shaped differently. This usually happens due to inconsistent tension. Be sure to measure both shoes and count your stitches carefully in each row.
Another issue is shoes that are too loose or too tight. Always measure your foot before starting and adjust the foundation chain to fit your length. Adding or removing rows can help tailor the shoe’s fit.
If the shoes don’t hold their shape, it may be due to using yarn that’s too soft or stretchy. Opt for a firmer cotton yarn or consider double-stranding your yarn for added strength.
Sometimes the toe section might bunch or look uneven. Use stitch markers to help guide your decreases evenly on both sides. Reading your work as you go can prevent uneven shaping.
If your stitches are too tight, the shoes might feel stiff and uncomfortable. Try going up a hook size or relaxing your hand tension slightly to make the fabric more flexible.
Finally, don’t forget about durability. Reinforce the sole and strap joins with an extra row of stitches or backstitching. A well-finished shoe will last longer and look more polished.
Can beginners really make this pattern?
Yes! The VERY EASY CROCHET SHOE – PATTERN is designed for beginners using basic stitches and simple construction. If you know how to chain and single or half-double crochet, you can follow this pattern with ease.
What type of yarn is best for crochet shoes?
Cotton yarn is ideal because it’s breathable, durable, and maintains structure. Avoid very soft or stretchy yarns, as they may not hold the shape well.
How do I make the shoes non-slip?
Add a felt or rubber sole to the bottom of your finished shoes. These can be glued or sewn on and provide excellent grip for indoor wear.
Can I wash crochet shoes?
Yes, but hand washing is recommended to preserve their shape and texture. Use cold water and lay flat to dry.
Do I need to line my crochet shoes?
It’s optional, but adding a soft fabric lining can increase comfort and warmth, especially for winter slippers.
Can I sell shoes made from this pattern?
Absolutely! Handmade crochet shoes are popular at craft fairs and online. Just ensure your finished work is well-made and sized appropriately.
The VERY EASY CROCHET SHOE – PATTERN offers a wonderful opportunity to create a handmade, comfortable, and stylish pair of shoes with minimal effort. Whether you’re making them for yourself or as gifts, these shoes are fun to craft and full of personality. You’ve learned how to choose the right materials, follow a step-by-step pattern, personalize your shoes, and avoid common mistakes.
Now it’s your turn! Have you tried this pattern? We’d love to hear how it went. Share your experience, suggestions, or even a picture of your finished crochet shoes. Your feedback helps others on their creative journey too!