
If you love quilting and are looking for something unique, this 40 Fish Quilt And Block Patterns – TUTORIAL is the perfect guide for your next creative project.
Quilts with fish motifs bring a fresh and aquatic vibe, ideal for beach houses, children’s rooms, or anyone who loves marine-inspired decor. With 40 stunning designs, there’s something for every skill level and style preference.
Whether you’re creating a full quilt or just a single block, the versatility of these patterns allows for endless customization.
Play with colors, fabrics, and layouts to design something truly one-of-a-kind. From abstract fish blocks to realistic aquatic scenes, this tutorial will inspire your creativity and teach you the essential steps to bring these designs to life.
Let’s dive into the details of how to make these beautiful patterns. By following the 40 Fish Quilt And Block Patterns – TUTORIAL, you’ll be able to transform simple fabric into eye-catching masterpieces.
1. Getting Started: Materials and Preparation
Before diving into the 40 Fish Quilt And Block Patterns – TUTORIAL, it’s important to gather all your supplies and prepare your workspace. This step sets the stage for a smooth quilting process.
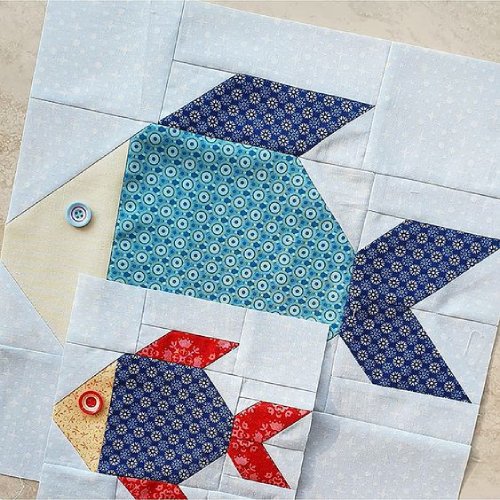
First, select your fabric. Choose a mix of solids, patterns, and textures that reflect your theme. Bright blues, greens, and sandy tones work well for ocean-inspired designs, while bold prints add depth and interest.
Next, choose the right tools. You’ll need a rotary cutter, cutting mat, quilting ruler, and quality sewing machine. Sharp scissors and pins or clips are also essential for precise assembly.
Prepare your patterns. Print or trace the designs you want to use from the 40 Fish Quilt And Block Patterns collection. Make sure to read the instructions thoroughly before starting.
Decide on a layout. Whether you’re creating a full quilt or a single block, sketch your design on graph paper. This will help you plan fabric placement and ensure your quilt looks cohesive.
Pre-wash your fabric to prevent shrinkage and color bleeding. Iron the fabric to remove creases, making it easier to cut and sew accurately.
Lastly, set up your workspace with good lighting and a comfortable chair. Having everything within reach will save time and make the process more enjoyable.
2. Step-by-Step Guide to Creating Fish Quilt Blocks
The heart of the 40 Fish Quilt And Block Patterns – TUTORIAL is the construction of individual quilt blocks. Follow these steps to bring your designs to life.
Start by cutting your fabric pieces according to the pattern dimensions. Use a rotary cutter and quilting ruler for clean, precise edges.
Lay out the fabric pieces on a flat surface. Arrange them as they’ll appear in the final block to ensure you’re satisfied with the color and pattern placement.
Begin sewing the pieces together. Use a ¼-inch seam allowance, which is standard for quilting. Press the seams open or to one side after sewing each piece to reduce bulk.
Assemble the block by joining smaller sections together. Follow the pattern closely, checking alignment as you sew to ensure the fish shapes are clear and proportional.
Add any embellishments, such as embroidery, appliqué, or decorative stitching, to enhance the design. These details can bring your fish quilt blocks to life.
Repeat these steps for additional blocks, experimenting with different fish patterns from the tutorial. Mix and match blocks to create a diverse and visually interesting quilt.
3. Designing and Assembling the Quilt
Once you’ve completed several blocks from the 40 Fish Quilt And Block Patterns – TUTORIAL, it’s time to assemble the quilt. This stage involves layout planning, joining blocks, and adding finishing touches.
Lay out your completed blocks on a large, flat surface. Experiment with different arrangements to find a layout that balances colors and patterns.
Decide on sashing and borders. Adding sashing (strips of fabric between blocks) creates separation and makes each design stand out. Borders frame the quilt and provide a polished look.
Sew the blocks together row by row. Take your time to align seams and ensure everything is even. Press the rows after sewing to keep them flat.
Join the rows to form the quilt top. Again, check alignment at each step and press seams to keep the top smooth and cohesive.
Create a quilt sandwich by layering the quilt top, batting, and backing fabric. Secure the layers with basting pins or spray adhesive.
Quilt the layers together using straight-line stitching, free-motion quilting, or hand quilting. Follow the contours of the fish patterns to highlight the designs.
4. Tips for Customizing Your Fish Quilt
The 40 Fish Quilt And Block Patterns – TUTORIAL is versatile, allowing for endless personalization. Here are some tips to make your quilt truly unique.
Experiment with colors. Use bright, bold hues for a playful look, or opt for muted tones for a sophisticated, understated aesthetic.
Incorporate textured fabrics like velvet, denim, or corduroy to add dimension and interest to your quilt blocks.
Use fussy cutting to highlight specific fabric motifs within your fish patterns. This technique works well with prints featuring aquatic or oceanic themes.
Combine different patterns from the tutorial to create a quilt that tells a story. For example, alternate fish blocks with wave or coral motifs.
Add embellishments like sequins, beads, or buttons to mimic scales or bubbles. These details can enhance the marine theme and make your quilt stand out.
Consider making smaller projects, such as table runners, pillow covers, or wall hangings, using individual blocks from the tutorial.
FAQ: Frequently Asked Questions
1. What skill level is required for these patterns?
The 40 Fish Quilt And Block Patterns – TUTORIAL includes designs for all skill levels, from beginner-friendly blocks to more advanced options.
2. Can I use scraps for these quilt blocks?
Yes, fish quilt blocks are perfect for using up fabric scraps. Smaller pieces can be combined to create intricate and colorful designs.
3. How do I ensure my fish blocks are symmetrical?
Accuracy in cutting and sewing is key. Use a quilting ruler and take your time to align pieces before sewing.
4. What size are the finished blocks?
Block sizes vary depending on the pattern, but most are 6 to 12 inches. Adjust dimensions as needed to fit your project.
5. Can I hand-sew these quilt blocks?
Absolutely! While a sewing machine speeds up the process, hand-sewing is a great option for those who prefer traditional techniques.
6. How do I care for my finished quilt?
Wash your quilt on a gentle cycle with cold water and mild detergent. Air dry or use a low heat setting in the dryer.
Join our VIP broadcast list and gain access to exclusive patterns, all for free. As a VIP member, you’ll receive the best patterns daily, delivered directly to your device. ✨📱 It’s a unique opportunity to stay up-to-date with the latest trends and designs, curated just for you. Don’t miss out on enhancing your projects and discovering new inspirations with the best patterns every day! 🎨🔝
Conclusion
The 40 Fish Quilt And Block Patterns – TUTORIAL is a comprehensive guide to creating stunning, marine-inspired quilts. With 40 unique designs to choose from, this tutorial offers endless possibilities for personalization and creativity. From selecting materials to finishing your quilt, each step ensures a rewarding and enjoyable quilting experience.
We’d love to hear your thoughts and see your creations! Share your feedback, suggestions, and photos of your fish quilts in the comments below. Happy quilting!


