
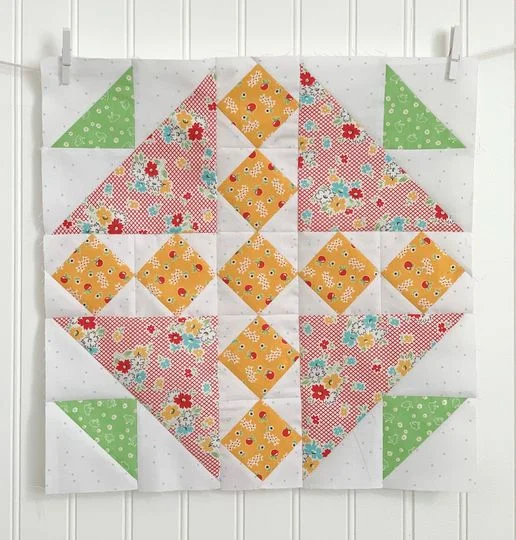
The Around the Corner Quilt Block Tutorial is a wonderful project for quilters looking to explore a fresh, dynamic design. This block uses simple shapes that come together to create a stunning pattern, perfect for beginners and experienced quilters alike.
In this guide, we will walk you through the steps to create this beautiful block, from fabric selection to assembly, ensuring that your finished quilt block is crisp, well-constructed, and eye-catching.
Whether you’re creating a quilt from scratch or just adding some new blocks to an existing quilt, the Around the Corner Quilt Block will make a delightful addition.
It can be incorporated into quilts of all sizes, from wall hangings to large bed quilts. The block’s versatility allows it to work in a variety of quilt styles, whether you’re going for something modern or traditional.
With this tutorial, you’ll have all the knowledge and tips you need to master the Around the Corner Quilt Block. Let’s dive into the steps and get started with this fun and creative quilting project!
1. Materials Needed for the Around the Corner Quilt Block
Before you start working on your Around the Corner Quilt Block, it’s essential to gather all the materials you’ll need. The right tools and fabrics will ensure that your project goes smoothly and that the finished block turns out beautifully.
Start by choosing quilting cotton fabric, which is the most commonly used fabric for quilting projects. For the Around the Corner Quilt Block, you will need several different fabrics. Typically, quilters use two contrasting fabrics: one for the main block and one for the corner pieces. These fabrics should complement each other in color, but don’t be afraid to experiment with different prints, patterns, and colors to create a unique and personal look for your quilt.
In addition to fabric, you’ll need the right tools to cut, sew, and press your pieces. A rotary cutter, cutting mat, and quilting ruler will help you cut your fabric accurately and consistently. These tools are essential to ensure that each piece is the correct size, allowing for smooth assembly and a professional-looking finished block.
You’ll also need a sewing machine to stitch the pieces together. Make sure you have a quarter-inch seam foot for accurate seam allowances, as this will help your block fit together perfectly. An iron and pressing mat will also come in handy for pressing your seams flat as you go, ensuring that each part of your block lies perfectly flat and neat.
Lastly, don’t forget about fabric scissors, pins, and a quilting needle. These small items will help you with finishing touches and ensuring everything is secure as you sew.
Now that you’ve gathered your materials, it’s time to start cutting your fabric pieces!
2. Cutting the Fabric for the Around the Corner Quilt Block
The next step in creating your Around the Corner Quilt Block is to cut your fabric pieces. Precise cutting is crucial in quilting, as it ensures that your pieces fit together properly and your block turns out as planned.
Start by cutting the main square pieces for the block. The size of the square will depend on the size of your finished block. A typical measurement for the main square is around 6 inches by 6 inches, but this can be adjusted depending on the size of the quilt you are creating. Using a quilting ruler and rotary cutter, measure and cut your square pieces accurately.
Next, cut the corner pieces. These are typically smaller squares or triangles that will be sewn onto the main square to create the “around the corner” effect. A common size for the corner pieces is 3 inches by 3 inches, but again, you can adjust this based on your block’s size and design. Use the same method of measuring and cutting with your quilting ruler and rotary cutter to ensure accuracy.
If you’re using multiple fabrics for your quilt block, you may need to cut additional pieces for the different sections of the block. Take care to choose fabrics that complement each other and create a pleasing contrast when the pieces are assembled.
Once all of your pieces are cut, lay them out to ensure everything fits together properly before you begin sewing. This step will help you visualize how the fabrics will come together in the finished block and allow you to make any adjustments before you start stitching.
With all your pieces cut and organized, you’re ready to begin assembling the Around the Corner Quilt Block!
3. Sewing the Around the Corner Quilt Block
Now that you’ve cut your fabric pieces, it’s time to start sewing them together to form your Around the Corner Quilt Block. This is where your block really starts to take shape.
Start by sewing the corner pieces onto the main square. To do this, align one corner piece with the edge of the main square, right sides together, and sew along the edge using a quarter-inch seam allowance. After sewing, press the seam flat with an iron to ensure that it lays neatly. Repeat this process for the other three corners of the square.
Once all the corner pieces are attached, you may need to sew smaller connecting pieces in the spaces between the corners. These smaller sections will help create the “around the corner” effect, where the corner pieces are connected by additional fabric to complete the design.
After all the pieces are sewn together, it’s time to check for accuracy. Measure the block to ensure that the edges are straight and the block is the correct size. If necessary, trim the edges slightly to ensure everything lines up properly.
When you’re satisfied with the assembly, press the seams one final time to give the block a clean, crisp finish. This step helps to remove any wrinkles and ensures that your block is flat and ready for the next stage of your project.
At this point, your Around the Corner Quilt Block should be complete and ready to use in your quilt or other project!
4. Assembling the Quilt and Final Touches
Now that you’ve created your Around the Corner Quilt Block, you can use it to assemble your quilt. Whether you’re making a small wall hanging, a table runner, or a large quilt, the steps for assembling the quilt are the same.
Start by arranging your blocks in a layout that you find appealing. You can create a simple grid design or mix and match the blocks for a more dynamic and varied look. Take the time to experiment with different arrangements until you find the one that best suits your vision.
Once you’re happy with the layout, begin sewing the blocks together. Start by stitching the blocks in rows, using a quarter-inch seam allowance to join each block to the next. After each row is complete, press the seams flat before attaching the rows together.
When all the rows are sewn together, you can add a border to your quilt if desired. A border can help frame your quilt and give it a more finished look. Choose a fabric that complements the rest of the quilt, and sew the border pieces along the edges of the quilt top.
Finally, once the quilt top is complete, it’s time to add the backing and batting. Lay the quilt top on a flat surface, and place the batting underneath. Then, add the backing fabric to the back of the quilt. Pin or baste the layers together to keep them in place before quilting.
You can quilt your quilt by hand or machine, using your preferred technique. Straight-line quilting, free-motion quilting, or hand quilting can all add beautiful texture to your finished quilt. Once the quilting is complete, trim any excess fabric and bind the edges with your choice of binding fabric.
FAQ: Frequently Asked Questions
1. What fabrics should I use for the Around the Corner Quilt Block?
Quilting cotton is the best choice for the Around the Corner Quilt Block because it is durable, easy to work with, and comes in a variety of colors and patterns. You can choose both solid fabrics and prints to create a vibrant block.
2. Can I adjust the size of the Around the Corner Quilt Block?
Yes, you can adjust the size of the block by altering the dimensions of the fabric pieces. Just be sure to maintain the proportions of the corner and main pieces to preserve the block’s overall design.
3. How can I make my quilt look more unique?
Experiment with different color schemes, patterns, and fabric combinations to give your Around the Corner Quilt Block a personalized touch. You can also add embellishments such as embroidery, buttons, or fabric paint to enhance the design.
4. How do I prevent my quilt from becoming too bulky?
To avoid bulkiness, use lightweight fabrics and avoid adding too many layers of batting. When quilting, make sure to use a quilting needle that can handle multiple layers of fabric.
5. Can I use the Around the Corner Quilt Block in other projects?
Absolutely! This block can be used in various projects, including pillows, table runners, wall hangings, or even tote bags. The possibilities are endless!
6. What’s the best way to quilt my finished project?
There are many quilting techniques to choose from, including straight-line quilting, free-motion quilting, and hand quilting. Choose the method that best suits your skill level and the design of your quilt.
Join our VIP broadcast list and gain access to exclusive patterns, all for free. As a VIP member, you’ll receive the best patterns daily, delivered directly to your device. ✨📱 It’s a unique opportunity to stay up-to-date with the latest trends and designs, curated just for you. Don’t miss out on enhancing your projects and discovering new inspirations with the best patterns every day! 🎨🔝
Conclusion
The Around the Corner Quilt Block Tutorial has provided a detailed, step-by-step guide to creating a beautiful and dynamic quilt block. From choosing fabrics to cutting, sewing, and assembling, you now have all the knowledge needed to create this fun block. The block’s versatility makes it perfect for many different types of quilting projects, allowing you to showcase your creativity.
We hope you found this tutorial helpful and inspiring! We’d love to hear your thoughts and see how your Around the Corner Quilt Block turned out. Please leave a comment with your feedback and any suggestions for future tutorials! Happy quilting!


