
Pie Carrier Sewing Pattern

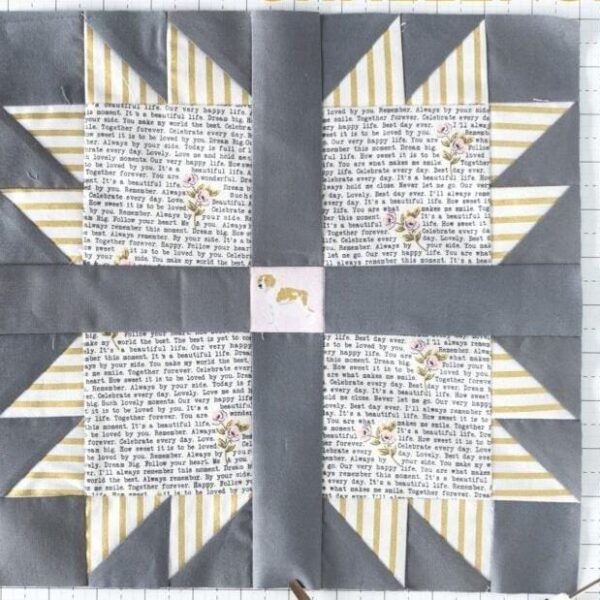
The Bear Paw Quilt Block – FREE PATTERN is one of the most cherished traditional quilt patterns. This timeless design, known for its sharp angles and symmetrical layout, represents strength and heritage.
Whether you’re a beginner or an experienced quilter, this pattern is a must-try due to its versatility and stunning visual appeal.
Quilting enthusiasts love the Bear Paw Quilt Block because it allows for creativity while maintaining a structured design. With the right fabric choices, this classic block can look modern or maintain its rustic charm. Moreover, mastering this pattern helps improve piecing accuracy and quilting skills.
In this article, you’ll find a FREE PATTERN and a detailed step-by-step guide to creating your own Bear Paw Quilt Block. From gathering materials to stitching the final pieces, this tutorial ensures you can confidently complete this project with professional results.
Before diving into the Bear Paw Quilt Block – FREE PATTERN, it’s essential to gather all the necessary supplies. Having the right tools ensures precision and a smoother quilting experience.
Choosing the right fabric plays a crucial role in the final appearance of the quilt block. Cotton fabric is highly recommended due to its durability and ease of handling. Pre-washing the fabric is also a good practice to prevent shrinking later.
Accuracy in cutting is vital for seamless alignment. Using a rotary cutter and quilting ruler ensures each piece fits perfectly. Taking your time during this step saves frustration when assembling the quilt block.
An iron is often overlooked but is an essential tool in quilting. Pressing seams open or to one side helps keep the quilt block flat and professionally finished.
Once you’ve gathered all the materials, it’s time to cut and piece the fabric for the Bear Paw Quilt Block – FREE PATTERN. This step requires attention to detail to ensure precision.
Half-square triangles (HSTs) are the foundation of this quilt block. Sewing these accurately ensures the bear paw claws look sharp and defined. Using a 1/4-inch seam allowance helps maintain consistency.
Arranging the pieces before sewing prevents mistakes and allows for any last-minute adjustments. Taking a photo at this stage can serve as a reference while stitching.
Seam allowances play a key role in the final look of the quilt block. Using a consistent seam allowance and pressing properly ensures the pieces align correctly without bulkiness.
Now that your pieces are ready, it’s time to assemble the Bear Paw Quilt Block – FREE PATTERN. Sewing with precision is key to achieving clean and crisp results.
Taking your time when aligning the pieces helps maintain symmetry. If any sections are misaligned, unpicking and resewing is worth the effort for a professional finish.
Pressing the seams open versus pressing to one side is a debated topic in quilting. For this pattern, pressing to one side helps nest seams, reducing bulk at intersections.
Squaring up the quilt block is an important final step before joining it to other blocks. Using a quilting ruler ensures the edges are straight and the block fits perfectly into a larger quilt design.
The beauty of the Bear Paw Quilt Block – FREE PATTERN is its adaptability. You can modify the colors, layout, and size to create unique variations.
Choosing bold colors can give a contemporary twist to this traditional design. Playing with color placement alters the overall visual impact, making it a focal point in a quilt.
Mixing patterned fabrics adds texture and movement to the block. Selecting complementary or analogous colors ensures a cohesive look without overwhelming the design.
Adjusting the block size allows for various applications. Larger blocks work well for quilts, while smaller ones make excellent table runners or pillow covers.
1. What is the history of the Bear Paw Quilt Block? The Bear Paw pattern dates back to the 1800s and symbolizes strength, nature, and a guiding path. It is commonly found in traditional American quilts.
2. Is the Bear Paw Quilt Block suitable for beginners? Yes! While it requires precise cutting and sewing, beginners can successfully complete this pattern with careful attention to detail.
3. What is the best fabric for making a Bear Paw Quilt Block? Cotton fabric is highly recommended due to its durability, ease of use, and variety of available prints.
4. How big should my Bear Paw Quilt Block be? Standard sizes range from 6 to 12 inches, but you can adjust the dimensions to fit your project needs.
5. Can I make a full quilt using only Bear Paw blocks? Absolutely! Repeating the Bear Paw block creates a stunning quilt with a cohesive and traditional feel.
6. How do I ensure my seams match perfectly? Using a consistent 1/4-inch seam allowance, pinning fabric carefully, and pressing seams properly helps achieve perfect alignment.
Join our VIP broadcast list and gain access to exclusive patterns, all for free. As a VIP member, you’ll receive the best patterns daily, delivered directly to your device. ✨📱 It’s a unique opportunity to stay up-to-date with the latest trends and designs, curated just for you. Don’t miss out on enhancing your projects and discovering new inspirations with the best patterns every day! 🎨🔝
The Bear Paw Quilt Block – FREE PATTERN is a fantastic project for quilters of all skill levels. This timeless design allows for creativity while helping you refine your quilting techniques. By following this guide, you’ll be able to create a beautiful and precise quilt block that can be incorporated into a variety of projects.
Have you tried making the Bear Paw Quilt Block? Share your experience in the comments below! Your feedback and suggestions are always welcome.


