
If you are a fan of quilting, you’ve likely come across the Bento Box Block Pattern. This design is a classic choice for quilters looking to create a dynamic yet easy-to-follow pattern.
Whether you’re a seasoned quilter or a beginner, the Bento Box Block offers a beautiful way to practice your skills and experiment with different fabric choices.
In this Bento Box Block Pattern – Tutorial, we will guide you step by step to help you create this striking quilt block. Not only will you learn the basics, but we’ll also offer tips and tricks to enhance your quilting journey.
The Bento Box Block pattern is a well-loved quilt block design that consists of interlocking squares and rectangles. The pattern is known for its geometric simplicity, but when combined with vibrant fabric choices, it can become a stunning work of art.
It’s often used in larger quilts and can be adapted for various projects such as wall hangings, table runners, and more. This tutorial will give you all the instructions you need to bring your Bento Box Block to life.
As you follow along with this Bento Box Block Pattern – Tutorial, you’ll find that the process is straightforward. It requires basic sewing techniques and an understanding of quilting terms like patchwork, sashing, and cornerstones.
With just a few simple steps, you can create a quilt block that looks complex, but is actually quite easy to make. So let’s dive into the steps, and soon you’ll be creating your own Bento Box Blocks with ease.
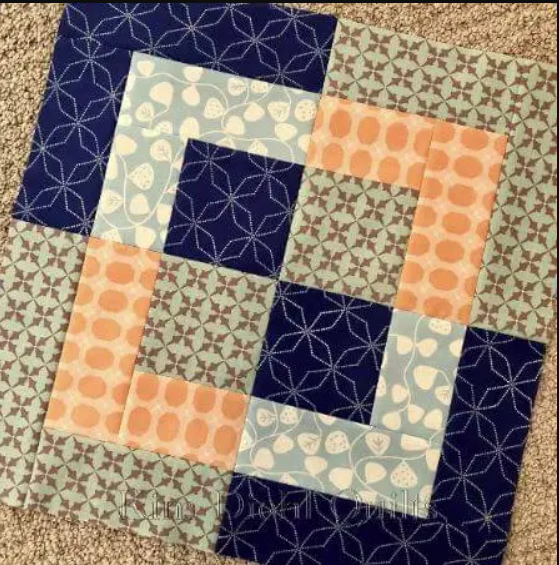
1. Understanding the Bento Box Block Structure
The Bento Box Block Pattern is primarily made up of squares and rectangles, which form a grid-like design. This design is often arranged in a way that creates a sense of depth and movement. The block typically includes a central square surrounded by four rectangular pieces, forming the visual effect of a “box” within a box. Understanding the structure of the block is the first step to successfully creating this quilt design.
To begin, you will need to select your fabrics. It’s important to choose colors that contrast well with one another. The Bento Box Block can be playful and vibrant, or it can have a more subdued, modern aesthetic. The beauty of this pattern lies in its versatility. Once you have your fabric choices ready, it’s time to cut your fabric pieces to the right size. Each block will require a set of uniform squares and rectangles.
After cutting your fabric, the next step is to sew the pieces together. Start by sewing your central square to the four rectangular pieces. It’s important to measure your pieces carefully and ensure that your seams are straight. If your seams are even and precise, your Bento Box Block will come together beautifully. When sewing, always press your seams flat for a neat and polished finish.
You’ll want to repeat this process for each block you plan to make. Depending on your project, you might need multiple Bento Box Blocks to complete your quilt. As you get comfortable with the process, you’ll find that the blocks come together quickly. This makes the Bento Box Block an ideal choice for quilters who want a fun and efficient project that still results in stunning designs.
2. Cutting Your Fabric Pieces
When it comes to making the Bento Box Block Pattern, precise fabric cutting is key. The first step in the process is to cut your fabric into the appropriate sizes for the blocks. Typically, the block requires a central square and four rectangular pieces. The size of these pieces will vary depending on the size of the finished block you want to create. Make sure to use a rotary cutter and cutting mat for the best accuracy.
For the central square, a common size is 4.5 inches by 4.5 inches. This square will be surrounded by four rectangular pieces, each usually measuring 2.5 inches by 4.5 inches. You may also choose to modify the size of your fabric pieces if you want a larger or smaller block. Be sure to account for seam allowances when cutting, typically 1/4 inch on all sides.
It’s also a good idea to cut your fabric pieces in a way that maximizes your fabric usage. Lay out your pieces before cutting to ensure you are using the fabric efficiently and avoiding waste. If you’re working with multiple colors or prints, try to balance your fabric choices so that each piece stands out in the final design.
Once all of your pieces are cut, arrange them in a grid pattern to get a visual idea of how the block will look. This is the time to adjust any fabric choices or patterns if necessary. Remember that quilting is as much about creativity as it is about following instructions. Don’t be afraid to play around with the arrangement of your pieces before you start sewing.
3. Sewing the Bento Box Block
Once your fabric pieces are cut, the next step is to sew them together. Start by aligning the rectangular pieces with the central square. The rectangle pieces should be sewn to each of the four sides of the central square, creating the visual effect of a box within the block. It’s important to take your time and make sure your seams are aligned as accurately as possible.
Begin by sewing one rectangle to one side of the square. Make sure to press the seam flat after each step. This will help your fabric lay smoothly and prevent any puckering. Continue adding the remaining three rectangular pieces to the other sides of the square, ensuring each seam is straight and pressed. When all pieces are sewn together, you’ll have the basic Bento Box Block structure.
After sewing all the pieces together, take a moment to check the dimensions of the block. The finished Bento Box Block should measure around 9.5 inches by 9.5 inches. If your block is slightly larger or smaller, that’s perfectly fine, as long as you’re consistent with the size throughout your quilt. The key is to make sure the seams are even and that the fabric is stitched securely.
If you want to create a quilt with a more intricate design, you can combine the Bento Box Blocks in various arrangements. For example, try alternating the blocks with other designs or mix different fabric choices for a patchwork effect. The Bento Box Block is a great foundation for a wide range of quilt designs, and it can be customized in countless ways to suit your style.
4. Assembling Your Quilt
Once you’ve completed all of your Bento Box Blocks, it’s time to assemble them into a quilt. Start by laying out the blocks in the order you prefer, paying attention to how the colors and patterns interact with each other. You can opt for a traditional grid pattern or create a more modern layout with staggered rows or offset blocks.
Next, sew your blocks together by joining them in rows. Once the rows are complete, sew them together to form the entire quilt top. Take care to match up seams where the blocks meet for a smooth finish. Press the seams as you go to keep the quilt top flat and neat.
After the quilt top is assembled, it’s time to add the quilt backing and batting. Sandwich the backing fabric and batting between the quilt top, and then pin the layers together. Use a basting stitch or safety pins to hold everything in place. Once your quilt layers are secured, you can begin quilting through all the layers. You can choose to quilt by hand or use a sewing machine, depending on your preference.
Finally, add the quilt binding around the edges of your quilt. This will give the quilt a finished look and ensure that the raw edges are neatly tucked away. You can make your own binding from fabric or purchase pre-made binding if you prefer. Once the binding is attached, your quilt will be ready for display or use.
FAQ
1. What size should the Bento Box Block be?
The typical size for a Bento Box Block is around 9.5 inches by 9.5 inches, but you can adjust the size of your central square and rectangles to create smaller or larger blocks.
2. Can I use different fabrics for each block?
Yes! The Bento Box Block Pattern is highly versatile, and using different fabrics for each block is a great way to add interest to your quilt. Just ensure that the fabric choices complement each other.
3. How do I press the seams?
To achieve flat seams, press them with an iron after each step. Press the seams in the direction they naturally fall to avoid bulky seams and maintain a neat appearance.
4. How many Bento Box Blocks do I need for a quilt?
The number of blocks you need will depend on the size of your quilt. A lap quilt might require around 30-40 blocks, while a larger bed quilt will need more. Plan accordingly based on the size you want to achieve.
5. Can I hand-quilt a Bento Box quilt?
Absolutely! Hand quilting adds a personal touch to any project. If you prefer hand quilting, simply quilt through the layers once your quilt top is assembled and basted.
6. What other patterns can I combine with Bento Box Blocks?
Bento Box Blocks pair well with many other quilt patterns, including the log cabin, nine-patch, and hourglass blocks. Mixing and matching different patterns can create a unique and custom design for your quilt.
Join our VIP broadcast list and gain access to exclusive patterns, all for free. As a VIP member, you’ll receive the best patterns daily, delivered directly to your device. ✨📱 It’s a unique opportunity to stay up-to-date with the latest trends and designs, curated just for you. Don’t miss out on enhancing your projects and discovering new inspirations with the best patterns every day! 🎨🔝
Conclusion
In this Bento Box Block Pattern – Tutorial, you’ve learned the step-by-step process to create a beautiful quilt block. From selecting fabric and cutting pieces to assembling your quilt, the Bento Box Block offers endless opportunities for creativity.
Whether you’re a beginner or an experienced quilter, this pattern is an excellent choice for any project. If you’ve enjoyed this tutorial, please leave a sincere comment and share any suggestions for future tutorials. Happy quilting!


