
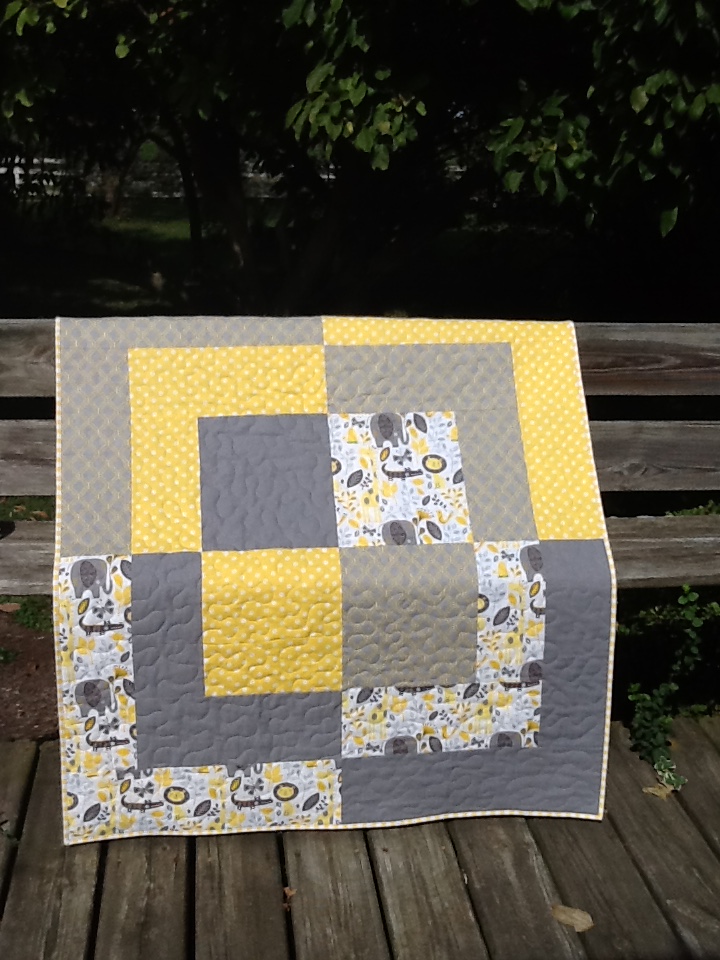
The Big Baby Bento Box Quilt Free Tutorial is the perfect way to create a beautiful, playful quilt that can be used for a baby’s nursery or as a thoughtful gift.
The Bento Box quilt pattern is known for its easy construction and stunning results, and this “big” version offers an opportunity to make a bold statement while maintaining the charm and simplicity of the original design.
Whether you’re a seasoned quilter or a beginner, this free tutorial will walk you through the process step by step, allowing you to create a vibrant quilt that is sure to be cherished.
In this article, we’ll take you through the basics of the Big Baby Bento Box Quilt, from gathering the necessary materials to finishing the quilt top.
The tutorial is designed to be clear and easy to follow, making it ideal for quilters of all levels. We’ll also discuss tips for choosing the right fabrics, cutting your pieces, and assembling the quilt block so that you can achieve a beautiful, professional finish.
As you follow along with this tutorial, you’ll learn about the importance of fabric selection, the step-by-step process of piecing the quilt, and helpful tips for putting together the Big Baby Bento Box Quilt.
The beauty of this pattern lies in its simplicity, and by the end of this tutorial, you’ll be able to create a stunning quilt that your little one (or someone special) can enjoy for years to come.
1. Materials Needed for the Big Baby Bento Box Quilt
Before we dive into the steps for creating your Big Baby Bento Box Quilt, it’s important to gather all the necessary materials. The beauty of this quilt is that it doesn’t require complicated fabrics or advanced techniques, but you will still need some basic supplies. Here’s what you’ll need to get started:
- Fabric: For the Big Baby Bento Box Quilt, you’ll need an assortment of fabrics in various colors and patterns. The key to achieving a balanced and appealing quilt is to select fabrics that complement each other. You can choose to use a coordinated color scheme for a more modern look, or opt for a more whimsical design with lots of fun prints and colors. Typically, for a baby quilt, you’ll need fabric for the blocks, borders, and backing. For the Big Baby Bento Box Quilt, we suggest using quilting cotton, as it is soft, easy to work with, and durable for everyday use.
- Rotary Cutter and Mat: To achieve precise cuts, a rotary cutter and mat are essential tools. A quilting ruler will also be helpful to ensure your pieces are cut to the correct dimensions.
- Thread: Choose a neutral or coordinating thread color for piecing your quilt together. A cotton or polyester thread works best for this project.
- Batting: For a cozy finish, you’ll need quilt batting, which provides warmth and structure to your quilt. The batting should be soft but sturdy enough to maintain the quilt’s shape.
- Sewing Machine: While you can certainly hand-sew your quilt, using a sewing machine will speed up the process. Any standard sewing machine will do for piecing together the quilt blocks.
- Pins or Clamps: To keep your fabric pieces in place while sewing, you’ll need pins or clamps. These will help prevent shifting as you stitch the blocks together.
By gathering all these materials ahead of time, you’ll be able to work more efficiently and enjoy the process of creating your Big Baby Bento Box Quilt.
2. Cutting the Fabric for the Big Baby Bento Box Quilt
The first step in creating your Big Baby Bento Box Quilt is cutting the fabric into the necessary shapes. The Bento Box pattern is a block-based design that uses square and rectangular pieces arranged in a grid. Follow these steps to ensure accurate cuts:
- Cut the fabric into strips: Start by cutting your fabric into strips. The width of these strips will determine the final size of your quilt blocks. For a Big Baby Bento Box Quilt, cut your strips to about 4-6 inches wide. You can vary the size depending on the desired look of the blocks.
- Cut squares from the strips: Next, cut your fabric strips into squares. The squares will make up the main section of the Bento Box block. For a larger quilt, you may want to cut the squares to 6-8 inches to give the block a bigger, more pronounced design.
- Cut border pieces: You’ll also need to cut fabric for the borders of each block. These strips are typically smaller than the main square pieces, about 2 inches wide. Be sure to cut enough border pieces to frame each block.
- Arrange your pieces: Before you start piecing everything together, lay out your cut fabric pieces in the pattern you want. This step will help you visualize how the quilt will look and ensure that the colors and patterns are balanced.
Cutting your fabric accurately is crucial to making sure that your Big Baby Bento Box Quilt comes together smoothly. Take your time to measure and cut each piece precisely.
3. Assembling the Big Baby Bento Box Quilt Blocks
Once your fabric is cut, it’s time to begin assembling the quilt blocks. The Big Baby Bento Box Quilt features a simple layout of squares and rectangles arranged in a grid. Follow these steps to piece your blocks together:
- Sew the strips together: Start by taking your cut strips of fabric and sewing them together. Begin by pairing two strips of fabric, placing them right sides together, and sewing along the edges. Press the seams open for a smooth finish. Repeat this process with the rest of your fabric strips.
- Cut the strips into blocks: After you’ve sewn your strips together, cut them into blocks. The size of the blocks will depend on the dimensions of your strips and the final size you want your quilt to be.
- Sew the blocks into rows: Once you have your blocks cut, arrange them into rows. Make sure the fabrics align properly, creating the Bento Box pattern. Sew the blocks together, and then press the seams flat.
- Add the borders: To complete each Bento Box block, sew the border strips to the outside of the blocks. This will give the quilt a finished look and create the “boxed” appearance that the pattern is known for.
- Join the blocks together: After your blocks are assembled, sew them into rows. Then, join the rows to create the quilt top. Press the seams as you go to ensure a smooth finish.
- Trim the quilt top: Once all the blocks are sewn together, trim the edges of the quilt top to make sure everything lines up properly. This will create a neat, uniform edge around the entire quilt.
The Big Baby Bento Box Quilt pattern is easy to piece together and looks stunning once the blocks are assembled. Take your time with each step to ensure that everything is aligned and sewn neatly.
4. Finishing the Big Baby Bento Box Quilt
After your quilt blocks are sewn together, the next step is to finish your Big Baby Bento Box Quilt. This involves adding the quilt backing, batting, and binding to complete the project. Follow these steps to achieve a professional finish:
- Attach the backing fabric: Lay out your quilt backing fabric, and place your quilt top on top of it, right sides together. Pin the layers in place and sew around the edges, leaving a small opening for turning the quilt right-side out. Once sewn, trim any excess fabric and turn the quilt right-side out.
- Add the batting: Lay the quilt flat and position the batting between the quilt top and backing. Smooth out any wrinkles, and then pin the layers together to keep them in place while quilting.
- Quilt the layers: You can choose to hand quilt or machine quilt the layers together. Use your sewing machine to quilt along the seams or in a pattern that complements the Bento Box design. This step will help hold the layers together and add texture to your quilt.
- Bind the edges: To finish the quilt, cut strips of fabric for the binding. Fold them over the edges of the quilt, folding under the raw edges, and sew the binding in place. This final step will give your quilt a clean, professional look.
- Press the quilt: Once the quilt is bound, give it a final press with an iron to ensure that all the seams are flat and the quilt has a polished finish.
- Enjoy your quilt: Now that your Big Baby Bento Box Quilt is complete, you can enjoy the fruits of your labor! Whether you’re gifting it to a loved one or keeping it for yourself, this quilt is sure to bring comfort and joy.
FAQ: Frequently Asked Questions
1. What size is the Big Baby Bento Box Quilt?
The size of the Big Baby Bento Box Quilt can vary depending on how many blocks you make and the size of the blocks. Typically, a baby quilt measures around 40×40 inches, but you can adjust the size by adding more blocks or using larger squares.
2. Can I use other fabrics besides quilting cotton?
While quilting cotton is the most popular choice for this quilt, you can experiment with other fabrics such as flannel or linen for a different texture and feel.
3. How do I make the quilt bigger?
To make the quilt larger, simply add more blocks or increase the size of the blocks. You can also add borders to the edges to make the quilt more expansive.
4. Can I machine quilt the Big Baby Bento Box Quilt?
Yes! Machine quilting is a great option for this quilt. You can quilt along the seams or use a free-motion quilting technique for a more intricate design.
5. What’s the best way to wash the quilt?
To preserve the quilt, wash it in cold water on a gentle cycle. Air dry or tumble dry on low heat. This will keep the quilt soft and prevent any shrinking or damage to the fabric.
6. Can I use this pattern for other projects?
Absolutely! The Big Baby Bento Box Quilt pattern can be adapted for other projects such as wall hangings, table runners, or throw blankets. Adjust the block sizes and layout to suit your needs.
Join our VIP broadcast list and gain access to exclusive patterns, all for free. As a VIP member, you’ll receive the best patterns daily, delivered directly to your device. ✨📱 It’s a unique opportunity to stay up-to-date with the latest trends and designs, curated just for you. Don’t miss out on enhancing your projects and discovering new inspirations with the best patterns every day! 🎨🔝
Conclusion
In this Big Baby Bento Box Quilt Free Tutorial, we’ve walked you through each step of creating a stunning quilt that’s perfect for babies or as a gift. From gathering materials and cutting fabric to piecing together the blocks and finishing your quilt, this guide has provided everything you need to successfully complete your project. We hope you’ve enjoyed learning about this quilt pattern and feel inspired to start your own.
If you have any questions or would like to share your feedback, we’d love to hear from you in the comments below. Please let us know how your quilt turns out or share any suggestions you might have for future tutorials!


