
Pie Carrier Sewing Pattern

The Blooming Love Quilt Pattern – Free Tutorial is an enchanting and easy-to-follow project that allows you to create a beautiful quilt perfect for any occasion.
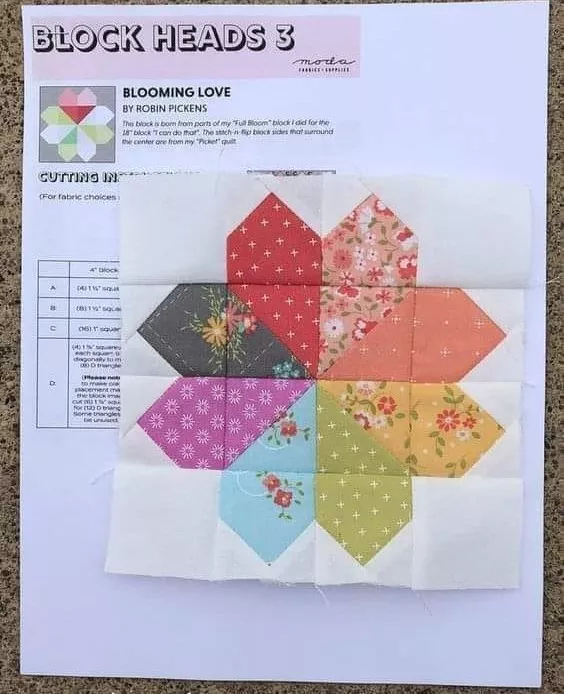
This pattern, with its combination of simple shapes and vibrant colors, brings the charm of blooming flowers into your home.
Whether you’re a beginner quilter or someone looking to explore a new design, this quilt pattern is sure to provide both fun and satisfaction as you stitch it together.
Creating a quilt with the Blooming Love Quilt Pattern is not only a great way to show your love for the craft but also a perfect way to gift something personal to someone special.
The quilt’s design incorporates hearts and petals, which symbolize love, warmth, and care, making it ideal for a romantic gift or a cozy addition to any room.
In this article, we will guide you through every step of the process, from the materials needed to finishing touches, ensuring that your quilting experience is both enjoyable and successful.
Whether you plan to make this quilt for yourself, a loved one, or as a gift for a special occasion, the Blooming Love Quilt Pattern – Free Tutorial will equip you with all the tips, tricks, and instructions you need to create a memorable and beautiful quilt. Let’s dive into the details of this stunning quilt design!
Before diving into the actual quilting process, it is essential to gather all the necessary materials for the Blooming Love Quilt Pattern – Free Tutorial. Having everything you need on hand will make the process smoother and ensure that you achieve the best results. Here’s a list of the basic supplies required for the project.
First, you will need quilt fabric in various colors. The pattern uses a combination of light and dark shades to create the visual contrast, and these fabrics are generally made from 100% cotton. Some of the recommended colors include red, pink, white, and green, as these will highlight the heart and floral shapes in the quilt. You’ll need enough fabric for the quilt top, backing, and binding. A typical size for a full quilt might require approximately 5-7 yards of fabric, depending on the quilt’s final dimensions.
Next, you’ll need batting to give the quilt its warmth and thickness. Cotton batting works great for a soft and breathable quilt, but you can also opt for polyester batting for a more durable option. Batting usually comes in various thicknesses, so you’ll want to select one that suits your preferences for the quilt’s weight.
A sewing machine will be necessary for stitching the quilt pieces together, and a 1/4-inch quilting foot is often recommended for accurate seams. Additionally, thread in neutral colors like white or cream will work well for piecing together the fabric. You may also want to use quilt pins or clips to hold the layers of fabric together while you sew. A rotary cutter, cutting mat, and ruler are crucial for cutting the fabric pieces with precision, ensuring that your quilt blocks fit together seamlessly.
Lastly, make sure to have a quilting needle for your sewing machine, as it is specifically designed for working with quilt fabric and batting. With these materials in hand, you are ready to start assembling your Blooming Love Quilt.
Once you have all your materials, it’s time to get started on the Blooming Love Quilt Pattern! Follow these simple steps to piece together the quilt blocks and create a beautiful, heart-filled design.
Creating the Blooming Love Quilt Pattern can be a bit challenging, but with the right tips, you can make the process easier and more enjoyable. Here are some helpful suggestions to keep in mind while you work on your quilt.
One of the best things about quilting is the ability to customize your project, and the Blooming Love Quilt Pattern offers plenty of opportunities to make it your own. Here are some ways to add your personal touch to this beautiful quilt.
Q1: How long will it take to make the Blooming Love Quilt?
A: The time required to complete the quilt depends on your skill level and the size of the quilt. On average, it may take a few days to a few weeks to finish, depending on how much time you dedicate each day.
Q2: Can I make the Blooming Love Quilt with different fabrics?
A: Absolutely! You can customize the quilt by using different fabrics, patterns, or colors to make it suit your personal style.
Q3: Is hand quilting a viable option for this pattern?
A: Yes, hand quilting is an option. While machine quilting is faster, hand quilting can add a beautiful, personal touch to your project.
Q4: What is the best fabric for the Blooming Love Quilt?
A: 100% cotton fabric is ideal for quilting because it’s durable, easy to work with, and holds up well over time.
Q5: Can I make this quilt larger?
A: Yes! You can increase the number of blocks or adjust the size of the blocks to make the quilt larger.
Q6: What is the best batting for this quilt?
A: Cotton batting is a popular choice for this quilt, but you can also opt for polyester batting if you prefer a more durable and lighter quilt.
Join our VIP broadcast list and gain access to exclusive patterns, all for free. As a VIP member, you’ll receive the best patterns daily, delivered directly to your device. ✨📱 It’s a unique opportunity to stay up-to-date with the latest trends and designs, curated just for you. Don’t miss out on enhancing your projects and discovering new inspirations with the best patterns every day! 🎨🔝
In this Blooming Love Quilt Pattern – Free Tutorial, we’ve explored everything from gathering your materials to completing the quilt. Whether you’re a beginner or an experienced quilter, this pattern offers a perfect blend of simplicity and creativity.
Now, it’s time to put these tips into practice and create a quilt that will bring warmth and love to any home.
If you enjoyed this article, please leave your thoughts and any suggestions for future tutorials. We’d love to hear from you! Happy quilting!


