
The Bluebird Migration – Quilt Pattern is a beautiful and inspiring design that brings nature’s elegance into your quilting projects. From the very first stitch, this pattern invites quilters of all levels to create a work of art that symbolizes freedom, beauty, and the natural journey of bluebirds in migration.
The Bluebird Migration – Quilt Pattern captures the essence of these gentle birds in a delicate yet structured design.
Using the Bluebird Migration – Quilt Pattern allows you to bring a fresh, light, and meaningful theme into your quilting work. This pattern is perfect for those who appreciate detailed craftsmanship and wish to add a storytelling element to their quilt.
With soft colors and flowing movement, this quilt creates a calming visual experience that is enjoyable both to create and to display.
In this article, you will find a detailed, step-by-step guide to help you complete your own Bluebird Migration – Quilt Pattern successfully. Whether you are a beginner or an experienced quilter, this tutorial will offer clear instructions and practical tips to ensure your quilt turns out beautifully. Let’s explore how you can start this wonderful project and make it your own.
1. Understanding the Bluebird Migration – Quilt Pattern
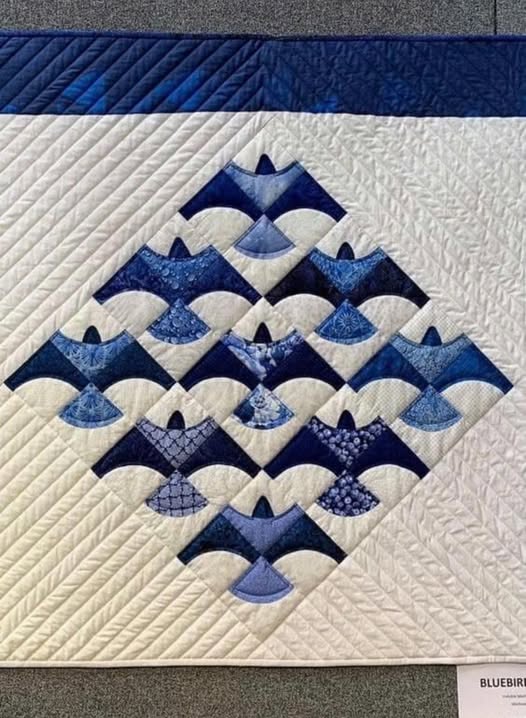
The Bluebird Migration – Quilt Pattern is designed to illustrate the graceful flight of bluebirds as they travel across the skies. This quilt pattern often features soft blue tones, gentle curves, and repeated bird motifs that simulate the movement of a flock.
Quilters who choose this pattern enjoy working with light fabrics that create an airy, floating effect. The birds in the quilt often appear in various sizes to give the impression of distance and motion, which brings the Bluebird Migration – Quilt Pattern to life in a unique and elegant way.
The construction of this pattern typically includes pieced bird blocks, flying geese units, and flowing sashing that connects the visual story throughout the quilt top. Paying attention to fabric selection is essential to highlight the beauty of the bluebirds and the natural scenery.
Many quilters love this pattern because it balances simplicity with beauty. The layout can be customized to match your preferred size, making it a versatile project for wall hangings, lap quilts, or bed covers.
This pattern is also an excellent way to practice precision piecing and develop your skills in creating movement within a quilt. The Bluebird Migration – Quilt Pattern provides room for creativity while offering clear guidelines for success.
Once you understand the basic structure and theme of this quilt, you are ready to begin selecting your materials and preparing your workspace for the next steps.
2. Materials and Fabric Selection for the Bluebird Migration – Quilt Pattern
To create the Bluebird Migration – Quilt Pattern, selecting the right materials is key to achieving the desired soft and natural look. Start by choosing a palette that includes various shades of blue, soft whites, and gentle grays to represent the sky and the birds.
Cotton fabric is often recommended because it is easy to work with, holds its shape well, and is widely available in the needed color ranges. Consider adding some light batik or patterned fabrics to bring texture and depth to your quilt.
The background fabric plays an important role in the Bluebird Migration – Quilt Pattern. A light neutral, soft sky blue, or subtle print can create a beautiful sky backdrop for your birds. The choice of background fabric helps the bird motifs stand out and enhances the visual flow.
You will also need high-quality batting that offers a smooth, even surface and good drape. This will give your quilt a soft and cozy feel while ensuring that the bird designs maintain their shape.
A matching thread in soft tones is ideal for piecing and quilting. Using coordinating thread helps keep the focus on the birds and the overall pattern without distracting from the design.
In addition to fabric and thread, make sure to have basic quilting tools such as a rotary cutter, cutting mat, quilting ruler, sewing machine, pins, and iron. Having everything ready will make your quilting process smoother and more enjoyable.
Once your materials are gathered, you can confidently begin the cutting and piecing steps of the Bluebird Migration – Quilt Pattern.
3. Step-by-Step Piecing Process for the Bluebird Migration – Quilt Pattern
The Bluebird Migration – Quilt Pattern begins with carefully cutting your fabric pieces. Start by cutting the bird shapes according to the templates provided by the pattern or based on your custom design.
Accurate cutting is essential to ensure the birds and background pieces fit together smoothly. Take your time to align your ruler correctly and cut with precision to achieve clean edges.
Once your pieces are cut, start assembling the bird blocks. Follow the piecing sequence provided in your pattern instructions. Typically, you will join smaller sections to form the wings, bodies, and tails of the birds, then assemble them into complete bird units.
As you piece the bird blocks, remember to press your seams carefully. Pressing towards the darker fabric is often recommended to keep the quilt top flat and visually appealing. Pay attention to the direction of your seams to make assembly easier.
After completing the bird units, begin piecing the background sections and the flying geese blocks that represent the birds in motion. Flying geese blocks are perfect for creating the visual path of migrating birds across your quilt.
Carefully join all blocks together, maintaining consistent seam allowances and ensuring that the birds align properly throughout the quilt. The Bluebird Migration – Quilt Pattern relies on precise placement to showcase the gentle movement of the birds.
When your quilt top is complete, it’s time to prepare for quilting. Choose a quilting design that enhances the flight path, such as soft waves, gentle arcs, or subtle cloud patterns, to emphasize the migratory theme.
4. Finishing Your Bluebird Migration – Quilt Pattern Project
Once you finish piecing the quilt top for the Bluebird Migration – Quilt Pattern, the next step is layering and basting. Lay your backing fabric flat, place the batting on top, and center the quilt top over it.
Smooth all layers carefully to avoid wrinkles and use safety pins or basting spray to secure the layers together. Basting is essential to prevent shifting during quilting.
When it’s time to quilt, consider using soft, flowing quilting lines that follow the direction of the birds. This will reinforce the theme of movement and migration while adding a gentle texture to your quilt.
Take your time with the quilting process. Start from the center and work outward to keep the quilt layers even. Use consistent stitch lengths and gentle curves to create a professional and polished look.
After quilting, trim any excess batting and backing fabric. Prepare your binding by cutting strips, joining them, and sewing them around the edges of your quilt. Binding finishes the edges neatly and adds a final touch to your Bluebird Migration – Quilt Pattern project.
Once the binding is attached, give your quilt a final press to smooth out any remaining folds. Your Bluebird Migration – Quilt Pattern quilt is now complete and ready to be admired.
This beautiful quilt will not only bring comfort and style to your home but also tell a story of nature’s beauty and the graceful journey of bluebirds in migration.
FAQ – Bluebird Migration – Quilt Pattern
What skill level is required for the Bluebird Migration – Quilt Pattern?
The Bluebird Migration – Quilt Pattern is suitable for confident beginners and intermediate quilters. Basic piecing skills and some experience with flying geese blocks will make the process easier.
What type of fabric works best for the Bluebird Migration – Quilt Pattern?
Soft cotton fabrics in shades of blue, white, and gray are ideal. Adding subtle prints or batiks can bring texture and depth to your quilt.
Can I customize the size of the Bluebird Migration – Quilt Pattern?
Yes, you can adjust the number of bird blocks and background sections to create a smaller wall hanging or a larger bed quilt. The pattern is flexible and can be tailored to your needs.
What quilting design complements the Bluebird Migration – Quilt Pattern?
Soft, flowing quilting lines that follow the birds’ flight path work beautifully. Gentle arcs, waves, or cloud-like patterns can enhance the theme of movement.
How long does it take to complete the Bluebird Migration – Quilt Pattern?
Depending on your experience and available time, it may take a few days to several weeks. Taking your time with careful piecing and quilting will ensure the best results.
Do I need special tools to make the Bluebird Migration – Quilt Pattern?
Basic quilting tools such as a rotary cutter, quilting ruler, sewing machine, pins, and an iron are sufficient. Templates for bird shapes may be included in the pattern or can be created by hand.
Conclusion
In this article, we explored the beautiful Bluebird Migration – Quilt Pattern, from understanding its theme to selecting the right materials, piecing the blocks, and finishing the quilt with care. This pattern offers a unique opportunity to bring the story of migrating bluebirds to life through fabric and thread. Whether you are new to quilting or have years of experience, this project is a rewarding way to create something meaningful and visually stunning.
I would love to hear your thoughts and experiences with the Bluebird Migration – Quilt Pattern. Please leave a sincere opinion and share any suggestions you may have for future patterns or tutorials. Your feedback is always welcome!


