
Pie Carrier Sewing Pattern

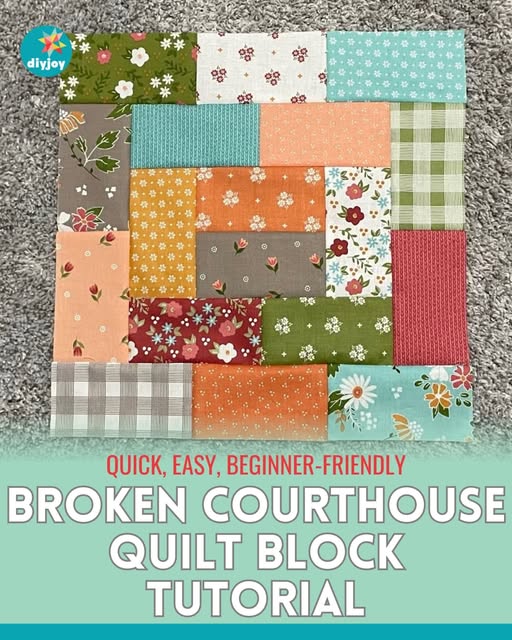
If you’re looking for a fun and creative quilting project, the Broken Courthouse Quilt Block Tutorial is the perfect choice. This timeless block pattern is loved by both beginners and experienced quilters.
It’s a wonderful way to explore color combinations, use up fabric scraps, and create something truly unique. In this guide, we will walk you through everything you need to know about the Broken Courthouse Quilt Block Tutorial, step-by-step.
The Broken Courthouse Quilt Block Tutorial is inspired by the traditional courthouse steps block but adds a playful twist with asymmetrical lines and creative fabric placement.
This block is not only beautiful but also very beginner-friendly. Whether you’re making a full quilt, a wall hanging, or a table runner, this block fits perfectly into any project.
In this comprehensive guide, we’ll dive deep into fabric choices, cutting techniques, sewing instructions, and assembly tips. The goal is to help you complete your own version of the Broken Courthouse Quilt Block Tutorial with confidence and joy. Get ready to unleash your creativity and learn how to make this stunning block.
The Broken Courthouse Quilt Block Tutorial is a variation of the traditional courthouse steps block, which is known for its layered appearance resembling courthouse steps. What makes this block “broken” is the intentional irregularity in the layout, giving it a modern and scrappy look.
This block allows quilters to play with different fabric prints and colors. It’s particularly popular among those who enjoy scrappy quilts because it uses small pieces of fabric effectively. This means it’s a sustainable and budget-friendly project, as you can use leftover materials from previous quilts.
Another reason quilters love the Broken Courthouse Quilt Block Tutorial is its versatility. You can adapt the block size to fit various projects like pot holders, pillow covers, or large bed quilts. The possibilities are truly endless when you start working with this block.
The construction of this block involves sewing strips of fabric around a central square. The “broken” effect comes from varying the widths and placements of these strips, creating a dynamic and eye-catching design.
It’s important to note that this block is a great practice tool for mastering straight-line sewing and accurate cutting. If you’re new to quilting, this tutorial will help build your skills while offering a beautiful result.
By following the Broken Courthouse Quilt Block Tutorial, you’ll gain a deeper appreciation for the balance between tradition and creativity in quilting. It’s a fantastic way to express your personal style while respecting quilting heritage.
Before diving into the sewing process, it’s essential to gather the right materials for the Broken Courthouse Quilt Block Tutorial. Choosing the perfect fabrics will make your block truly shine.
First, decide whether you want a cohesive color scheme or a scrappy look. Many quilters opt for pinks, reds, blues, or neutrals, but you can choose any palette that matches your style. Fat quarters, jelly rolls, or scrap bins are excellent sources for this block.
You’ll need a central square to start each block. This square can be a focal print or a solid color that anchors the design. It’s often fun to select a bold print for the center to draw attention.
Next, gather fabric strips of varying widths. The beauty of the Broken Courthouse Quilt Block Tutorial lies in its asymmetry, so feel free to mix strip sizes ranging from 1 inch to 3 inches wide.
Make sure you have high-quality cotton fabric, as quilting cotton offers durability and ease of sewing. Pre-washing your fabric is recommended to prevent shrinkage later on.
In addition to fabric, you’ll need basic quilting tools: a rotary cutter, self-healing cutting mat, quilting ruler, pins or clips, sewing machine, thread, and an iron for pressing seams.
Finally, consider whether this block will be part of a larger quilt or a smaller project like a hot pad, table runner, or pillow. This decision will influence how many blocks you need and how you coordinate the fabric colors.
Now that you’ve gathered your materials, let’s dive into the sewing process of the Broken Courthouse Quilt Block Tutorial. This step-by-step guide ensures success for quilters of all levels.
Start by cutting your center square. A typical starting size is 4 inches by 4 inches, but you can adjust based on your project’s needs. This square is the heart of your block.
Next, cut your fabric strips. These should be of varying lengths and widths. For each round, measure the sides of the growing block and cut strips slightly longer to trim later for accuracy.
Begin sewing the first strip to one side of the center square. Use a ¼-inch seam allowance, which is standard in quilting. Press the seam to one side for a clean finish.
Continue adding strips in a clockwise or counterclockwise direction. Unlike traditional courthouse blocks where strips are symmetrical, the Broken Courthouse Quilt Block Tutorial encourages varying the strip widths to create a “broken” look.
After completing each round, square up the block. This step ensures that your block remains even and well-shaped, which is crucial when assembling multiple blocks into a quilt.
Repeat the process until your block reaches the desired size. Most finished blocks measure between 10 to 14 inches, depending on how many rounds of strips you add.
Once your blocks are complete, it’s time to think about assembly. The Broken Courthouse Quilt Block Tutorial allows for numerous layout options, depending on the effect you want.
One common approach is to alternate the orientation of each block, creating a dynamic, almost woven appearance. This layout works beautifully for quilts, table runners, or wall hangings.
If you prefer a more uniform look, align all blocks in the same direction. This method highlights the differences in strip widths and enhances the modern feel of the block.
You can also experiment with color gradients. Arrange blocks from light to dark shades or create a rainbow effect across your quilt. The flexibility of the Broken Courthouse Quilt Block Tutorial supports endless creativity.
Another idea is to use sashing between blocks. Sashing provides a frame around each block, helping the eye to appreciate the individuality of each one. White, black, or gray sashing often makes colorful blocks pop.
If you’re making smaller items like pot holders or fabric trivets, consider adding insulation batting (such as heat-resistant batting) to protect surfaces from heat. This adaptation transforms your quilt blocks into functional kitchen accessories.
Binding your finished project is the final touch. Choose a binding fabric that complements your block colors. A striped or polka-dotted binding can add a fun finishing detail.
What is a Broken Courthouse Quilt Block?
The Broken Courthouse Quilt Block is a variation of the courthouse steps block. It features asymmetrical strip placement, giving a modern and scrappy appearance.
Is the Broken Courthouse Quilt Block beginner-friendly?
Yes! The Broken Courthouse Quilt Block Tutorial is excellent for beginners because it focuses on straight-line sewing and simple construction techniques.
How big should the center square be?
A common center square size is 4 inches, but you can adjust this based on how large you want the finished block to be.
What fabrics work best for this block?
Quilting cotton is ideal. You can use coordinated fabrics for a polished look or scraps for a colorful, eclectic style.
Can I use this block for things other than quilts?
Absolutely! The Broken Courthouse Quilt Block is perfect for pot holders, fabric trivets, pillows, table runners, and wall hangings.
How do I achieve the “broken” look?
Vary the widths of your fabric strips intentionally. Instead of keeping all strips the same size, mix different widths to create a unique, broken courthouse effect.
In this Broken Courthouse Quilt Block Tutorial, we’ve explored everything you need to create this charming and versatile quilt block. From understanding the design concept to selecting fabrics, sewing step-by-step, and exploring creative layouts, this tutorial equips you with all the tools for success.
This block is not only a joy to make but also a fantastic way to use up fabric scraps while practicing essential quilting skills. Whether you choose to make a full quilt, a small kitchen accessory, or a decorative item, the Broken Courthouse Quilt Block Tutorial will inspire your creativity.
I’d love to hear your feedback! Please leave a sincere opinion about this tutorial and share any suggestions or ideas for future patterns. Your input helps make this quilting community even better. Happy quilting!


