
The Build A Heart Quilt Block Tutorial is a beautiful way to combine creativity, love, and stitching. Whether you’re creating a quilt for Valentine’s Day, a baby shower, a wedding gift, or simply to express warmth and affection, this heart block pattern adds a meaningful and eye-catching element to any quilt.
In this tutorial, you’ll learn step by step how to make a Build A Heart Quilt Block using basic patchwork techniques. This design is beginner-friendly, but versatile enough for advanced quilters to personalize and transform into stunning projects.
The heart motif never goes out of style—and once you learn the basics, you’ll find countless ways to incorporate it into your quilting life.
Let’s walk through everything you need to know to make your own Build A Heart Quilt Block, from materials and measurements to assembly tips, creative uses, and more.
1. Materials and Fabric Selection
To get started on your Build A Heart Quilt Block Tutorial, you’ll first need to gather your supplies. Fortunately, this pattern requires only basic tools and fabric scraps, making it an excellent stash-busting project.
Start by choosing two high-contrast fabrics—one for the heart and one for the background. The heart fabric can be red, pink, or any color that fits your project theme, while the background should allow the heart shape to stand out clearly.
You’ll need:
- Heart fabric: Two 5″ x 5″ squares and four 2.5″ x 2.5″ squares
- Background fabric: One 4.5″ x 4.5″ square and four 2.5″ x 2.5″ squares
- Rotary cutter and ruler
- Cutting mat
- Sewing machine with 1/4″ foot
- Iron and pressing surface
- Thread in coordinating color
This block finishes at 6.5″ x 6.5″ unfinished, or 6″ square once sewn into a quilt.
2. Assembling the Heart Block Step by Step
Let’s dive into the step-by-step instructions for building your Build A Heart Quilt Block. Follow these directions carefully, and you’ll end up with a clean, sharp heart shape perfect for your quilt.
Step 1: Prepare Your HSTs
Start by making two Half Square Triangles (HSTs) with one 5″ heart fabric square and one 5″ background square.
- Place the squares right sides together.
- Draw a diagonal line on the back of one square.
- Stitch 1/4″ on both sides of the line.
- Cut on the drawn line and press open.
- Trim each to 4.5″ square.
These two HSTs will form the top slanted sides of your heart.
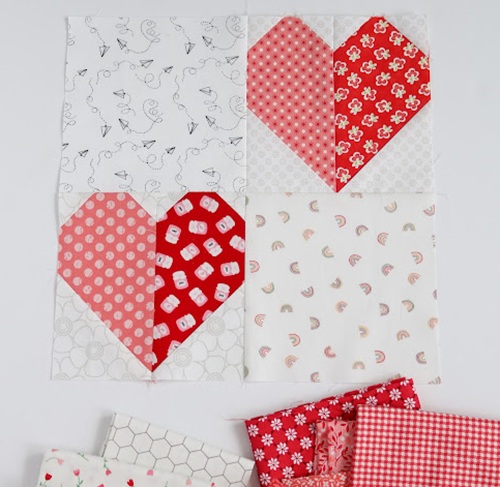
Step 2: Arrange and Layout
Lay out all your fabric pieces on a flat surface in this order:
- Top row: two 2.5″ heart squares and two 2.5″ background squares
- Middle row: the two HST units side by side
- Bottom row: one 4.5″ background square
This arrangement creates the full heart shape with the background surrounding it.
Step 3: Sew Rows
- Sew the top row together (2.5″ pieces). Press seams to the side.
- Join the HST units for the middle row.
- Bottom row remains as a single square.
Step 4: Join the Rows
- Sew the top row to the middle, and then add the bottom square.
- Press all seams flat or open, based on your preference.
And there you have it—your completed Build A Heart Quilt Block!
3. Creative Uses for Heart Blocks
Once you’ve mastered the Build A Heart Quilt Block Tutorial, you’ll find endless ways to use this lovely design.
Make a full quilt by combining multiple heart blocks in a grid layout. Alternate background fabrics or flip the hearts to create visual movement. For a more modern look, leave some blocks empty to create negative space.
Create mini quilts or wall hangings using just a few heart blocks. Add a border, do some simple quilting, and you’ve got a charming handmade decoration.
Use hearts for cushions or pillows. A single heart block makes the perfect front panel for a love-themed pillow—great for weddings, Valentine’s Day, or anniversaries.
Sew a table runner with hearts stitched in a row. Choose seasonal fabrics to create a holiday version or go scrappy for a fun, eclectic look.
Add to tote bags or zipper pouches. Heart blocks can become statement features in functional projects, adding a personal, handmade flair.
4. Tips for Perfect Heart Blocks Every Time
While the Build A Heart Quilt Block Tutorial is simple, here are some helpful tips to ensure your hearts come out perfect each time.
- Use starch or pressing spray to stabilize fabric before cutting, especially with smaller squares.
- Accurate cutting is key—double-check your measurements to avoid wonky seams.
- Use a scant 1/4″ seam allowance. This ensures your finished blocks maintain correct dimensions and fit together nicely.
- Chain piece where possible. This speeds up the process and keeps your blocks consistent.
- Press seams thoughtfully. Decide whether to press seams open or to the side based on the final quilting method and personal preference.
Most importantly, don’t stress! Quilting is about expression and joy. Even if a seam is slightly off, your heart block will still shine.
FAQ – Build A Heart Quilt Block Tutorial
Is this heart block beginner-friendly?
Yes! This block is a fantastic project for beginners. It uses basic squares and HSTs—great practice for new quilters.
What is the finished size of the block?
The block finishes at 6.5″ x 6.5″ unfinished, and 6″ x 6″ when sewn into a quilt.
Can I make the block larger or smaller?
Absolutely! You can scale the pattern up or down by adjusting your squares proportionally. Just remember to recalculate your seam allowances.
How many heart blocks do I need for a quilt?
That depends on the quilt size. For a lap quilt, try 5 rows of 6 blocks (30 hearts). For a baby quilt, 4 rows of 4 is a sweet choice.
What fabric works best?
Cotton quilting fabric is ideal. Choose fabrics with high contrast so the heart shape stands out.
Can I use scraps?
Definitely! This is a fantastic scrap-friendly project. Mix and match for a playful, colorful look.
Conclusion
The Build A Heart Quilt Block Tutorial is a delightful way to bring love and warmth into your quilting. With just a few squares and simple steps, you can create a block that is full of meaning and beauty.
Whether you’re quilting for a loved one, crafting a gift, or just enjoying a creative afternoon, this heart block brings joy with every stitch.
Now it’s your turn—grab your favorite fabrics and start building hearts today!


