
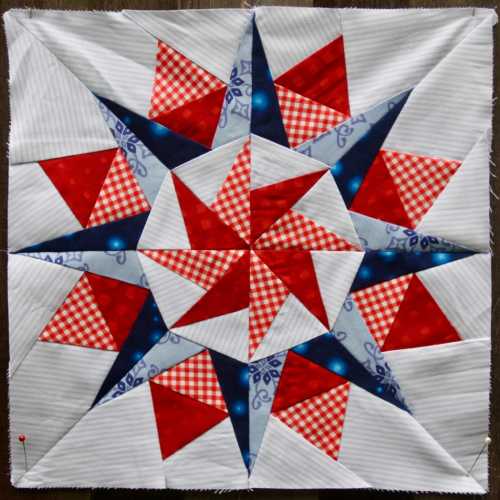
The Cactus Compass Quilt Block – Free Pattern is a beautiful and intricate quilt design that brings together the elements of both traditional and modern quilting styles.
If you love working with geometric patterns and enjoy adding a personal touch to your quilts, this pattern is a perfect choice. The Cactus Compass Quilt Block creates a striking visual impact with its bold lines and vibrant design, making it an ideal project for quilters of all skill levels.
Whether you are an experienced quilter or just starting out, creating a Cactus Compass Quilt Block is an exciting way to explore new techniques and develop your quilting skills.
The pattern is versatile enough to be used in a variety of quilt projects, including bed quilts, wall hangings, and even throw pillows. In this article, we’ll walk you through the steps of creating this stunning quilt block and offer tips for making the most of this free pattern.
By following the instructions in this article, you’ll be able to create a beautiful Cactus Compass Quilt Block that you can incorporate into your next quilt project.
We’ll cover everything from the materials you’ll need to step-by-step instructions for cutting and piecing the block together. Whether you’re a seasoned quilter or just starting, this free pattern will guide you through the entire process with ease.
1. Materials Needed for the Cactus Compass Quilt Block
To get started with the Cactus Compass Quilt Block – Free Pattern, it’s important to gather all the necessary materials. Using the right fabric, tools, and equipment will ensure that the process goes smoothly and that your quilt block turns out as planned. Here’s a list of materials you’ll need to create your Cactus Compass Quilt Block:
- Fabric: Choose a variety of fabrics that complement each other to bring out the full beauty of the Cactus Compass design. A combination of contrasting fabrics works best, such as light and dark shades, to create depth and dimension. You can choose a traditional color palette with warm earth tones or go for a more modern look with bright, bold colors.
- Rotary Cutter and Mat: A rotary cutter is an essential tool for cutting fabric quickly and accurately. Using a cutting mat will protect your work surface and provide a smooth, even cutting experience.
- Quilting Ruler: A quilting ruler helps ensure that your fabric pieces are cut to the correct size and shape. It’s especially useful when making precise measurements for the blocks and when cutting triangles or other angled pieces.
- Sewing Machine: A reliable sewing machine is essential for stitching together your quilt blocks. Be sure to use a sharp needle and high-quality quilting thread to avoid any issues during the sewing process.
- Pins or Fabric Clips: Pins or fabric clips are necessary to hold your fabric pieces in place before sewing. Use these to secure the fabric as you piece together the block, ensuring everything stays in place.
- Quilt Batting and Backing Fabric: For the finished quilt, you’ll need quilt batting for warmth and backing fabric to complete the quilt top. Choose a fabric that complements the overall design of your quilt.
Once you have all your materials ready, you’re all set to begin making your Cactus Compass Quilt Block. This pattern requires precision and patience, so be sure to take your time during each step for the best results.
2. Cutting the Fabric for the Cactus Compass Quilt Block
The next step in creating your Cactus Compass Quilt Block – Free Pattern is cutting the fabric into the necessary shapes and sizes. Cutting accurately is crucial to ensure that your block pieces fit together properly. Here’s how to get started with the cutting process:
- Cut the central square: Begin by cutting a square for the center of the block. This will serve as the focal point of the design, so choose a fabric that will stand out. A 4-inch square is typically used, but you can adjust the size based on your preferences.
- Cut the triangles: Next, you’ll need to cut several triangles for the outer parts of the block. Use your quilting ruler and rotary cutter to cut equal-sized triangles from your chosen fabrics. These triangles will form the points of the compass design, so be sure to cut them accurately.
- Cut the border strips: For the outer border of the block, cut strips of fabric. These strips will surround the compass design and create a clean frame for the block. The width of the strips will vary based on the size of the block you’re making, but a typical width of 2.5 inches works well.
- Cut the corner squares: You’ll also need small squares for the corners of the block. These squares are used to create the corner sections that complete the Cactus Compass design. Cut these squares to the same size as the center square to maintain symmetry.
- Double-check your measurements: Before moving on to the next step, double-check that all your fabric pieces are cut to the correct size. Accuracy is important when piecing together your quilt block, as even a small mistake can affect the overall design.
- Organize your pieces: After cutting your fabric pieces, organize them into separate piles to make it easier to assemble the block. Having everything neatly arranged will help speed up the process and keep you organized as you move forward.
Once your fabric is cut and organized, you’re ready to begin piecing together your Cactus Compass Quilt Block. Accurate cutting is key to making sure your block pieces fit together perfectly.
3. Assembling the Cactus Compass Quilt Block
Now that you’ve cut your fabric pieces, it’s time to start assembling the Cactus Compass Quilt Block. This step involves carefully piecing the different sections together to form the final block. Here’s how to assemble the Cactus Compass Quilt Block:
- Start with the center square: Begin by placing your center square in the middle of your work surface. This square is the focal point of the design, so make sure it’s positioned correctly.
- Attach the triangles: Next, take the triangles you cut earlier and sew them to the four sides of the center square. Be sure to line up the edges of the triangles with the edges of the center square and sew them carefully, using a quarter-inch seam allowance.
- Sew the corner squares: Once the triangles are attached, it’s time to add the corner squares. Sew these squares to the corners of the block to complete the first part of the compass design.
- Add the border strips: After the main part of the block is assembled, sew the border strips to the edges of the block. These strips will frame the Cactus Compass design and give the block a clean, finished look.
- Press the seams: After sewing each section together, press the seams flat with an iron. Pressing helps set the seams and ensures that your block lies flat and smooth.
- Trim the block: Once the entire block is assembled, trim any excess fabric from the edges to ensure that the block is the correct size. This step is important to keep the block neat and tidy.
After following these steps, you should have a beautifully pieced together Cactus Compass Quilt Block ready to be added to your quilt. Be sure to check that all the seams are aligned and the block is square.
4. Finishing the Cactus Compass Quilt
Once you’ve completed your Cactus Compass Quilt Block, it’s time to incorporate it into your larger quilt project. Here’s how to finish your quilt using the Cactus Compass block:
- Arrange the blocks: Lay out your completed Cactus Compass blocks in a grid pattern to see how they look together. You can arrange them in rows or experiment with different layouts to create unique designs.
- Sew the blocks together: Once you’re happy with the arrangement, sew the blocks together. Be sure to match the seams carefully as you join each block to create a cohesive quilt top.
- Add quilt borders: Once the quilt top is complete, you can add borders to frame the quilt. Choose a fabric that complements the blocks and enhances the overall design. Borders also help to add size to your quilt, if necessary.
- Quilt the layers: Once the quilt top is finished, it’s time to add quilt batting and backing fabric. You can quilt by hand or machine, depending on your preference. Quilting adds texture and holds the layers of the quilt together.
- Attach the binding: Finally, add the binding around the edges of the quilt to finish it off. Binding is a fabric strip that covers the raw edges and gives the quilt a polished, professional look.
- Final press: Once the quilt is finished, give it a final press with an iron to smooth out any wrinkles and ensure that the quilt lays flat. Your Cactus Compass Quilt is now ready to be enjoyed.
FAQ: Frequently Asked Questions
1. Can I use different fabrics for the Cactus Compass Quilt Block?
Yes, you can experiment with different fabrics and colors to create your own unique design. Just be sure to choose fabrics that contrast well to highlight the Cactus Compass pattern.
2. How do I increase the size of the Cactus Compass Quilt Block?
To make the Cactus Compass Quilt Block larger, you can increase the size of the central square, triangles, or borders. Just make sure all your pieces are proportional to each other.
3. Can I make a quilt using just Cactus Compass blocks?
Absolutely! You can make a beautiful quilt using just the Cactus Compass blocks. You can arrange them in various patterns, such as rows, to create a stunning quilt design.
4. What is the best fabric to use for this quilt block?
Cotton quilting fabric is ideal for this quilt block. It’s easy to work with and holds up well after quilting and washing.
5. How long does it take to complete the Cactus Compass Quilt Block?
The time it takes to complete the block depends on your skill level and the amount of time you dedicate to the project. On average, it may take a few hours to complete one block.
6. Can I make this block by hand?
Yes, you can make the Cactus Compass Quilt Block by hand if you prefer. Just be sure to use precise stitching to ensure the block turns out accurately.
Join our VIP broadcast list and gain access to exclusive patterns, all for free. As a VIP member, you’ll receive the best patterns daily, delivered directly to your device. ✨📱 It’s a unique opportunity to stay up-to-date with the latest trends and designs, curated just for you. Don’t miss out on enhancing your projects and discovering new inspirations with the best patterns every day! 🎨🔝
Conclusion
In this article, we’ve walked you through the process of creating the Cactus Compass Quilt Block – Free Pattern from start to finish. From gathering materials to cutting fabric, assembling the block, and finishing your quilt, you now have all the knowledge you need to complete this beautiful and versatile quilt block.
Remember to take your time and enjoy the creative process. If you have any feedback or suggestions, feel free to leave a comment below! We’d love to hear about your quilting journey. Happy quilting!


