
Pie Carrier Sewing Pattern

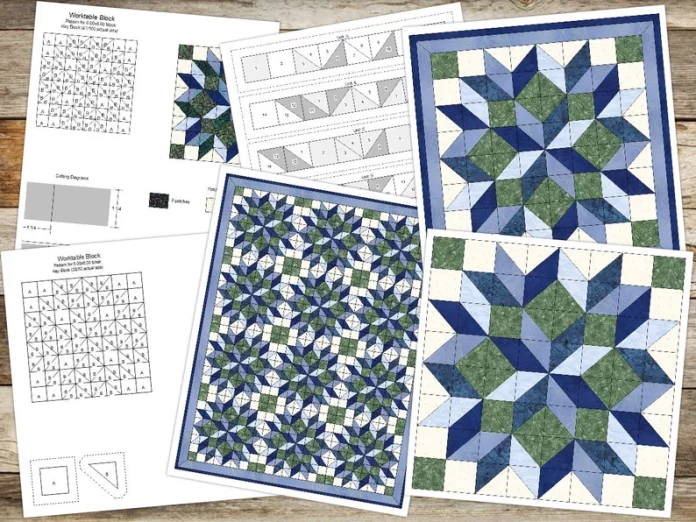
The Carpenter Star Quilt – Free Pattern is a timeless design that’s known for its beautiful geometric patterns and striking star motifs. This quilt is perfect for quilters of all levels who are looking to create a project with both complexity and elegance.
The Carpenter Star pattern features interlocking blocks that form a star within a star, which gives it a captivating visual appeal. Whether you’re a beginner or an experienced quilter, this free pattern will guide you through the steps of creating a stunning quilt that you can be proud of.
The Carpenter Star Quilt is not only a beautiful design but also offers a sense of satisfaction when completed. The beauty of this pattern lies in the combination of simple geometric shapes that create an intricate and sophisticated design.
By following the instructions step-by-step, you can make a quilt that brings warmth and charm to any space.
In this article, we will explore the steps to create your own Carpenter Star Quilt from start to finish. From gathering materials to cutting your fabric, assembling your quilt top, and finishing with binding, we will cover every aspect of this exciting project.
Follow along as we break down each step of the process, providing clear instructions and tips to ensure your quilt turns out just the way you envision it.
Before starting any quilt, it’s important to gather all the necessary materials. For the Carpenter Star Quilt, the right fabric and tools are essential to bring your vision to life. Let’s take a look at the materials you’ll need to begin your project.
The fabric is the most important component of your quilt. For a Carpenter Star Quilt, you’ll need two types of fabrics: one for the background and another for the star pieces. Choose fabrics that contrast well with each other, as this will help the star pattern stand out. You can use a variety of fabric types, but cotton is the most popular because it’s easy to work with and durable. For the background, choose a solid or subtle pattern to allow the star design to shine. For the star points, consider using bold colors or patterns that complement your background fabric.
You’ll also need a rotary cutter, cutting mat, and quilting ruler for precise cutting of fabric. Accuracy in cutting your fabric is key to achieving clean seams and a polished quilt. A quarter-inch seam foot for your sewing machine is also recommended to maintain consistent seam allowances throughout the project. Other materials include thread that matches your fabrics, scissors for trimming threads, and pins to hold fabric pieces together as you sew.
Lastly, for the finishing touches, you’ll need batting to provide warmth and thickness, backing fabric for the quilt’s reverse side, and binding fabric to frame your quilt. These elements will give your quilt its final shape and help it maintain its structure.
The next step in creating your Carpenter Star Quilt is cutting the fabric. Proper cutting is essential for ensuring that all the pieces fit together correctly, so take your time and make sure to cut accurately.
Start by cutting the background fabric into large squares and rectangles that will form the outer blocks. These pieces will serve as the background for the star pattern. Then, for the star blocks, you’ll need to cut your fabric into smaller squares, triangles, and rectangles. The star points are made up of half-square triangles, so cut squares and then cut them in half diagonally to form triangles. Make sure you cut enough pieces to create the number of star blocks you need for your quilt.
Once you’ve cut all the pieces, it’s helpful to lay them out in the pattern you want to use for your quilt. This will give you a visual guide and ensure that the colors and fabrics are arranged in a way that creates a balanced and attractive design. Organizing your pieces before you start sewing can save you time and help you avoid mistakes.
Remember to press your fabric before cutting to remove any wrinkles. This ensures that your fabric lies flat, which makes cutting easier and more accurate. Also, make sure your quilting ruler is aligned with the fabric grain to avoid distortion.
Now that all your fabric pieces are cut, it’s time to begin assembling your Carpenter Star Quilt top. This process involves piecing together the background and star blocks to create the quilt’s overall design.
Start by sewing together the half-square triangles that will form the points of the stars. Carefully align the edges and sew along the diagonal seam, making sure your seam allowance is consistent. Once the triangles are sewn, press the seams open or to one side, depending on your preference, to reduce bulk and ensure your blocks remain flat.
Next, begin assembling the larger blocks by sewing together the smaller star pieces. Each block will consist of a center square, the star points, and surrounding background fabric. Once you’ve completed a block, measure it to ensure it’s the correct size. If necessary, trim any edges to maintain uniformity.
After completing the star blocks, start sewing them together in rows. Join the rows by aligning the seams, and make sure the star points and background fabric are sewn together evenly. Once all rows are assembled, join them to complete the quilt top.
When all the blocks are sewn together, press the seams again to ensure that everything lies flat. You can press the seams open or to one side, but the key is to keep the quilt top neat and smooth.
With the quilt top assembled, it’s time to move on to the next stage—quilting and binding. These final steps will add texture and a finished look to your Carpenter Star Quilt.
Start by layering your quilt top, batting, and backing fabric. The backing fabric should be a little larger than the quilt top to allow for trimming. Pin or baste the layers together to prevent shifting as you quilt. You can quilt by hand or use a sewing machine. If you’re using a machine, a walking foot will help feed the layers evenly. For the quilting pattern, you can stitch along the seams or choose an all-over design, such as straight lines or a free-motion pattern.
Once you’ve quilted the layers together, it’s time to add the binding. Cut strips of fabric for the binding, making sure they’re long enough to go around the entire quilt. Join the strips together and sew them onto the edges of the quilt top. Fold the binding over to the back of the quilt and hand-stitch it in place for a clean and polished finish.
After attaching the binding, trim any excess batting and backing fabric, and give the quilt one final press. Your Carpenter Star Quilt is now complete and ready to be enjoyed!
Join our VIP broadcast list and gain access to exclusive patterns, all for free. As a VIP member, you’ll receive the best patterns daily, delivered directly to your device. ✨📱 It’s a unique opportunity to stay up-to-date with the latest trends and designs, curated just for you. Don’t miss out on enhancing your projects and discovering new inspirations with the best patterns every day! 🎨🔝
The Carpenter Star Quilt – Free Pattern is a fantastic project that combines simple geometry with elegance. By following the steps outlined in this article, you can create a stunning quilt that will impress anyone who sees it. From choosing fabrics and cutting your pieces to assembling the quilt top and adding the finishing touches, each step is essential for ensuring your quilt turns out beautifully.
We hope this tutorial has inspired you to create your own Carpenter Star Quilt. Please feel free to leave a sincere opinion or any suggestions in the comments below. Happy quilting!


