The Chandelier Quilt Pattern is a timeless design that captivates with its elegant symmetry and classic appeal. Perfect for both beginners and experienced quilters, this pattern brings sophistication to any project.
Whether you’re making a bedspread, wall hanging, or a cozy throw, the chandelier design stands out as a versatile and beautiful choice.
Advertising
This pattern is known for its geometric shapes and intricate yet manageable assembly. The result is a quilt that radiates charm and works well with various fabric choices, from modern prints to vintage-inspired patterns.
Image from google.
The Chandelier Quilt Pattern is a great way to showcase your creativity and quilting skills.
In this guide, we will explore how to create your own chandelier quilt, the materials you’ll need, and tips for customizing it to make it uniquely yours. Let’s dive into the details of this enchanting pattern and bring your quilting vision to life.
1. Understanding the Chandelier Quilt Pattern
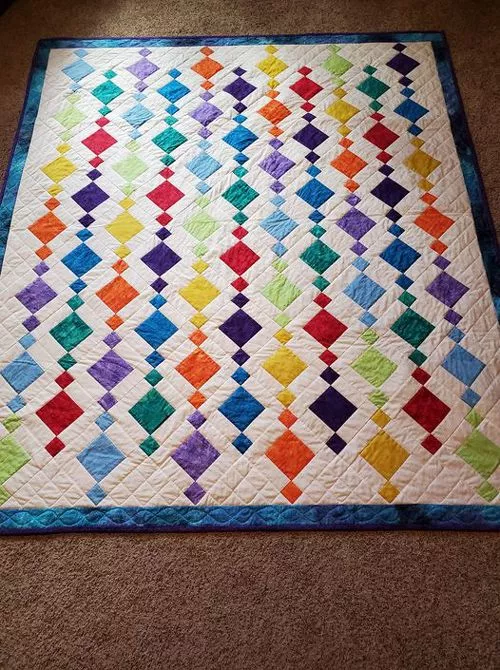
The Chandelier Quilt Pattern is based on a repeating geometric design, often incorporating diamonds, squares, and contrasting fabrics to create a stunning visual effect. This section will break down the pattern and help you get started.
Advertising
The Design Basics
The chandelier quilt uses a diamond grid structure, typically alternating dark and light fabrics to create contrast. This design element gives it its signature “chandelier” look.
Fabric Choices
To make this pattern truly shine, select fabrics with varying tones and textures. For a modern look, opt for solids and minimalistic prints.
Required Tools
Ensure you have essential quilting tools like a rotary cutter, cutting mat, quilting ruler, and sewing machine. These tools make the process faster and more precise.
Pattern Layout
The chandelier quilt is often created in blocks. Each block features the repeating diamond pattern, making it easy to assemble and expand.
Size Customization
One of the advantages of the Chandelier Quilt Pattern is its scalability. You can adjust the block size or the number of blocks to create anything from a lap quilt to a king-size bedspread.
Planning Your Project
Before you begin cutting fabric, plan your layout. Visualizing your finished quilt helps ensure that your fabric choices work harmoniously.
2. Step-by-Step Guide to Making a Chandelier Quilt
This section outlines the steps to create your Chandelier Quilt Pattern, from cutting fabrics to sewing the final stitches.
Cutting the Fabric
Using your quilting ruler and rotary cutter, cut your fabrics into the required shapes, such as diamonds and squares. Precision is crucial for ensuring clean lines in your finished quilt.
Arranging the Layout
Lay out your fabric pieces on a flat surface to arrange the design. This step helps you visualize the pattern and make adjustments if needed.
Piecing the Blocks
Start sewing the individual pieces together to form blocks. Use a ¼-inch seam allowance for accurate assembly.
Joining the Blocks
Once your blocks are complete, arrange them into rows. Sew the rows together, ensuring the seams align for a polished look.
Adding Borders
If desired, add borders to frame your quilt and give it a finished appearance. Borders can be simple or intricate, depending on your preference.
Quilting and Binding
Finish your quilt by layering it with batting and backing fabric. Quilt the layers together, then bind the edges for a professional result.
3. Creative Customizations for Your Chandelier Quilt
Personalizing your Chandelier Quilt Pattern allows you to create a truly unique piece. Here are some ideas for adding your creative touch.
Color Palette
Experiment with bold, vibrant colors for a contemporary look, or stick to pastels for a softer, vintage-inspired aesthetic.
Pattern Combinations
Mix and match fabric prints to add depth and visual interest. Stripes, florals, and geometric prints work well together.
Size Variations
Create mini quilts or oversized throws by adjusting the block size and number of repeats.
Texture Additions
Incorporate textured fabrics like velvet or linen to add dimension to your quilt.
Embroidery Details
Add hand-stitched embroidery accents to highlight specific areas of the quilt.
Quilting Patterns
Choose a quilting design that complements the chandelier pattern, such as swirls, straight lines, or free-motion quilting.
4. Tips for a Perfect Chandelier Quilt
Creating a quilt is a rewarding process, but it can come with challenges. Follow these tips for a seamless experience when working with the Chandelier Quilt Pattern.
Use High-Quality Tools
Investing in quality rotary cutters, rulers, and fabric scissors ensures clean cuts and precise seams.
Practice Consistent Seam Allowance
Maintaining a consistent ¼-inch seam allowance is critical for accurate piecing.
Press Seams Properly
Press your seams as you go to create smooth, flat blocks that are easier to assemble.
Stay Organized
Keep your fabric pieces organized by block or row to avoid confusion during assembly.
Take Your Time
Quilting is a labor of love. Don’t rush the process; instead, focus on enjoying the creative journey.
Seek Inspiration
Browse quilting forums, social media, or Pinterest for ideas on fabric choices and layouts.
FAQ
Q: Is the Chandelier Quilt Pattern suitable for beginners?
A: Yes, the pattern is beginner-friendly but may require patience and attention to detail.
Q: What is the best fabric for a chandelier quilt?
A: Cotton fabrics are the most popular choice as they are easy to work with and come in various designs.
Q: Can I make a chandelier quilt without a sewing machine?
A: While possible, hand-sewing can be time-consuming. A sewing machine speeds up the process significantly.
Q: How do I ensure my quilt blocks align perfectly?
A: Use pins to hold pieces together and check your seam allowance for accuracy.
Q: How should I care for my finished quilt?
A: Wash your quilt gently with cold water and mild detergent to preserve its colors and structure.
Q: Can I gift a chandelier quilt?
A: Absolutely! A handmade quilt makes a thoughtful and cherished gift for any occasion.
Join our VIP broadcast list and gain access to exclusive patterns, all for free. As a VIP member, you’ll receive the best patterns daily, delivered directly to your device. ✨📱 It’s a unique opportunity to stay up-to-date with the latest trends and designs, curated just for you. Don’t miss out on enhancing your projects and discovering new inspirations with the best patterns every day! 🎨🔝
The Chandelier Quilt Pattern is a beautiful and versatile design that can transform your quilting projects into timeless masterpieces. By following this guide, you can create a quilt that reflects your personal style while mastering essential quilting techniques.
PATTERN HERE
We hope you found this tutorial helpful and inspiring. Share your thoughts, experiences, and suggestions in the comments below. Happy quilting!