
Pie Carrier Sewing Pattern

Christmas Tree Quilt Block – Step by step tutorial is a fantastic way to celebrate the holiday season with a creative, handmade touch.
Quilting enthusiasts and beginners alike will enjoy making this festive block that can be used in a variety of projects, from blankets to table runners.
The beauty of a Christmas tree quilt block lies in its simple yet striking design, which makes it easy to create while also allowing for personal flair.
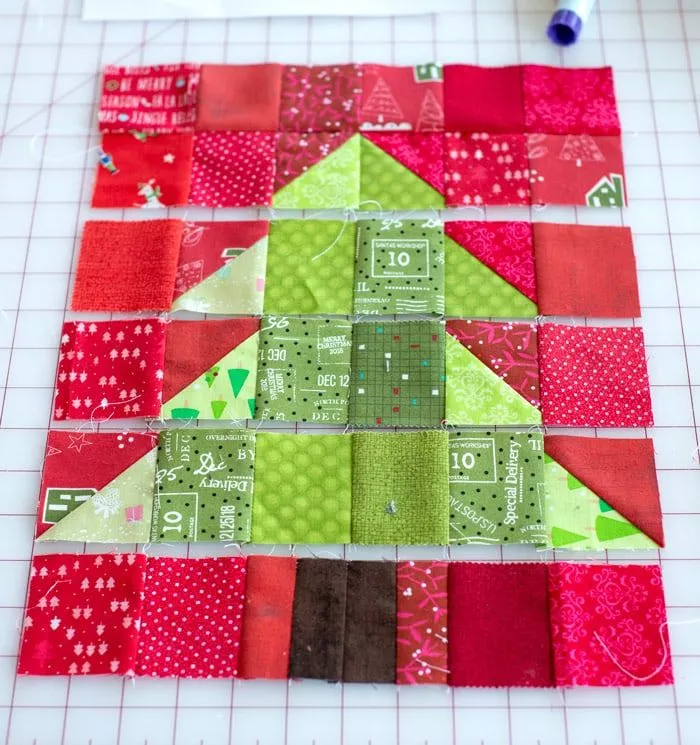
Image from google.
In this tutorial, we’ll guide you through every step of creating a beautiful Christmas tree quilt block, ensuring your project is fun and satisfying.
You’ll learn the best techniques, materials, and tips to make your quilt block stand out this holiday season. This step-by-step guide is perfect for quilters of all skill levels, whether you’re just getting started or you’re a seasoned pro looking for a quick, seasonal project.
Creating a Christmas tree quilt block is a great way to bring holiday cheer into your home. It can be used as part of a larger quilt, sewn into a festive wall hanging, or even crafted into a simple pillow cover. Let’s get started with your Christmas Tree Quilt Block project!
To begin, gather the materials needed for your Christmas Tree Quilt Block project. Having everything ready ensures the process goes smoothly, and you won’t be scrambling for supplies halfway through.
For a traditional Christmas tree quilt block, choose fabrics with holiday-themed patterns. A rich green fabric will represent the tree itself, while red, gold, or white fabrics can be used for decorations and the tree trunk. Consider using cotton fabric, as it’s both easy to work with and holds up well over time.
A rotary cutter and mat are essential tools for cutting precise shapes and sizes for your quilt pieces. This will make it much easier to work with smaller pieces, ensuring accuracy in your cuts.
A quilting ruler is vital for measuring and cutting your fabric pieces evenly. It will help you create straight edges and symmetrical designs.
A sewing machine is necessary for piecing together your quilt blocks. Ensure that your machine is threaded with a color that complements your fabric choice.
For your thread, choose a strong cotton thread that matches your fabric colors. You can use a contrasting color for decorative stitching, but ensure it’s durable enough to hold the quilt pieces together.
Pressing the seams as you go along is crucial in quilting. This ensures that your blocks are flat and the fabric lays neatly, giving your quilt a polished, professional finish.
Once you’ve gathered your materials, the next step is to cut your fabric pieces. The size and shape of each piece are crucial for achieving a balanced and visually appealing quilt block.
Start by cutting a triangle shape for the tree. Measure and cut the base of your triangle to your desired size (a typical size for this block is around 6 inches wide). The height of the triangle should be twice as long as the width. This forms the main shape of your Christmas tree.
Cut a small rectangle to serve as the tree trunk. Typically, this rectangle is about 1.5 inches wide and 2.5 inches tall, but you can adjust the size based on the proportions of your tree.
For the ornaments on your tree, cut out small circles or shapes from different fabric colors. You can mix fabrics with patterns like stripes or polka dots to make your quilt block stand out. These shapes can range from 1 to 2 inches in diameter.
Now, cut the fabric that will serve as the background for your quilt block. This piece should be large enough to frame your tree, typically 12 inches by 12 inches, though the size can vary depending on your desired finished block size.
If you want to add a decorative border around the Christmas tree, cut a few strips of fabric for this purpose. These should be 1 to 2 inches wide, depending on your design preference.
Cut a small star shape to place on top of your Christmas tree. A simple five-pointed star in gold or yellow will add a festive touch. The star should be about 2 inches wide.
Now that your fabric pieces are cut, it’s time to assemble the quilt block. This is where the magic happens!
Start by sewing the tree trunk to the bottom of the tree triangle. Use a quarter-inch seam allowance and press the seam flat. This will form the base of your Christmas tree.
Place your fabric circles (the ornaments) onto the tree in an aesthetically pleasing arrangement. You can sew them on using a straight stitch or a zigzag stitch for added texture. Ensure the ornaments are evenly spaced for a balanced look.
Sew the star at the top of the tree. You can either sew it directly onto the tree triangle or use a small applique technique for a more textured look.
Once your tree is fully assembled, center it on the background fabric. Pin it in place and sew around the edges, making sure everything is securely attached.
If you chose to add a border, sew the fabric strips around the outer edges of the block. This step will help frame the Christmas tree and give the block a finished, polished look.
Once the quilt block is complete, press all seams and edges to make the fabric lay flat. Trim any excess fabric around the edges to ensure a neat finish.
Here are some tips to help you achieve the best results when making your Christmas Tree Quilt Block.
Choose high-quality quilting cotton fabric for the best results. This will help ensure that your quilt block looks sharp and lasts for years to come.
Don’t rush through the process. Take your time with each step to ensure precision, especially when cutting your fabric pieces and sewing the tree together.
Don’t be afraid to experiment with different fabric patterns and colors. Mix solid colors with festive prints for added visual interest. You can even use metallic fabrics for a shimmering effect on the tree ornaments.
When piecing your fabric together, always press the seams open to keep your quilt block flat and smooth. This will make it easier to sew the blocks together when you’re making a larger quilt.
If you’re new to quilting, consider using quilting clips instead of pins. They are easier to handle and prevent fabric from shifting during sewing.
You can add extra decorations to your Christmas tree, such as small ribbon bows, fabric garlands, or even embroidery for additional details. This will make your quilt block even more unique.
Q: What size should my quilt block be?
A: The typical size for a Christmas tree quilt block is 12 inches by 12 inches, but you can adjust the size depending on your project needs.
Q: Can I use a different type of fabric?
A: Yes, you can use any type of cotton fabric that works well for quilting. Just ensure that the fabric is not too thick, as it may be difficult to sew through multiple layers.
Q: How do I add more details to the Christmas tree?
A: You can add more details by using embroidery to create garlands, adding small fabric bows, or using sequins or beads for extra sparkle.
Q: How do I keep the fabric from shifting while sewing?
A: Use quilting clips to hold your fabric in place while you sew, and always press your seams to keep everything aligned.
Q: Can I hand sew this block instead of using a sewing machine?
A: Yes, you can hand sew the quilt block, but it will take more time and patience compared to using a sewing machine.
Q: What’s the best way to quilt multiple blocks together?
A: Once you’ve made several Christmas tree blocks, you can sew them together by aligning the edges and joining them with a quarter-inch seam allowance. Press the seams flat after each row is sewn together.
Join our VIP broadcast list and gain access to exclusive patterns, all for free. As a VIP member, you’ll receive the best patterns daily, delivered directly to your device. ✨📱 It’s a unique opportunity to stay up-to-date with the latest trends and designs, curated just for you. Don’t miss out on enhancing your projects and discovering new inspirations with the best patterns every day! 🎨🔝
In this Christmas Tree Quilt Block – Step by step tutorial, you’ve learned how to create a festive, beautiful quilt block that can be used in a variety of holiday projects. From gathering the right materials to adding the finishing touches, every step is designed to ensure your success.
We’d love to hear how your quilt blocks turn out and any suggestions you have for future tutorials. Don’t forget to leave your feedback in the comments! Happy quilting and enjoy the holiday season!


