You’ll also find helpful tips for achieving precise cuts and perfect alignment. By the end of this tutorial, you’ll have a festive quilt block that can be used for pillows, wall hangings, or incorporated into a larger quilt.
Read on to discover how to create the Christmas Tree Star Quilt Block and make your holiday season even more memorable!
Advertising
1. Materials Needed for the Christmas Tree Star Quilt Block
To begin your project, you’ll need to gather all the necessary materials. Preparation is key to achieving a neat and beautiful finish.
Fabric Selection: Choose holiday-themed fabrics in shades of green, red, white, and gold to capture the festive essence of a Christmas tree and star. High-quality cotton fabric is ideal for quilting projects because of its durability and ease of use.
Cutting Tools: A rotary cutter, self-healing cutting mat, and quilting ruler are essential tools for clean and precise fabric cuts. This will ensure all pieces fit together perfectly when assembling the block.
Sewing Supplies: You will need a sewing machine with a 1/4-inch presser foot, thread (preferably matching or contrasting in festive colors), scissors, and pins or clips for holding pieces together.
Templates or Patterns: Use a star block pattern and a tree template to cut out your desired shapes. These templates can be purchased or drafted by hand, depending on your experience level.
Batting and Backing Fabric: If you plan to use the block for a pillow or wall hanging, select batting and backing fabric that complements your chosen colors.
Measuring Tape and Iron: A measuring tape will help ensure consistency, while an iron will allow you to press seams and fabric pieces for a professional finish.
With all your materials gathered, you are now ready to begin cutting and assembling the fabric pieces to create your quilt block. Proper preparation will save you time and frustration as you progress.
2. Cutting and Preparing Fabric Pieces
Once you have all your materials ready, the next step in the Christmas Tree Star Quilt Block – TUTORIAL is cutting and preparing the fabric pieces. Attention to detail at this stage will make piecing the block easier.
Cut Your Fabric into Sections: Begin by cutting the fabric into the following sizes:
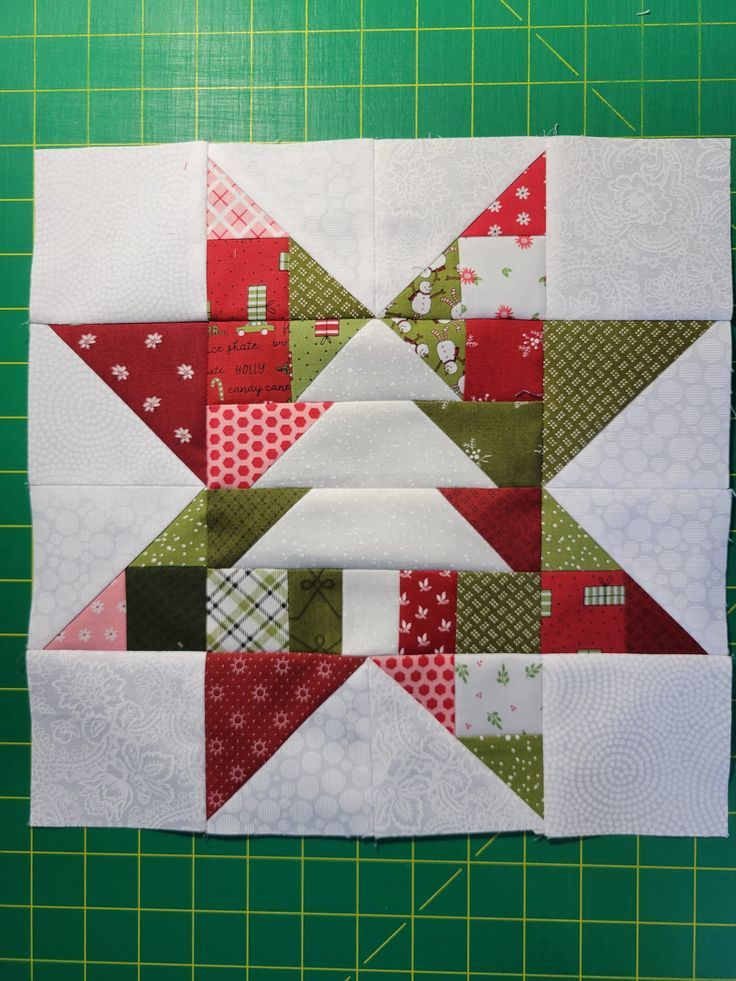
Star Points: Four triangles or diamond shapes in a contrasting fabric (e.g., gold or yellow).
Tree Shapes: Use green fabric to cut triangle shapes that resemble Christmas trees.
Background Fabric: White or neutral squares to frame the block and bring out the design.
Use Templates: If you’re using a printed template, lay it over the fabric and cut carefully with your rotary cutter. Templates ensure consistent shapes and sizes.
Label Pieces: Once all pieces are cut, label them according to their purpose. This makes assembly much quicker and prevents confusion as you sew.
Check Measurements: Verify that all fabric pieces are the correct size. A 1/4-inch seam allowance should be considered in your measurements.
Press Fabrics: Use an iron to press each fabric piece before sewing. This removes wrinkles and ensures a smooth, professional-looking finish.
Organize Your Pieces: Arrange your cut fabric pieces in the order you plan to assemble them. Place the star points and tree shapes on a flat surface to visualize the layout before sewing.
Cutting and preparing the fabric pieces carefully will result in a quilt block with clean lines and precise alignment, ensuring a polished final look.
3. Assembling the Christmas Tree Star Quilt Block
Now comes the exciting part of the Christmas Tree Star Quilt Block – TUTORIAL: assembling the pieces to create the final block. Follow these steps carefully to piece your design together.
Start with the Star: Begin by sewing the star points together. If you’re using triangles, align two pieces with right sides facing each other and stitch along the edge. Press the seams open to reduce bulk.
Add the Tree Shapes: Position the green fabric triangles (trees) around the star. Sew each triangle to the adjacent star pieces. Use pins to hold them in place and prevent shifting while sewing.
Attach Background Fabric: Add the white or neutral squares to frame the design. Sew the background fabric to the tree shapes and star points, ensuring everything aligns perfectly.
Join Sections Together: Once the smaller sections are complete, join them to form the full quilt block. Sew each row together and press the seams flat to create a smooth finish.
Check for Accuracy: Verify that all seams line up neatly and the block lays flat. If necessary, trim any excess fabric to ensure the block is square.
Press the Final Block: Use an iron to press the entire quilt block, paying attention to the seams. This will give it a clean, professional appearance.
Assembling the quilt block requires precision and patience, but the result is a beautiful and festive design that can be used in a variety of holiday projects.
4. Ideas for Using Your Finished Quilt Block
After completing the Christmas Tree Star Quilt Block, you may wonder how to incorporate it into holiday projects. Here are some creative ideas to showcase your work.
Holiday Wall Hanging: Turn your quilt block into a festive wall hanging by adding a border, backing fabric, and batting. Hang it in your living room to bring holiday cheer.
Quilted Pillow: Add batting and a soft backing fabric to transform your quilt block into a cozy throw pillow. This makes a great addition to your holiday-themed décor.
Christmas Quilt: Use multiple Christmas Tree Star Quilt Blocks to create a full quilt. Alternate with solid fabric squares for a balanced and visually appealing design.
Table Runner: Combine several quilt blocks to create a festive table runner for your dining table. Add borders and quilted details for a polished finish.
Gift Wrap or Stocking: Incorporate the block into handmade gift bags, stockings, or other small fabric projects for a personal touch during the holiday season.
Framed Art: Frame your quilt block and hang it as art in your home. This is a simple way to display your handiwork while adding a festive touch to your space.
No matter how you choose to use your quilt block, it will bring joy and warmth to your holiday celebrations.
FAQ About Christmas Tree Star Quilt Block – TUTORIAL
1. What size should my finished quilt block be?
The standard size for a quilt block is typically 12 x 12 inches, but you can adjust this depending on your project needs.
2. What type of fabric is best for this quilt block?
Cotton fabric is ideal for quilting projects because it is durable, easy to cut, and holds its shape well.
3. Do I need to use templates for this design?
Templates are recommended for achieving consistent shapes and sizes, especially for the star and tree elements.
4. Can I hand-sew the quilt block instead of using a machine?
Yes, you can hand-sew the block, but it will take more time. A sewing machine ensures quicker and more precise results.
5. How can I use this block in a larger quilt?
Combine multiple Christmas Tree Star Quilt Blocks with solid or patterned fabric squares to create a full quilt.
Join our VIP broadcast list and gain access to exclusive patterns, all for free. As a VIP member, you’ll receive the best patterns daily, delivered directly to your device. ✨📱 It’s a unique opportunity to stay up-to-date with the latest trends and designs, curated just for you. Don’t miss out on enhancing your projects and discovering new inspirations with the best patterns every day! 🎨🔝
The Christmas Tree Star Quilt Block – TUTORIAL is a perfect holiday project that combines festive design with traditional quilting techniques. Whether you’re creating a wall hanging, pillow, or full quilt, this block will add a charming and personalized touch to your holiday décor.
We hope this tutorial has inspired you to try this festive block. Leave a comment below with your thoughts, suggestions, or ideas for future projects—we’d love to hear from you! Happy quilting!