
Pie Carrier Sewing Pattern

The Converging Geese Quilt Pattern – Tutorial is a beautiful and creative way to explore the dynamic movement of flying geese blocks arranged in a captivating design.
This pattern uses basic shapes to create a modern and eye-catching quilt, perfect for quilters of all skill levels. With its sense of movement and visual appeal, it can serve as a centerpiece for any quilted project, from bedspreads to wall hangings.
In this tutorial, we’ll walk you through each step of creating the Converging Geese Quilt Pattern. Whether you’re an experienced quilter or just starting out, this guide will provide tips and techniques to ensure your project is a success.
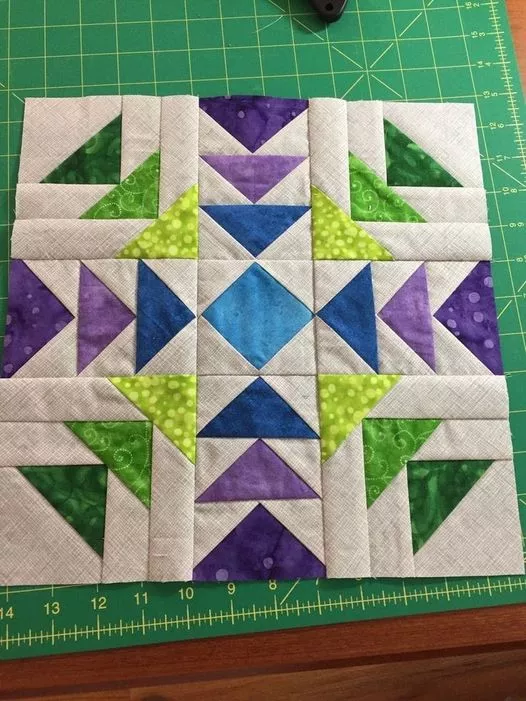
Image from google.
The convergence effect of the geese makes this pattern particularly engaging and a favorite among modern quilters.
As you follow along, you’ll learn how to cut, assemble, and arrange flying geese units to achieve the stunning converging effect. The pattern offers plenty of room for customization, allowing you to play with colors, sizes, and layouts to make your quilt truly unique.
The Converging Geese Quilt Pattern is a creative take on the traditional flying geese block. Here’s an overview of its unique characteristics and why it’s so popular.
The pattern creates a visual flow, with flying geese blocks appearing to converge toward a central point or line.
Its clean lines and geometric symmetry make it an excellent choice for modern quilting projects.
Despite its intricate look, the design relies on straightforward techniques, making it beginner-friendly.
The pattern can be adapted for various projects, including quilts, table runners, and pillows.
You can play with fabric choices, colors, and arrangements to create a completely personalized quilt.
The convergence effect is both satisfying to create and mesmerizing to look at, making it a rewarding project.
Choosing the right materials is essential for a successful quilting project. Here’s what you’ll need for the Converging Geese Quilt Pattern.
Pick contrasting fabrics to highlight the flying geese units and create the illusion of movement.
Using pre-cut squares or strips can save time and ensure uniformity in your blocks.
Opt for high-quality thread in neutral or coordinating colors to keep seams secure and visually appealing.
Precision is key for this pattern, so invest in a good rotary cutter and a self-healing cutting mat.
A clear quilting ruler will help you achieve clean, straight cuts.
Pressing your seams properly ensures that your blocks lie flat and fit together perfectly.
Creating the Converging Geese Quilt Pattern involves a few key steps. Follow this detailed guide to complete your quilt successfully.
Start by cutting your fabric into the necessary shapes, including rectangles and squares for the flying geese units.
Use the stitch-and-flip method or your preferred technique to create flying geese units.
Lay out the blocks to form the convergence effect, adjusting the arrangement until you achieve your desired look.
Sew the blocks into rows, being mindful of seam alignment to maintain the pattern’s flow.
Combine the rows carefully, pressing the seams to reduce bulk and ensure a smooth finish.
You can add borders to frame your quilt and enhance the converging effect.
Once your quilt top is complete, the possibilities are endless! Here are some creative ways to use the Converging Geese Quilt Pattern.
Use the pattern for a bedspread that makes a bold statement in any bedroom.
Frame your quilt top as an art piece to bring a modern touch to your decor.
Create a table runner with a few converging geese blocks for a stylish centerpiece.
Incorporate the pattern into pillow designs to add a pop of geometric interest to your living space.
This pattern makes for unique and thoughtful gifts, from mini quilts to tote bags.
Try monochromatic schemes, rainbow effects, or seasonal palettes to give the pattern a fresh twist.
Q: Is this pattern suitable for beginners?
A: Yes, the Converging Geese Quilt Pattern is beginner-friendly, especially with its simple flying geese units.
Q: What size should the flying geese blocks be?
A: The size depends on your project. Standard sizes are 2×4 inches or 3×6 inches, but you can scale as needed.
Q: Can I use pre-cut fabrics for this pattern?
A: Absolutely! Pre-cut strips or squares can simplify the cutting process and ensure accuracy.
Q: How do I ensure my geese units align perfectly?
A: Use a quilting ruler for precise cuts and pin your pieces before sewing to maintain alignment.
Q: What’s the best way to choose colors for this pattern?
A: Select high-contrast colors to emphasize the convergence effect and make the design stand out.
Q: Can I adapt this pattern for smaller projects?
A: Yes, the pattern is versatile and can be used for mini quilts, placemats, or even fabric bookmarks.
Join our VIP broadcast list and gain access to exclusive patterns, all for free. As a VIP member, you’ll receive the best patterns daily, delivered directly to your device. ✨📱 It’s a unique opportunity to stay up-to-date with the latest trends and designs, curated just for you. Don’t miss out on enhancing your projects and discovering new inspirations with the best patterns every day! 🎨🔝
The Converging Geese Quilt Pattern – Tutorial provides a comprehensive guide to creating a dynamic and visually stunning quilt. By following these steps and tips, you’ll master the art of flying geese blocks while crafting a unique design that showcases your creativity.
We’d love to hear about your experience with this tutorial! Share your feedback, suggestions, and photos of your finished quilt in the comments. Happy quilting!


