
If you’re looking to Create a Charming Umbrella Block: A Quilting Tutorial, you’ve come to the right place. This fun and beginner-friendly quilting project is perfect for adding a touch of whimsy to your quilt designs.
With a few simple steps and some creative inspiration, you’ll be able to stitch a unique block that stands out in any quilt layout. Whether you’re quilting for a seasonal project or just want to explore playful shapes, this tutorial will guide you through everything you need.
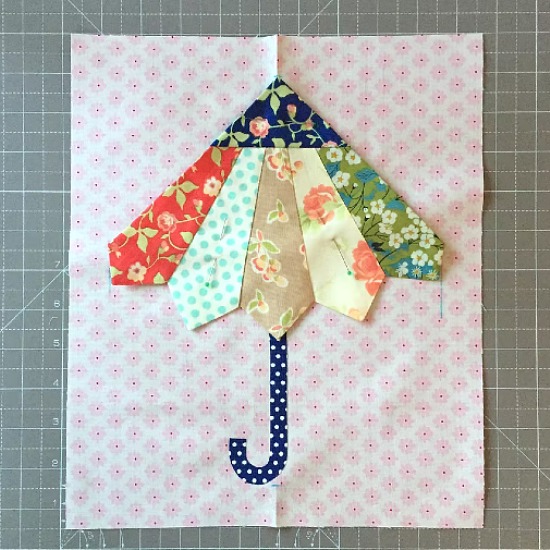
In this comprehensive guide, we’ll break down how to Create a Charming Umbrella Block using easy-to-follow instructions. The Umbrella Block is known for its delightful curved shape, evoking a cozy rainy-day feeling.
Quilters love how versatile this block can be—it works great in children’s quilts, picnic-themed pieces, or even spring-inspired wall hangings. Best of all, this tutorial is designed with both beginners and seasoned quilters in mind.
We’ll cover tools and materials, block construction techniques, layout ideas, and finishing touches. Plus, there’s a handy FAQ at the end to clear up common doubts. By the end of this article, you’ll have everything you need to confidently Create a Charming Umbrella Block and start using it in your own quilting projects.
1. Gather Your Materials and Prepare Your Fabric
Before you begin, it’s essential to have all your materials ready. To Create a Charming Umbrella Block, you’ll need fabric in several colors—one for the umbrella top, one for the handle, and one for the background. Cotton fabric is ideal for quilting because it’s easy to sew and presses well.
You’ll also want to make sure you have a rotary cutter, cutting mat, quilting ruler, and your sewing machine set up. If you prefer hand sewing, that’s perfectly fine—this block can be hand-pieced or machine-sewn depending on your preference. Don’t forget to have thread that matches your fabric and a good pair of fabric scissors.
Pre-washing your fabric is optional, but it’s a good habit to reduce shrinkage and remove any sizing or dye. Once your fabric is ready, press it flat so you can get precise cuts for your umbrella pieces. A smooth surface makes a big difference in accuracy.
Now it’s time to create your template. You can draw a simple semi-circle for the umbrella top and a curved or straight handle for the base. There are plenty of printable templates available online, or you can sketch one freehand for a more personalized touch.
Cut your fabric pieces using your template. Keep your lines smooth and curves clean. Use pins or clips to hold the pieces together as you prepare to sew. Mark your seam allowance lightly with a fabric pencil or chalk if needed.
Finally, make sure you’re working in a well-lit, comfortable space. Having everything organized will help your quilting process go smoothly and keep your creativity flowing as you begin to Create a Charming Umbrella Block.
2. Sewing the Umbrella Top and Handle
The first part of constructing your Umbrella Block is sewing the curved umbrella top. If you’re new to curved seams, don’t worry—they’re easier than they look. Start by matching the center of the curved edge with the center of the background piece and pin outward from there.
Sew slowly and steadily, keeping your seam allowance even. If you’re using a machine, reduce the stitch length for better control on curves. Finger-press your seams as you go, and then press with an iron to flatten everything neatly.
Once the umbrella top is secured, it’s time to add the handle. You can either applique the handle on or piece it into the block using narrow strips. Appliqué allows more flexibility with shapes—great for curved or looped handles. Use a blanket stitch or zigzag for decorative effect.
If you prefer piecing, be sure to press all seams carefully and double-check alignment before stitching. The handle should appear to “emerge” from the base of the umbrella top and travel downward.
You may choose to embellish your umbrella with small details like raindrops, trim, or a cute border. These touches can be appliquéd or embroidered for extra flair. Let your creativity guide you—it’s your unique Charming Umbrella Block, after all!
Once both parts are sewn, square up your block to the desired size. Trim carefully, keeping the umbrella centered and proportional. Your block is now ready to be added to a quilt or displayed on its own.
3. Design Ideas Using the Umbrella Block
Now that you’ve created your Charming Umbrella Block, it’s time to decide how to use it! One popular approach is to make a seasonal quilt, pairing umbrellas with pastel colors and floral prints for a spring vibe. Combine it with raindrop blocks or sunshine motifs for extra personality.
Another idea is a baby quilt using soft shades and fun umbrella prints. These blocks are whimsical and comforting, making them perfect for nursery décor. Add some cloud or rainbow elements to complete the theme.
For a more modern look, try a minimalist layout with bold, graphic umbrellas on a neutral background. Repeating the same umbrella shape in various colors creates a clean and eye-catching effect. This style works great for wall hangings or lap quilts.
If you’re interested in storytelling through quilting, you can incorporate the Umbrella Block into a narrative quilt. Each block can represent a different scene, and the umbrella adds a charming, protective element to the story.
Table runners and quilted bags are other great options. A row of umbrellas along the edge of a table runner brings instant joy to your dining space. Or sew one block into the flap of a handmade bag for a custom, rainy-day accessory.
No matter how you use it, this block adds character and visual interest to any quilting project. The charm of the umbrella shape instantly makes your quilt feel more cozy and cheerful.
4. Finishing Touches and Quilting Techniques
Once your blocks are assembled into a quilt top, it’s time for quilting. For a block like this, echo quilting along the curves of the umbrella can really make it pop. This technique highlights the design while adding texture.
Straight-line quilting works great too, especially if you want a more modern or clean aesthetic. You can also try free-motion quilting to add swirling raindrops or windy effects around your Umbrella Block.
Choose a backing fabric that complements the front. If your quilt is bold and colorful, consider a subtle backing to balance the look. Or go playful and pick an umbrella-printed fabric for a fun surprise on the flip side.
Bind your quilt using a coordinating fabric. Bias binding is ideal if your quilt has curved edges or you want a smooth finish. Take your time stitching down the binding—this final step really brings the whole quilt together.
Label your quilt with the date, your name, or a short message. This gives it a personal touch and commemorates the effort and creativity you’ve poured into your Charming Umbrella Block quilt.
Lastly, don’t forget to share your creation with fellow quilters! Join online groups or quilting forums to exchange ideas, inspire others, and find joy in the craft together.
FAQ – Create a Charming Umbrella Block: A Quilting Tutorial
What is an Umbrella Block in quilting?
An Umbrella Block is a quilt block designed in the shape of an umbrella, typically featuring a curved top and handle. It’s a playful and charming design often used in seasonal or themed quilts.
Can beginners create a Charming Umbrella Block?
Yes! This block is beginner-friendly. It involves simple templates, basic piecing or appliqué techniques, and lots of room for creativity.
Do I need a special template for the umbrella shape?
You can draw your own or download free templates online. The key is to keep the curves smooth and proportionate to your desired block size.
What quilting technique is best for this block?
Echo quilting works beautifully around the curved umbrella shape. Straight-line or free-motion quilting also adds personality and movement to the design.
What size should the Umbrella Block be?
The size is flexible depending on your project. Most quilters make blocks around 10 to 12 inches square, but you can scale up or down as needed.
Can I combine the Umbrella Block with other designs?
Absolutely! It pairs well with raindrops, clouds, flowers, or sunshine motifs. It’s also a great centerpiece block for storytelling quilts or seasonal themes.
Conclusion
In this tutorial, we learned how to Create a Charming Umbrella Block: A Quilting Tutorial, starting from materials and templates to sewing and design ideas. This whimsical block is perfect for quilters of all skill levels and can be adapted to fit a variety of projects and themes.
We explored techniques for curved piecing, appliqué, layout inspiration, and finishing touches that bring your quilt to life. With creativity and care, your umbrella block can become a standout feature in your quilting journey.
If you enjoyed this guide or gave the block a try, we’d love to hear your thoughts! Leave a sincere comment below and share your ideas or suggestions—your feedback helps us continue creating valuable content for quilters like you.


