
Pie Carrier Sewing Pattern

The CUBE TOILETRY BAG STEP BY STEP is a practical and stylish sewing project that allows you to create a functional accessory while practicing your sewing skills.
Whether you are new to sewing or have some experience, this tutorial provides an easy path to create a bag that is perfect for organizing toiletries, makeup, or even small crafting supplies. By following the process carefully, you can craft a bag that is not only useful but also personalized to match your taste and fabric choices.
One of the biggest advantages of making your own CUBE TOILETRY BAG STEP BY STEP is the freedom it gives you in terms of design. You can choose fabrics with vibrant prints, minimalist tones, or even waterproof materials for extra durability.
With the right choices, the bag can become a travel essential or a daily organizer in your bathroom. Beyond its functionality, the cube shape adds a modern and unique look that makes it stand out compared to traditional flat toiletry bags.
This project is also a wonderful way to practice essential sewing techniques. From cutting fabric to installing zippers and stitching neat corners, each step in the CUBE TOILETRY BAG STEP BY STEP process helps you improve your skills.
Even if you are a beginner, the structure is straightforward and approachable. As you finish the project, you will not only have a practical bag but also the satisfaction of creating something with your own hands.
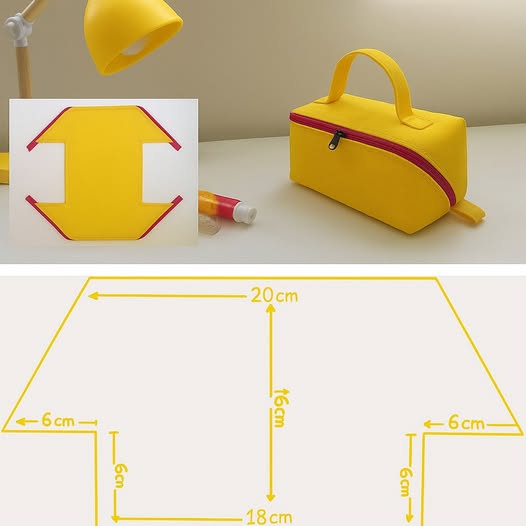
To begin your CUBE TOILETRY BAG STEP BY STEP, you will first need to gather the right materials. The essentials include your chosen fabric, lining fabric, a zipper, interfacing for stability, thread, and basic sewing tools like scissors, pins, and a sewing machine. Choosing quality fabric will give your bag both durability and an attractive appearance.
The lining is an important detail because it protects the inside and makes the bag more resistant to wear. Waterproof lining can be an excellent choice if the bag will be used for toiletries or makeup. It prevents leaks and makes cleaning easier. Interfacing is equally important, as it gives the cube shape its structure and keeps the bag from collapsing when empty.
When selecting a zipper, choose one that complements the size of the bag. A sturdy zipper not only adds functionality but also makes the bag easier to open and close. Long zippers can even be trimmed down to size, ensuring they fit perfectly with your cube design.
Cutting your fabric with precision is the first sewing step. Accuracy ensures that all sides of your CUBE TOILETRY BAG STEP BY STEP align properly. Using a rotary cutter and cutting mat can make this process faster and more accurate than traditional scissors.
Before sewing, always iron your fabrics and interfacing. This removes any creases that could interfere with accurate stitching. It also helps the interfacing adhere better to the fabric, making the bag more durable.
Finally, organize your materials before starting. Having everything ready and in place will save time during the sewing process and help prevent mistakes. Preparation is often the key to a smooth sewing project.
The second stage of the CUBE TOILETRY BAG STEP BY STEP involves sewing the bag into its cube shape. Begin by attaching the interfacing to the outer fabric using an iron. This adds stiffness and ensures that the cube structure will hold its shape even with frequent use.
Once the interfacing is applied, place the lining and fabric pieces together, right sides facing each other. Carefully pin them so they stay aligned during stitching. This step ensures a clean and professional finish inside the bag.
The zipper installation comes next. Sew the zipper between the outer fabric and the lining, making sure it operates smoothly. Beginners often find zipper installation intimidating, but with patience, it becomes one of the most satisfying parts of the process. A neat zipper can elevate the entire look of the bag.
After securing the zipper, stitch the sides of the bag together. This will begin to form the cube. Leave a small opening in the lining so you can turn the bag inside out later. Accuracy in this step is essential for clean corners and a sharp cube shape.
Boxing the corners is the final step in shaping. Measure carefully, sew across the marked lines, and trim away the excess fabric. When done correctly, this technique gives your bag its signature cube appearance.
Once all seams are complete, turn the bag inside out through the opening in the lining. Push out the corners gently to define the cube shape. Then, stitch the lining closed, and your cube structure is complete.
The joy of making a CUBE TOILETRY BAG STEP BY STEP is the ability to personalize it. Fabric choice is the first level of customization. Bright floral prints, minimalist linen, or even bold geometric designs can completely change the style of your bag.
Adding embellishments like fabric patches or embroidery can make your bag unique. If you enjoy hand embroidery, a small design stitched onto the side can transform a simple bag into a one-of-a-kind accessory. Beads, appliqué, or fabric paint are also options.
Zipper pulls are another fun way to customize. You can use ribbons, charms, or crocheted decorations to make the zipper easier to handle while adding style. These small details make the bag feel more personal and crafted with care.
Size adjustment is also a form of customization. Following the same CUBE TOILETRY BAG STEP BY STEP, you can scale the fabric measurements up or down. Larger bags work well for travel, while smaller ones can store jewelry, cables, or craft supplies.
For functionality, consider adding inner pockets or dividers. This makes it easier to keep items organized and adds value to your handmade project. Sewing elastic straps inside can hold items in place, making your bag even more practical.
Finally, play with textures. Mixing cotton with faux leather or denim can create interesting contrasts. Lining the bag with satin or waterproof fabric not only looks professional but also adds functionality.
While the CUBE TOILETRY BAG STEP BY STEP is beginner-friendly, paying attention to details will make the final result more polished. One of the most important tips is to sew slowly and carefully around the zipper. Precision in this area determines how neat the bag looks.
Another tip is to always backstitch at the beginning and end of seams. This secures the stitches and prevents them from unraveling with use. Strong seams are crucial for a bag meant to hold items regularly.
Pressing your seams as you go also improves the overall look. An ironed seam sits flatter, making the cube shape cleaner and easier to assemble. Pressing is a small step that adds a professional finish.
When boxing corners, measure twice before cutting. Symmetry is important for a balanced cube shape. Uneven corners can cause the bag to look lopsided, which takes away from its neat design.
For durability, use polyester thread instead of cotton. Polyester thread is stronger and more resistant, making it a better option for a bag that will see daily use. Matching the thread color to your fabric also enhances the finished look.
Finally, don’t forget to add a finishing touch like a handmade tag, label, or charm. These small details make your CUBE TOILETRY BAG STEP BY STEP not just a project, but a crafted piece that reflects your personality and style.
1. Can beginners make the CUBE TOILETRY BAG STEP BY STEP?
Yes, this project is suitable for beginners. With careful attention to instructions, even those new to sewing can achieve excellent results.
2. What type of fabric works best for this bag?
Cotton is the easiest to work with, but waterproof fabrics and canvas are great for durability. The lining can be waterproof for extra practicality.
3. Do I need a special sewing machine for this project?
No, a standard sewing machine is enough. A zipper foot attachment is helpful but not mandatory.
4. How long does it take to complete the bag?
On average, it takes about 2–3 hours, depending on experience level and any customizations added.
5. Can I wash the bag once it’s finished?
Yes, but it depends on your fabric choice. Cotton bags can usually be machine-washed, while waterproof or decorated versions may require hand washing.
6. Can the size be adjusted easily?
Absolutely. By changing the measurements of your fabric, you can make larger or smaller versions of the cube bag.
Creating a CUBE TOILETRY BAG STEP BY STEP is an enjoyable and rewarding project that combines practicality with creativity. From gathering materials and shaping the cube to adding personal customizations, the process allows you to learn new sewing techniques while producing something truly useful.
By following the steps carefully and adding your own touch, you can design a bag that reflects your style while being functional for travel, storage, or daily use. Now that you have all the guidance, why not give it a try? Share your honest opinion about this tutorial and leave suggestions for future projects—we would love to hear your thoughts!


