
The Dalia Crossing Throw Quilt Pattern: A Comprehensive Guide is an intricate yet beginner-friendly project that promises to bring a touch of elegance and charm to your home.
The design is perfect for those who love geometric patterns and want to create something beautiful with their quilting skills. Whether you’re a seasoned quilter or just starting out, this pattern offers a great opportunity to improve your skills and create a stunning quilt.
This guide will walk you through everything you need to know, from fabric selection to the final steps of quilting, ensuring that you can complete the project with confidence and ease.
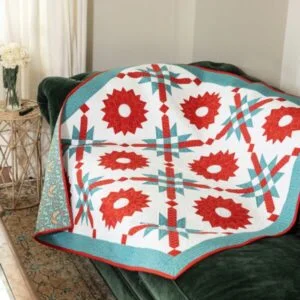
As you embark on making the Dalia Crossing Throw Quilt, the pattern’s clean lines and bold shapes will help you create a quilt that can serve as a statement piece for any room.
The versatility of this design means you can experiment with different color schemes, making it adaptable to various tastes and interior styles. The beauty of the Dalia Crossing Throw Quilt lies not only in its visual appeal but also in its simplicity, which allows for a high degree of customization.
In this guide, we’ll break down the pattern, explain key techniques, and share helpful tips for completing the quilt successfully. If you’re ready to start your quilting journey, read on for a detailed step-by-step tutorial that will guide you through every aspect of making the Dalia Crossing Throw Quilt.
1. Materials and Tools Needed for the Dalia Crossing Throw Quilt
Before you begin working on your Dalia Crossing Throw Quilt, it’s crucial to gather all the materials and tools required for the project. The right fabric choices and quilting tools will ensure that your quilt comes out looking polished and professional.
The first thing you’ll need is fabric. The Dalia Crossing Throw Quilt typically requires a variety of fabrics, including solid colors and patterned fabrics. A good combination of both will allow the design to pop and bring out the full potential of the pattern. The main color scheme often involves soft, neutral tones for the background with bold accent fabrics for the crossing blocks. However, you are free to experiment with colors that match your style.
You’ll also need a high-quality quilt batting, which adds warmth and softness to your quilt. Choose a batting that is appropriate for the size and feel you want your quilt to have. For the backing, you can either choose a coordinating fabric or a contrasting color that complements the front design.
In terms of tools, you’ll need a rotary cutter, cutting mat, and quilting ruler to cut your fabric precisely. A sewing machine with an adjustable stitch length is essential for piecing the quilt together. A seam ripper is always handy in case any mistakes need fixing, and quilting pins or fabric clips will help hold your pieces in place while sewing.
Lastly, don’t forget about the quilting thread. A strong cotton thread works best for piecing and quilting, and be sure to choose a color that blends well with your fabric choices. With all of these materials on hand, you’ll be ready to begin your Dalia Crossing Throw Quilt without delay.
2. Cutting and Preparing the Fabric for the Dalia Crossing Throw Quilt
The next step in making your Dalia Crossing Throw Quilt is cutting and preparing the fabric. Proper cutting is key to ensuring that the quilt pieces fit together seamlessly, and it’s important to be as precise as possible during this step.
Begin by carefully measuring your fabric and cutting it according to the pattern. The Dalia Crossing Throw Quilt typically involves cutting square and rectangular pieces, as well as triangles for the crossing block design. You can either cut your fabric using traditional scissors or use a rotary cutter, which is much more precise. A quilting ruler will also help ensure that your cuts are straight and uniform.
It’s important to follow the pattern’s dimensions closely. Cutting inaccurately can lead to ill-fitting pieces, which will affect the overall quality of your quilt. Be sure to double-check your measurements and cuts as you go along.
Once all of your fabric pieces are cut, it’s time to press them. Pressing each piece before piecing will help to eliminate wrinkles and ensure that the fabric lies flat. Press the seams in one direction to make it easier when you start piecing the blocks together.
Another tip is to organize your pieces by type or color to streamline the piecing process. This way, you can easily access the pieces you need without having to search for them in a pile of fabric.
At this point, you are ready to start piecing your quilt blocks together. The preparation of your fabric is a crucial step that sets the stage for the rest of the quilting process.
3. Piecing the Blocks for the Dalia Crossing Throw Quilt
Now that your fabric is cut and ready, the next step is to begin piecing the blocks for your Dalia Crossing Throw Quilt. This step is where the quilt begins to take shape, and it’s essential to follow the pattern closely to ensure the blocks align properly.
Start by creating the crossing blocks, which form the main design of the quilt. The blocks consist of different geometric shapes, so take your time to carefully sew the fabric pieces together. Begin by joining the smaller squares and triangles to create the larger blocks.
Once each block is pieced together, press the seams open or to one side to reduce bulk. Pressing the seams flat is important to keep the quilt top smooth and to prevent puckering. This will help maintain the integrity of the design as you continue to work on the quilt.
After the blocks are pieced, lay them out on a flat surface to arrange them in the desired pattern. The Dalia Crossing Throw Quilt often features a symmetrical arrangement, but feel free to experiment with different placements to make the design your own. Once you’re satisfied with the layout, begin sewing the blocks together row by row.
As you sew the rows, be sure to match up the seams carefully to keep the design aligned. Using quilting pins or fabric clips will help you maintain precision during this step. Once the rows are finished, press the seams flat again to ensure the quilt top is smooth and even.
This process can take some time, but it’s essential for achieving a neat and professional-looking quilt. With each block coming together, you’ll begin to see the beautiful design emerge.
4. Assembling, Quilting, and Binding the Dalia Crossing Throw Quilt
After piecing together the quilt top, the next step is to assemble the quilt, quilt it, and add the binding to finish your Dalia Crossing Throw Quilt. This is the final stage, and with attention to detail, your quilt will be ready to display or use.
Start by laying out the quilt top, batting, and backing fabric. The batting will provide the quilt with warmth, and the backing fabric will cover the back of the quilt. You can baste the quilt layers together using safety pins or a basting spray.
Once the quilt layers are securely in place, it’s time to quilt the layers together. You can choose from a variety of quilting techniques, such as straight-line quilting, free-motion quilting, or even hand quilting. Choose the method that best suits your style and skill level.
If you opt for straight-line quilting, follow the lines of the blocks or create a grid pattern to add texture to the quilt. For free-motion quilting, you can get creative by stitching around the shapes of the blocks to accentuate the design.
After quilting, the next step is to add the binding. The binding will give your quilt a polished, finished look and secure the layers in place. Cut fabric strips for the binding, then fold and sew them to the edges of the quilt. Once the binding is attached, give the quilt a final press to smooth out any wrinkles.
Finally, your Dalia Crossing Throw Quilt is complete! Enjoy your new creation and display it proudly in your home.
FAQ: Frequently Asked Questions
1. How long does it take to make the Dalia Crossing Throw Quilt?
The time it takes to complete the quilt depends on your skill level and the time you can dedicate to the project. On average, it can take anywhere from a few days to a couple of weeks to finish the quilt.
2. Can I make the Dalia Crossing Throw Quilt bigger?
Yes, the pattern can be adapted to create larger quilts. Simply add more blocks and adjust the fabric measurements to your desired size.
3. What is the best fabric for the Dalia Crossing Throw Quilt?
High-quality quilting cotton is recommended for both the top and backing fabric. It’s durable, easy to work with, and provides a smooth finish.
4. Can I use a different color scheme for the quilt?
Absolutely! Feel free to experiment with different colors and fabrics to make the quilt uniquely yours.
5. How do I prevent puckering when quilting?
To prevent puckering, make sure your fabric is properly pressed before piecing, and use a walking foot for even quilting. Also, be careful not to pull the fabric as you quilt.
6. How should I care for my finished quilt?
Wash your quilt on a gentle cycle with cold water and tumble dry on low or air dry. This will preserve the fabric and prevent shrinking.
Join our VIP broadcast list and gain access to exclusive patterns, all for free. As a VIP member, you’ll receive the best patterns daily, delivered directly to your device. ✨📱 It’s a unique opportunity to stay up-to-date with the latest trends and designs, curated just for you. Don’t miss out on enhancing your projects and discovering new inspirations with the best patterns every day! 🎨🔝
Conclusion
The Dalia Crossing Throw Quilt Pattern: A Comprehensive Guide offers a fantastic opportunity to create a beautiful and functional piece for your home. By following the steps outlined in this guide, from fabric selection to quilting and binding, you’ll be able to craft a quilt that is both striking and meaningful.
We hope this guide has inspired you to start your quilting project. If you have any questions or feedback, feel free to leave a comment below. We’d love to hear your thoughts and any suggestions for future quilting guides!


