
Pie Carrier Sewing Pattern

The Dancing Ribbons Quilt Pattern is a stunning design that features fluid, intertwining ribbons of fabric, creating an illusion of movement and elegance in your quilt. This pattern is not only visually captivating but also offers a unique challenge for quilters of various skill levels.
Whether you’re a beginner or an experienced quilter, this pattern can provide a fresh perspective and introduce new techniques to enhance your quilting repertoire.
In this article, we’ll explore the key aspects of the Dancing Ribbons Quilt Pattern, breaking down the design process into manageable steps. We’ll also discuss tips and tricks to help you master the pattern and ensure a smooth quilting experience.
By the end of this guide, you’ll have a deeper understanding of the pattern’s structure, design options, and how to create your own beautiful Dancing Ribbons Quilt.
Quilting is an art form that allows you to express creativity through fabric, color, and design. The Dancing Ribbons Quilt Pattern is one of those designs that brings a sense of movement and joy to your projects.
It’s a pattern that can be adapted for various occasions and can be customized to fit your personal style. Whether you’re quilting for a gift or making a quilt for your own home, this pattern offers endless possibilities.
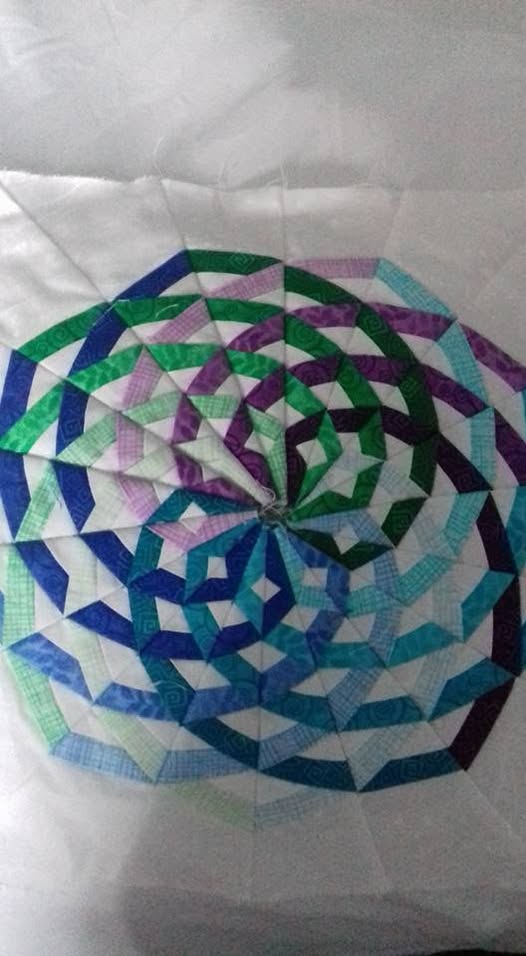
Before diving into the steps, it’s essential to understand the basic components of the Dancing Ribbons Quilt Pattern. The design typically consists of curved strips of fabric that move across the quilt in a way that resembles flowing ribbons. These strips are pieced together using specific techniques that ensure they curve gracefully and fit together seamlessly.
The pattern may look intricate at first glance, but with the right approach, it becomes a fun and rewarding project. The key to success with this pattern lies in the careful preparation of fabric pieces and understanding how to sew the curves together.
When creating the Dancing Ribbons Quilt, you’ll want to start by choosing fabrics that have a harmonious flow. Consider using fabrics that contrast with each other to highlight the ribbons, or select fabrics within the same color family for a more subtle look. Both approaches can create stunning results, depending on the mood you want to convey with your quilt.
A good quality quilting ruler and rotary cutter are essential for cutting precise strips. These tools ensure that your ribbons are even and smooth, which is crucial for achieving the flowing effect of the design. Additionally, the fabric strips should be carefully pressed to remove any creases before piecing them together.
Another important tip is to use a quilting walking foot for your sewing machine. This tool helps to keep your fabric layers moving evenly through the machine, preventing any shifting that could affect the final look of your quilt. As you sew, take your time and ensure that each seam is accurate and aligned.
Finally, remember that the Dancing Ribbons Quilt Pattern is versatile. You can experiment with different sizes, layouts, and fabric combinations to make the quilt truly your own.
When it comes to quilting, fabric choice plays a significant role in how your quilt turns out. For the Dancing Ribbons Quilt Pattern, the fabrics you select will impact the visual flow and the overall aesthetic of the quilt.
Start by selecting a mix of contrasting fabrics for the ribbons. You can choose bold, solid colors that create a striking contrast against a neutral background, or opt for a more subtle approach by using similar tones for both the ribbons and the background. The fabric combinations you choose will affect the final design, so experiment with different options to see what works best for your vision.
One popular option is to use a combination of batiks, which often have a beautiful flow and texture. These fabrics add depth and richness to the quilt, making the ribbons stand out even more. You can also mix traditional cotton fabrics with specialty fabrics like silk or linen for a unique effect.
If you prefer a more modern approach, consider using geometric or abstract prints for the ribbons. This can give the quilt a more contemporary feel, while still maintaining the elegant flow of the ribbons. For a more traditional look, floral or paisley prints can add a soft and classic touch to the design.
The background fabric is also crucial in determining the overall mood of the quilt. A light, solid background can make the ribbons pop, while a patterned background can add an additional layer of complexity to the design. Keep in mind that the background should complement the ribbons and not compete with them.
Finally, consider the weight and texture of your fabrics. Quilting cotton is the most common choice, but using a combination of fabric types can add interest and texture to the quilt.
The most challenging part of the Dancing Ribbons Quilt Pattern is piecing the curved ribbons together. However, with a bit of patience and the right techniques, you’ll be able to sew these curves without too much difficulty.
Start by cutting your fabric strips to the correct size, as per the pattern instructions. The strips will need to be sewn into long, flowing curves, which can be intimidating for beginners. However, the trick is to sew slowly and carefully, using pins to keep the pieces aligned.
To sew the curves, start at one end of the ribbon and gradually work your way down, gently easing the fabric as you go. It’s important not to stretch the fabric while sewing, as this can cause distortion and prevent the ribbons from flowing smoothly. Instead, let the fabric feed naturally through the machine.
A common technique used in piecing curves is the “clipping” method. This involves making small snips along the seam allowance, which helps the fabric to bend more easily. Be sure not to clip too deeply, as this could weaken the fabric.
It’s also helpful to press your seams after each step to ensure that the curves lie flat. A good pressing technique will help the quilt top maintain its shape and avoid any puckering. Use a pressing cloth to protect the fabric from heat damage.
Once all the curved ribbons are pieced together, it’s time to arrange them according to the desired pattern. The ribbons should flow gracefully across the quilt top, creating the illusion of movement. Take your time to play around with the layout before committing to the final arrangement.
After completing the piecing of your Dancing Ribbons Quilt, the next step is to quilt and finish the project. The quilting process adds texture and structure to the quilt, making it both functional and beautiful.
When it comes to quilting, you have a variety of options. You can opt for straight-line quilting, which emphasizes the curves of the ribbons, or you can choose to quilt in a free-motion pattern to add a more intricate design. The quilting should complement the flowing ribbons, enhancing their movement without overpowering them.
Once the quilting is complete, it’s time to add the quilt binding. This is the final step in completing your Dancing Ribbons Quilt, and it’s essential to choose a binding fabric that complements the quilt. The binding can either match the background fabric or create a contrast with the ribbons, depending on the look you’re going for.
To attach the binding, fold it over the edges of the quilt and sew it in place using a hand-sewing technique or by machine. Take care to ensure that the binding is evenly applied, as this will give the quilt a polished, professional finish.
Finally, give your quilt a good press to remove any wrinkles and to set the seams. This will help your Dancing Ribbons Quilt maintain its shape and structure over time.
1. Is the Dancing Ribbons Quilt Pattern suitable for beginners?
The Dancing Ribbons Quilt Pattern is ideal for quilters who have some basic sewing skills, particularly those who are comfortable with straight-line sewing. While the curved piecing can be challenging, with practice, beginners can master the technique. It’s recommended to start with a smaller project to build confidence.
2. Can I use any type of fabric for this pattern?
Yes, you can use a variety of fabric types for the Dancing Ribbons Quilt Pattern. However, quilting cotton is the most common and versatile choice. Batiks and other fabric types like silk or linen can also be used to create different textures and effects.
3. What is the best way to press seams in curved quilting?
To achieve smooth, flat seams in curved piecing, it’s important to press each seam as you go. Use a pressing cloth to avoid damaging delicate fabrics, and always press the seams toward the darker fabric if possible. This will help the curves maintain their shape.
4. How can I prevent puckering when piecing curves?
To avoid puckering, sew slowly and carefully, easing the fabric as you go. Use pins to secure the fabric and prevent it from shifting. If needed, clip the seam allowance slightly to help the fabric curve more smoothly.
5. Can I make a larger quilt using the Dancing Ribbons pattern?
Yes, the Dancing Ribbons Quilt Pattern can be scaled up to create larger quilts. Simply adjust the number of fabric strips and the layout to match your desired size.
6. What quilting technique is best for the Dancing Ribbons Quilt?
Both straight-line and free-motion quilting techniques can be used for the Dancing Ribbons Quilt Pattern. The choice depends on the effect you want to achieve. Straight-line quilting emphasizes the curves, while free-motion quilting can add more texture and complexity.
Join our VIP broadcast list and gain access to exclusive patterns, all for free. As a VIP member, you’ll receive the best patterns daily, delivered directly to your device. ✨📱 It’s a unique opportunity to stay up-to-date with the latest trends and designs, curated just for you. Don’t miss out on enhancing your projects and discovering new inspirations with the best patterns every day! 🎨🔝
In this guide, we’ve explored the Dancing Ribbons Quilt Pattern, covering everything from choosing the right fabrics to piecing the curves and finishing your quilt.
By following these steps, you’ll be able to create a beautiful quilt that showcases your quilting skills and creativity. Remember, the key to mastering this pattern is patience and practice. We’d love to hear your thoughts and suggestions—please leave a comment with your feedback!


