
Pie Carrier Sewing Pattern

If you’re searching for a fun and practical sewing project, the DIY CUTE BACKPACK – free pattern is the perfect place to start. Whether you’re new to sewing or already love crafting your own accessories, this backpack project brings creativity, function, and personal flair into one adorable package.
With its customizable features, you can easily match it to your style or create a thoughtful handmade gift for someone special.
The best part of this DIY CUTE BACKPACK – free pattern is that it’s budget-friendly and entirely achievable at home with just a few materials.
No need for industrial machines or complicated techniques—just a standard sewing machine, some basic tools, and a little patience. The result? A sturdy and stylish mini backpack that can carry your essentials with charm and flair.
Throughout this article, you’ll learn everything needed to bring this cute backpack to life. From the materials and tools you’ll use, to the step-by-step construction process, design tips, and creative ways to personalize it, we’ll guide you through each stage.
So let’s dive into the world of handmade accessories with this exciting DIY CUTE BACKPACK – free pattern that blends fashion and function perfectly!
To start your DIY CUTE BACKPACK – free pattern, you’ll need a few basic materials. Choose a medium-weight fabric such as canvas, cotton twill, or denim for the main body. These fabrics offer structure while remaining easy to sew. You can also line the inside with a lightweight cotton for a clean and professional finish.
You will also need matching thread, a zipper (for the main compartment), a magnetic snap or Velcro for closures, and a few adjustable buckle straps if you want to create adjustable shoulder straps. These hardware pieces are easily found at craft or sewing stores.
Don’t forget about interfacing. Using fusible interfacing will help reinforce your backpack and give it structure, especially for the flap, base, and back panel. It’s an essential component for a durable design.
As for tools, a standard home sewing machine will do just fine. Make sure you have a zipper foot for installing zippers neatly. Basic tools like fabric scissors, pins or clips, a ruler, and an iron will also be essential throughout the process.
If you want to personalize your DIY CUTE BACKPACK – free pattern, consider additional elements like fabric paint, embroidery, patches, or appliqué. These can make your backpack one-of-a-kind and show off your unique style.
Before you begin cutting, make sure to wash and press your fabric. This removes any residue or shrinkage, ensuring your final backpack keeps its shape and fits the pattern dimensions properly.
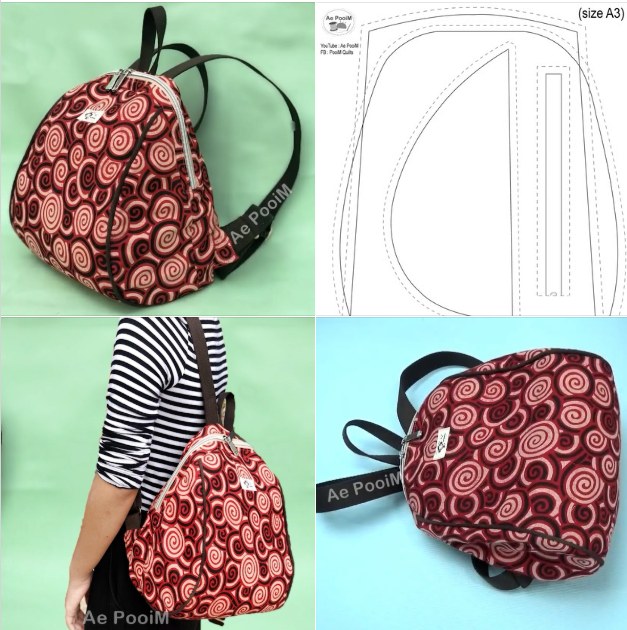
Begin your DIY CUTE BACKPACK – free pattern by cutting out all the pieces according to the dimensions provided in the pattern. Most backpack patterns include a front and back panel, side panels, a bottom piece, flap, straps, and a lining for each section.
Start with the front and back panels. Attach interfacing to the wrong side of the fabric if needed. Sew these panels together with the side and bottom panels to create the outer shell of the backpack. Use a ½-inch seam allowance and remember to press your seams flat for a clean look.
Next, assemble the lining pieces in the same way. You can include a small inner pocket if you’d like, which is handy for keeping items like keys or a phone secure. Leave a small opening in the bottom of the lining for turning the bag right side out later.
Now install the zipper across the top opening, sandwiching it between the outer fabric and the lining. Use a zipper foot and sew slowly to ensure everything aligns. Once your zipper is attached and top-stitched in place, your backpack will start taking shape.
Construct the flap and straps next. You can make simple fabric straps or add webbing for a sportier look. Sew the flap with interfacing and topstitch around the edges. Attach a magnetic snap, Velcro, or button to keep the flap closed securely.
Finally, assemble the entire bag. Turn the outer shell inside out and place the lining inside, right sides together. Sew around the top edge, turn the bag right side out through the lining hole, and close the hole with a few hand stitches or your machine. Press everything well.
One of the best features of the DIY CUTE BACKPACK – free pattern is how customizable it is. The base pattern provides structure, but the possibilities for colors, textures, and styles are endless. You can transform a simple pattern into something truly artistic and personal.
Start by selecting a fabric that reflects your personality or the recipient’s taste. Floral cottons, bold prints, minimalist neutrals, or even upcycled denim can all make stunning backpacks. The fabric choice sets the mood and theme of the entire accessory.
Add embellishments like fabric patches, lace trim, or even small embroidery details. If you enjoy hand embroidery, try stitching your initials or a tiny floral design on the flap or front pocket. It gives your project a handmade feel and makes it even more special.
For younger recipients, consider fun elements like animal ears on the flap, cartoon-themed fabric, or playful buttons. A kid-friendly version of the DIY CUTE BACKPACK – free pattern can make a great birthday or back-to-school gift.
Another idea is to add functional enhancements like water bottle side pockets or a padded inner compartment for gadgets. You can use quilted lining or foam interfacing to offer extra protection for electronics.
Use contrasting colors for the zipper or lining to create a playful pop. It’s a subtle way to add excitement and visual interest without overloading the design.
Finally, consider making a set—a matching pencil case or mini pouch using the same fabric and style as your backpack. It ties everything together and makes for an even more polished and practical gift.
With the DIY CUTE BACKPACK – free pattern, you’ll create a piece that’s not just beautiful, but also practical. This mini backpack is perfect for day-to-day use—think quick trips to the store, walks in the park, or a casual day out.
It’s a stylish and convenient choice for students who need a lightweight option to carry essentials. While it may not hold heavy textbooks, it’s great for a notebook, pencil case, and a small lunch.
For travelers, the backpack makes an ideal companion for flights, day tours, or as a compact carry-on. The hands-free design and custom pockets make it easy to access your items on the go.
Moms and dads can also use this cute backpack as a compact diaper or snack bag. It’s a fun and functional option that adds charm to routine outings with little ones.
This backpack also makes a fabulous gift for friends and family. It’s handmade, meaningful, and functional—perfect for birthdays, holidays, or just-because moments.
Finally, consider using your DIY CUTE BACKPACK – free pattern as part of your craft fair or small business. Handmade accessories are always in demand, especially when they’re as versatile and visually appealing as this design.
Is this DIY Cute Backpack suitable for beginners?
Yes! The DIY CUTE BACKPACK – free pattern is beginner-friendly if you’re familiar with basic sewing skills. With patience and attention to detail, even novice sewists can complete this project.
What type of fabric works best for this pattern?
Medium-weight fabrics like canvas, denim, cotton twill, or duck cloth work best. You can also use quilting cotton with interfacing for extra support.
Can I add extra pockets to the backpack?
Absolutely! You can include interior or exterior pockets, zipper compartments, or mesh pouches depending on your needs and skill level.
How long does it take to make one backpack?
Most people can complete the DIY CUTE BACKPACK – free pattern in about 3 to 5 hours, depending on customization and sewing experience.
Is the backpack washable?
Yes, if you use washable fabrics and materials. It’s best to spot clean or hand-wash to preserve any embellishments or delicate stitching.
Can I sell backpacks made from this pattern?
Yes, as long as the pattern is offered for free and there are no restrictions from the designer. Always respect pattern creators and do not sell the pattern itself.
The DIY CUTE BACKPACK – free pattern is a joyful project that combines creativity, practicality, and charm into one adorable accessory. Whether you’re sewing for yourself or crafting a thoughtful gift, this backpack offers endless opportunities for personalization and fun.
In this article, you discovered the materials and tools required, step-by-step instructions, creative customizations, and practical uses for your handmade backpack. It’s a rewarding and useful project that showcases the magic of sewing by hand.
We’d love to hear how your project turned out! Please leave your honest opinion and suggestions in the comments—your feedback helps others and inspires us to keep creating beautiful, free patterns for the community. Happy sewing!


