
If you’re looking for a dynamic and eye-catching quilt block, the Double Windmill Block – Free Pattern is a fantastic choice.
This classic quilt block design features a swirling motion that adds movement and elegance to any quilt. Whether you’re a beginner or an experienced quilter, this pattern is easy to follow and allows for endless color combinations.
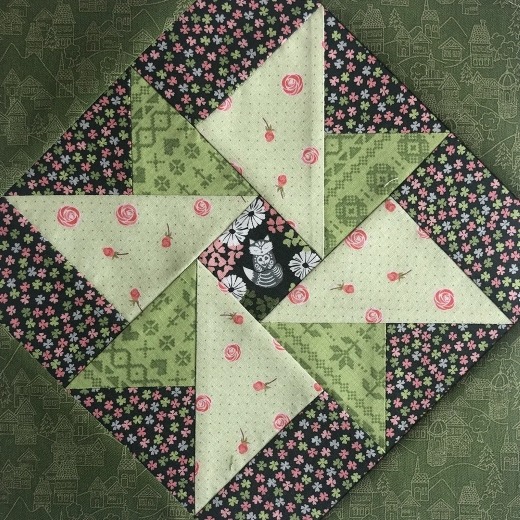
The Double Windmill Block – Free Pattern is perfect for creating quilts, table runners, pillow covers, or even wall hangings. The design consists of carefully arranged triangles that form the illusion of spinning windmill blades. It is a great way to practice precision piecing while creating a visually stunning effect.
In this step-by-step tutorial, we will guide you through the process of making your own Double Windmill Block quilt.
From gathering materials to sewing and assembling the block, you will have all the information needed to create a beautiful quilt block with ease.
1. Materials Needed for the Double Windmill Block
Before starting your Double Windmill Block – Free Pattern, make sure you have all the necessary materials. Preparing in advance will make your quilting process much smoother and more enjoyable.
- Fabric Selection: Choose at least two contrasting fabrics to make the windmill effect stand out. Cotton fabric is ideal due to its ease of use and durability.
- Rotary Cutter and Cutting Mat: A rotary cutter and self-healing cutting mat will ensure precise cuts for clean and sharp edges.
- Quilting Ruler: This tool helps maintain accurate measurements when cutting your fabric pieces.
- Sewing Machine and Thread: A sewing machine will speed up the process, but you can also sew the pieces by hand if preferred.
- Iron and Pressing Board: Pressing seams as you go will ensure that the block remains flat and professional-looking.
- Pins or Fabric Clips: These will hold the pieces in place while sewing, making sure everything stays aligned.
With all materials ready, let’s move on to cutting and piecing the fabric.
2. Cutting and Piecing the Fabric
Precise cutting and careful piecing are essential for achieving a clean and symmetrical Double Windmill Block – Free Pattern. Follow these steps to get started:
- Cut the Base Squares: Start by cutting your background fabric into squares of the appropriate size. These pieces form the foundation of the block.
- Cut the Triangles: Use contrasting fabric to cut triangles, which will form the spinning windmill blades.
- Arrange the Pieces: Lay out all fabric pieces before sewing to ensure they are correctly positioned.
- Sew the Triangles Together: Stitch pairs of triangles to form larger triangular units. Press the seams open to reduce bulk.
- Assemble the Block: Sew the triangle units together to complete the windmill design. Make sure the points align for a seamless look.
- Trim and Square Up: After sewing, use a ruler to trim any excess fabric and ensure your block is the correct size.
Now that your block is assembled, let’s explore some key sewing techniques to achieve a flawless finish.
3. Sewing Techniques for a Perfect Double Windmill Block
Proper sewing techniques can make a big difference in the quality of your finished Double Windmill Block – Free Pattern quilt. Here are some essential tips to help you sew like a pro:
- Use a 1/4-Inch Seam Allowance: Maintaining a consistent 1/4-inch seam allowance is crucial for properly aligned quilt blocks.
- Chain Piecing for Efficiency: Instead of sewing one piece at a time, use chain piecing to speed up the process while keeping pieces organized.
- Pin Fabric Pieces Before Sewing: Pinning helps keep fabric from shifting, ensuring your seams match up perfectly.
- Press Seams Properly: Press seams after each step to create a crisp, flat block. Decide whether to press seams open or to the side based on your preference.
- Square Up Each Section: Before assembling the final block, check that each section is squared up to avoid distortions.
- Check for Accuracy: Before moving on to quilting, inspect your block for any misaligned points or uneven edges and make necessary adjustments.
Once your Double Windmill Block is complete, consider incorporating it into creative quilting projects.
4. Creative Uses for the Double Windmill Block
The Double Windmill Block – Free Pattern is a versatile design that can be used in various quilting projects. Here are some ideas to inspire your creativity:
- Quilt Tops: Create a stunning quilt by repeating the Double Windmill Block in different color combinations.
- Pillow Covers: Use a single block to create a decorative pillow cover that adds a handmade touch to your home.
- Table Runners: Arrange several blocks in a row to make a beautiful table runner for any season.
- Wall Hangings: A single or multiple Double Windmill Blocks can be turned into a striking wall decoration.
- Tote Bags: Incorporate the block into a quilted tote bag for a unique and stylish accessory.
- Seasonal Quilts: Customize your fabric choices to match different holidays or themes for festive decorations.
No matter how you choose to use this pattern, it will add charm and elegance to your quilting projects.
Frequently Asked Questions (FAQ)
1. Is the Double Windmill Block suitable for beginners? Yes! While it requires careful piecing, the pattern is beginner-friendly with proper guidance.
2. What size should the finished block be? Common sizes range from 6 to 12 inches, but you can adjust based on your project needs.
3. Can I hand-sew the Double Windmill Block? Yes! While a sewing machine speeds up the process, hand-sewing is a great alternative.
4. How do I make sure my points align correctly? Use pins and a quilting ruler to ensure precise cutting and alignment.
5. What fabric works best for this pattern? Cotton fabrics are ideal because they are easy to sew and press neatly.
6. Can I use scraps for this pattern? Yes! This block is a great way to use fabric scraps creatively.
Join our VIP broadcast list and gain access to exclusive patterns, all for free. As a VIP member, you’ll receive the best patterns daily, delivered directly to your device. ✨📱 It’s a unique opportunity to stay up-to-date with the latest trends and designs, curated just for you. Don’t miss out on enhancing your projects and discovering new inspirations with the best patterns every day! 🎨🔝
Conclusion
We hope this Double Windmill Block – Free Pattern tutorial has provided you with all the knowledge needed to create a stunning quilt block. From selecting materials to sewing techniques and creative applications, you now have the tools to start your next quilting project with confidence.
Have you tried making the Double Windmill Block? Share your experiences and suggestions in the comments below. Happy quilting!


