
Pie Carrier Sewing Pattern

The Easy Brick Quilt Tutorial is a fantastic way to dive into quilting while creating a beautiful and timeless design. Quilting can seem overwhelming for beginners, but this simple yet stunning pattern allows you to create a cohesive quilt with minimal effort. If you’re looking for a way to start quilting, this tutorial will guide you through the basics step by step.
This quilt pattern is perfect for beginners and experienced quilters alike. With its straightforward design and easy-to-follow instructions, it’s an ideal choice for your next project.
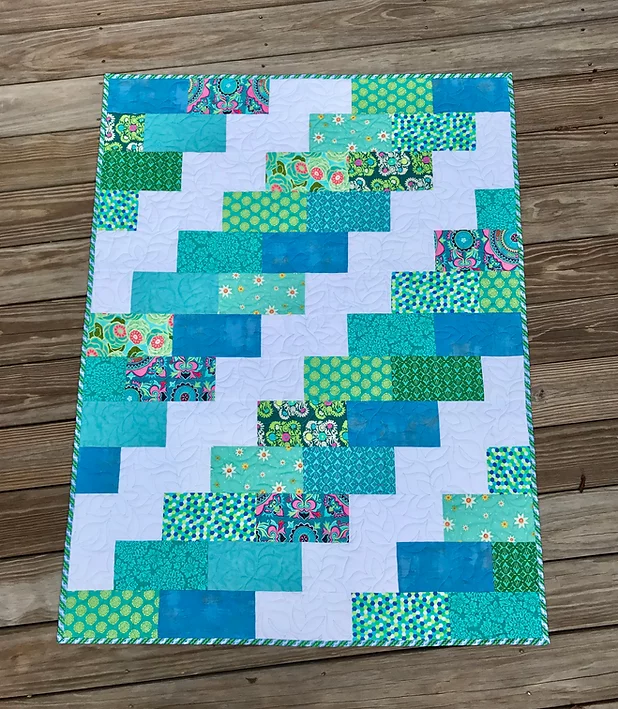
The Easy Brick Quilt Tutorial involves using rectangular blocks to create a simple brick-like pattern, making it both visually striking and easy to assemble. Whether you’re using fabric scraps or new fabrics, this quilt can be personalized to suit your style.
In this article, we’ll break down how to create this quilt from start to finish, providing tips for fabric selection, cutting, sewing, and finishing. The Easy Brick Quilt Tutorial will guide you through every step so you can create a beautiful quilt you can be proud of. Let’s get started!
Before you dive into the Easy Brick Quilt Tutorial, it’s essential to gather all the materials you’ll need to ensure your project goes smoothly. Here’s a list of the basic materials required to make this quilt:
Fabric: For a traditional brick quilt, you’ll need a selection of fabric that contrasts well. Choose fabrics in various colors and patterns to create a visually dynamic quilt. You can opt for fabric from a single collection, or mix and match fabrics from your stash for a more eclectic look.
Rotary Cutter and Cutting Mat: A rotary cutter and cutting mat are essential tools for cutting fabric accurately and efficiently. Using a rotary cutter allows you to cut your fabric into perfect rectangles quickly, which is a key step in creating the brick pattern.
Ruler: A quilting ruler is helpful for measuring and cutting your fabric into uniform pieces. Make sure your ruler is long enough to cut through the width of your fabric easily.
Sewing Machine: While you can technically hand-sew your quilt, using a sewing machine is much faster and more efficient. Make sure your sewing machine is set up for quilting, and you have the appropriate thread and needles.
Thread: Choose a strong quilting thread that matches or contrasts well with your fabric. You will also need a bobbin for your sewing machine.
Iron and Ironing Board: Pressing your seams as you go is essential for a clean and professional-looking quilt. An iron and ironing board will help ensure that your blocks are square and that your seams are crisp.
These materials will help you get started on your Easy Brick Quilt Tutorial, setting you up for a successful quilting experience.
One of the key elements of the Easy Brick Quilt Tutorial is the cutting process. The first step in making your quilt is to cut the fabric into the right shapes and sizes. For this pattern, you will be cutting rectangular blocks to create the brick-like effect. Here’s how to get started:
1. Choose Your Fabric: Select your fabric based on the colors and patterns you want to use in your quilt. Aim for a variety of fabrics that complement each other. You can mix solid colors with prints for added depth.
2. Measure and Cut Rectangles: The standard size for a brick block in a quilt is 6.5” x 12.5”, but you can adjust the size based on the dimensions of the quilt you want to make. Use your ruler to measure and mark the fabric, then cut the fabric into these rectangles. Make sure the edges are straight to ensure your quilt comes together neatly.
3. Cutting Accuracy: Precision is key when cutting fabric for a quilt. Even small discrepancies can cause misalignment when piecing the blocks together. Take your time, and always double-check your measurements before cutting.
4. Cutting the Background Fabric: In addition to the fabric for the brick blocks, you’ll also need fabric for the background. Cut large rectangular or square pieces to frame your brick blocks. The background fabric helps to highlight the brick design and makes it stand out.
5. Organize Your Blocks: After cutting all of your fabric, organize your blocks in a way that makes sense to you. You can arrange them in a random order, or create a more structured layout with alternating colors and patterns.
6. Press Your Fabric: Before sewing, it’s important to press your fabric pieces. This will help eliminate wrinkles and ensure that your blocks align properly when sewn together.
Once you’ve cut and organized your fabric, you’re ready to move on to the next step: sewing the blocks together.
Assembling the blocks for the Easy Brick Quilt Tutorial is straightforward but requires attention to detail. Follow these steps to stitch your blocks together:
1. Align Your Blocks: Begin by arranging your brick blocks in rows. Make sure that the rectangles are all facing the same direction, and pay attention to the spacing between the blocks. You can either space them evenly or create a staggered effect, depending on the look you want.
2. Sew the Blocks Together: Start by sewing the first two blocks together. Use a quarter-inch seam allowance for consistency. Make sure your stitches are straight and even as you sew. After the first two blocks are sewn together, continue adding blocks to form complete rows.
3. Join the Rows: Once you’ve sewn all the rows of blocks, begin joining the rows together. Be sure to align the seams of each row so that the blocks fit together neatly. Pin the rows in place before sewing to ensure they stay aligned.
4. Press Your Seams: After each row is sewn, press the seams open. This will reduce bulk and make your quilt top lie flat. Pressing is an essential part of quilting and ensures your quilt top will have a professional finish.
5. Repeat for All Rows: Continue joining the blocks and pressing your seams until you’ve completed the entire quilt top. This process can take some time, but be patient and take your time to ensure each seam is perfect.
6. Square Up Your Quilt Top: After all the rows are sewn together, it’s time to square up your quilt top. Use your ruler and rotary cutter to trim any excess fabric along the edges, making sure that the quilt top is even and neat.
Now that the quilt top is complete, it’s time to move on to the next step: adding the batting and backing.
The final step in the Easy Brick Quilt Tutorial is finishing the quilt by adding the batting, backing, and binding. This is where your quilt will come together and take shape as a finished piece.
1. Prepare the Backing Fabric: Cut your backing fabric to be at least 2-3 inches larger than your quilt top on all sides. Lay the backing fabric flat on a large surface, such as a clean floor, and smooth out any wrinkles.
2. Layer the Quilt: Lay your quilt top on top of the backing fabric, then place the batting on top of the quilt top. Make sure the batting is evenly distributed and the quilt top is centered on the backing fabric.
3. Baste the Layers: Use safety pins or a basting spray to temporarily hold the quilt layers together. This will prevent the fabric from shifting while you quilt.
4. Quilt the Layers: Now it’s time to quilt the layers together. You can quilt by hand or use a sewing machine. Start quilting from the center and work your way outwards to avoid puckering. You can choose a simple stitch pattern, such as straight lines or a grid, to complement the brick design.
5. Add the Binding: After quilting, trim the edges of the quilt to remove any excess fabric. Then, attach the binding to the edges of the quilt. Fold the binding over the edges and sew it in place, either by hand or machine.
6. Final Press: Once the binding is in place, give your quilt a final press to make sure it’s crisp and neat. Your Easy Brick Quilt is now complete and ready to be used!
Q1: What size should my quilt be for the Easy Brick Quilt Tutorial?
A: The size of your quilt depends on how many blocks you choose to make. You can adjust the dimensions by adding more rows and columns to the design.
Q2: Can I use different fabric types for this quilt?
A: Yes! You can mix and match different fabric types, such as cotton, flannel, or even batik. Just make sure that all the fabric types are suitable for quilting.
Q3: Do I need to use a sewing machine to make the Easy Brick Quilt?
A: While you can hand-sew your quilt, using a sewing machine is recommended for efficiency and consistency. It will save you time and effort.
Q4: How do I choose the right fabric for my quilt?
A: Choose fabrics that complement each other. Consider using a variety of colors and patterns to create a balanced design. You can also use fabric from a single collection for a more coordinated look.
Q5: Can I make the quilt larger?
A: Yes, you can increase the size of the quilt by adding more blocks. Simply adjust the number of rows and columns to suit your desired size.
Q6: How do I quilt the layers together?
A: You can quilt by hand or machine. Use a simple quilting stitch, such as straight lines or a grid, to secure the quilt layers together.
Join our VIP broadcast list and gain access to exclusive patterns, all for free. As a VIP member, you’ll receive the best patterns daily, delivered directly to your device. ✨📱 It’s a unique opportunity to stay up-to-date with the latest trends and designs, curated just for you. Don’t miss out on enhancing your projects and discovering new inspirations with the best patterns every day! 🎨🔝
The Easy Brick Quilt Tutorial provides a simple yet stunning way to create a beautiful quilt. From gathering materials to finishing the quilt, this step-by-step guide ensures a smooth quilting experience. By following the tutorial, you can create a personalized quilt that will be cherished for years to come.
If you enjoyed this tutorial, feel free to leave your feedback, suggestions, or any questions you may have in the comments below. We’d love to hear your thoughts and ideas for future quilting tutorials! Happy quilting!


