
Fabric Pumpkins – Pattern is a delightful and simple craft that perfectly captures the cozy essence of autumn. As the weather cools and the leaves start to fall, many crafters look for creative ways to decorate their homes. Making fabric pumpkins is one of the most charming and accessible ways to add warmth and handmade elegance to your seasonal decor.
Whether you’re an experienced sewer or a complete beginner, this project is ideal for bringing texture, color, and personality into your living space. With a few scraps of fabric, some stuffing, and basic sewing tools, you can create beautiful pumpkins that will last for years.
One of the best things about creating fabric pumpkins is their versatility. You can make them in various sizes and fabrics—velvet for a luxurious look, burlap for rustic charm, or cotton for a classic farmhouse style.
They are perfect for table centerpieces, mantel displays, or even as cozy additions to your fall wreaths. Each pumpkin can be unique, reflecting your taste and the atmosphere you want to create in your home. This is what makes this craft so enjoyable—there’s no wrong way to make a pumpkin!
Handmade decorations like fabric pumpkins also align with a more sustainable and meaningful approach to seasonal decorating. Instead of buying disposable items, you can reuse materials you already have and turn them into something beautiful. Plus, making your own decorations brings a sense of pride and accomplishment that store-bought items simply can’t match.
These pumpkins also make wonderful handmade gifts, showing care and creativity to family and friends. Now, let’s dive into the full Fabric Pumpkins – Pattern tutorial and explore how to make your own stunning set of pumpkins for fall.
1. Materials Needed for Fabric Pumpkins
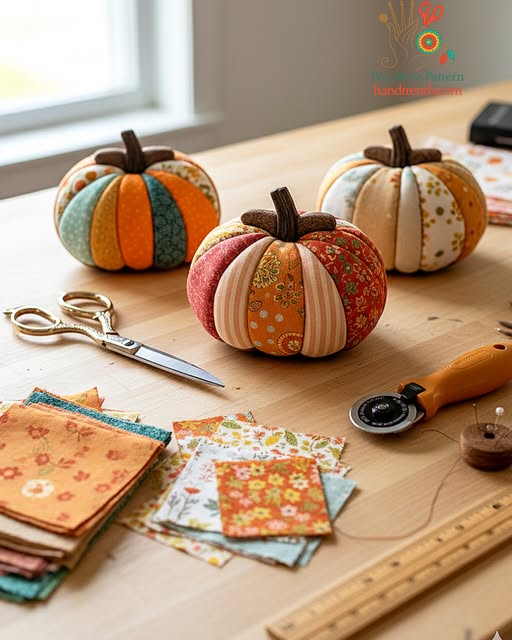
To get started with your Fabric Pumpkins – Pattern, gather a few basic supplies. You’ll need fabric, stuffing, a needle, thread, and some optional decorations like twine or felt leaves. One of the most exciting parts of this project is choosing your fabric. Depending on the look you’re going for, you can select neutral tones for a minimalistic touch or go bold with patterns and deep autumn colors.
Cotton fabrics are great for beginners because they are easy to work with. If you want a soft and plush pumpkin, try using velvet or fleece. Burlap and linen are also fantastic options for a rustic farmhouse aesthetic. Don’t worry about perfection—slightly uneven stitches or mixed textures add to the handmade charm.
For the stuffing, you can use polyester fiberfill or even fabric scraps. The goal is to give your pumpkins a soft but firm shape. A long needle and strong thread will help you create the pumpkin’s characteristic ridges. If you want, you can also use embroidery floss for decorative stitching.
You’ll need scissors to cut your fabric and a hot glue gun if you plan to attach stems or embellishments. For the stems, consider using cinnamon sticks, small branches, or fabric scraps rolled into shape. These details add personality to your fabric pumpkins and make each one unique.
Before starting, organize your workspace so everything is within reach. Crafting is much more enjoyable when your area is tidy and you can focus on the creative process. Once you have your materials ready, you’re all set to start making your cozy autumn pumpkins!
2. Step-by-Step Instructions to Make Fabric Pumpkins
Now that your materials are ready, it’s time to start creating your fabric pumpkins. This process is simple and enjoyable, making it perfect for both beginners and experienced crafters.
Start by cutting your fabric into a rectangle. The width will determine how full your pumpkin looks, and the height affects its size. For example, a 10 x 20-inch rectangle makes a small pumpkin, while a 15 x 30-inch one creates a larger piece. Fold the fabric in half lengthwise, with the right sides facing each other, and sew along the side edge to create a tube.
Next, thread your needle and use a running stitch along one open end of the tube. Pull the thread tightly to gather and close the bottom. Secure it with a few stitches so it won’t open. Now, turn your fabric right side out, so the seam is inside. You’ll have a small pouch-like shape ready to be filled.
Stuff the pumpkin with fiberfill until it’s plump and firm but not overly tight. The amount of filling depends on how soft or dense you want your pumpkin to feel. Once it’s filled, sew a running stitch around the open top edge and pull it closed, leaving a small hole for the stem.
To form the pumpkin’s signature ridges, thread a long needle with strong thread, insert it through the top center, and pull it down through the bottom. Wrap it around the outside and pull tight to create an indentation. Repeat this step several times around the pumpkin to form even sections, securing the thread at the top after each wrap.
Finally, attach your stem. You can glue on a cinnamon stick, a real twig, or a rolled piece of fabric. For extra charm, add small felt leaves, bows, or twine around the base. And there you have it—your first fabric pumpkin is complete!
3. Creative Variations and Styling Ideas
Once you’ve mastered the basic Fabric Pumpkins – Pattern, you can have fun experimenting with different styles and variations. This project is all about creativity, and there are endless ways to make each pumpkin stand out.
Try using various fabrics for a mix-and-match effect. Combine corduroy, flannel, and velvet pumpkins for a rich and textured display. Mixing different patterns like plaids, florals, and solids also adds depth to your autumn decor. You can make a set of three to five pumpkins in varying sizes for a more dynamic arrangement.
For a modern twist, go beyond traditional fall colors. Pastel pumpkins look lovely for a softer, romantic theme, while metallic fabrics or sequins bring a touch of glam to your holiday decor. You can even create Halloween-inspired versions by using black and orange fabrics and adding felt faces.
If you prefer a more rustic aesthetic, wrap jute or twine around the stems and attach small wooden buttons or lace trims. These details give your pumpkins a handcrafted, vintage feel that’s perfect for farmhouse-style homes.
You can also personalize your fabric pumpkins by embroidering initials or patterns onto the fabric before sewing them. This makes each pumpkin truly one of a kind.
When it comes to displaying your pumpkins, the possibilities are endless. Arrange them on your dining table, mantel, or window sill. They also make excellent gifts for friends or teachers during the fall season—beautiful, reusable, and handmade with love.
4. Tips for a Perfect Finish and Longevity
Creating fabric pumpkins is a rewarding experience, but a few tips can help ensure your final result looks professional and lasts for many seasons.
First, take time when choosing your fabrics. Higher-quality fabrics hold their shape better and resist fraying. If your fabric is too thin, consider using interfacing to add structure. Ironing your fabric before cutting also helps achieve smooth and neat results.
When sewing, use strong thread and double-knot your stitches at the beginning and end. This prevents your pumpkin from coming apart, especially when adding stuffing or forming ridges.
Be mindful not to overstuff your pumpkin. It should be firm enough to hold shape but soft enough for you to sew through easily when creating the segments. Overfilling can make it hard to achieve defined ridges.
For a more natural look, don’t worry if your pumpkins aren’t perfectly symmetrical. Handmade crafts have character, and small imperfections add authenticity to your project. Each fabric pumpkin becomes a reflection of your unique crafting style.
Store your pumpkins properly once the season ends. Keep them in a cool, dry place away from direct sunlight to prevent color fading. Wrapping them in tissue paper helps maintain their shape and protects delicate embellishments.
Following these tips ensures that your handmade decorations stay beautiful and ready to brighten up your home for many autumns to come.
FAQ About Fabric Pumpkins
1. Are fabric pumpkins easy to make for beginners?
Yes, they are one of the easiest and most beginner-friendly sewing projects. You only need basic sewing skills and a few simple materials.
2. What type of fabric works best for fabric pumpkins?
Cotton, velvet, and flannel fabrics are great choices. Burlap or linen can also be used for a rustic look.
3. Can I make fabric pumpkins without sewing?
Yes! You can use hot glue instead of stitches for a no-sew version. The result is still charming and quick to make.
4. How do I create realistic pumpkin ridges?
Use a long needle and strong thread to pull tightly from the top to the bottom several times, dividing the pumpkin into sections.
5. Can I wash fabric pumpkins?
It’s best not to wash them, as the stuffing may lose shape. Instead, gently dust them with a soft cloth.
6. How long does it take to make one pumpkin?
It usually takes about 30–60 minutes, depending on size and detail.
7. What can I use as a pumpkin stem?
Cinnamon sticks, twigs, or rolled-up fabric pieces make excellent stems and add extra charm.
8. Can I use this pattern for other holidays?
Absolutely! Change the fabric colors to fit different seasons—pastels for spring or red and green for Christmas.
Conclusion
Making your own Fabric Pumpkins – Pattern is a fun, relaxing, and creative way to celebrate the fall season. With just a few materials and a little time, you can create cozy handmade decorations that bring warmth and personality to your home. Each pumpkin reflects your personal style and the joy of crafting something unique with your hands.
Whether you choose classic autumn tones or experiment with new colors and textures, your fabric pumpkins will add charm and creativity to any space. This project is perfect for all skill levels and offers endless opportunities for customization.
Now that you know how to make these adorable pumpkins, why not give it a try? Share your thoughts and experiences in the comments—your feedback and creative ideas inspire other makers and help the crafting community grow.


