
Pie Carrier Sewing Pattern

The Feathered Star – Tutorial is a highly regarded quilting pattern that showcases a stunning and intricate star design. Known for its sharp, angular points and beautiful feather-like edges, this pattern offers quilters a chance to create a truly eye-catching piece.
The Feathered Star pattern combines traditional techniques with a modern twist, making it a favorite among experienced quilters and beginners alike.
As you dive into this tutorial, you’ll learn how to master each step required to create the Feathered Star Quilt.
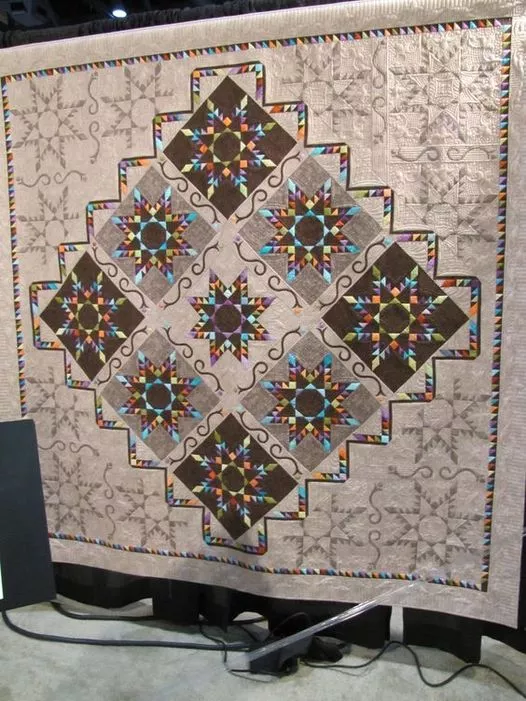
Image from google.
Whether you are looking to make a wall hanging, a quilt for your bed, or simply want to explore the beauty of this pattern, this guide will provide you with all the necessary information to succeed.
The tutorial will cover everything from fabric selection to cutting techniques, ensuring your Feathered Star quilt turns out beautifully.
Creating this quilt may appear complex at first glance, but by breaking down the steps and following this detailed guide, you can successfully create your very own Feathered Star masterpiece.
The Feathered Star Quilt is a traditional pattern that has been passed down through generations. Its intricate design features a central star surrounded by pointed “feathers,” giving the quilt a unique and impressive appearance.
This pattern is composed of several key components, including triangle units, flying geese blocks, and sharp points. These elements come together to form the distinct star shape that is the hallmark of the Feathered Star.
The key to mastering the Feathered Star Quilt lies in understanding the construction of these pieces. While the design is complex, with a little practice and the right tools, quilters can create this stunning pattern with precision.
Many quilters choose to adapt the Feathered Star pattern to suit their personal style, whether by choosing bold and bright colors or sticking with a more traditional palette. Regardless of your color choice, the star will remain the focal point of the design.
The Feathered Star Quilt is often used in large projects such as bed quilts or wall hangings, where its size and striking design can be fully appreciated. However, it can also be scaled down for smaller projects like pillows or table runners.
Whether you are a seasoned quilter or just starting out, the Feathered Star pattern will push your skills while providing a sense of achievement once completed. The complexity and beauty of this quilt make it a rewarding project for anyone who loves quilting.
Before diving into the construction of the Feathered Star Quilt, it’s essential to choose the right fabrics and tools. Selecting the right fabrics will enhance the beauty of the quilt and allow the intricate star to stand out.
Start by selecting a fabric for the background. Traditionally, quilters choose a solid color or a subtle print that contrasts with the star. This will allow the points and feathers to remain the focal point of the quilt.
For the star itself, consider using fabrics with varying colors and patterns. Many quilters choose to use a mix of fabrics to create a multi-dimensional effect. Choosing a combination of light, medium, and dark fabrics will give your Feathered Star depth and visual interest.
The right tools are just as important as the fabrics. A rotary cutter, ruler, and mat will help you cut fabric pieces accurately. Accurate cutting is especially crucial in the Feathered Star Quilt, where precision is key to achieving sharp points.
Templates are also a useful tool in ensuring that all your pieces are the correct size and shape. Many quilters use paper templates or acrylic templates that can be traced onto fabric. This ensures that every piece fits perfectly when it’s sewn together.
A sewing machine with adjustable stitch lengths and an accurate quarter-inch seam allowance is essential for piecing together the intricate components of the Feathered Star Quilt. These small adjustments will ensure that your pieces fit together seamlessly.
Now that you’ve selected your fabrics and tools, it’s time to begin constructing the Feathered Star Quilt. Follow these steps to create the star’s intricate design.
Begin by cutting all your fabric pieces according to the template instructions. This includes cutting triangles, flying geese blocks, and any other shapes necessary for the star’s construction. Be sure to cut precisely to avoid any issues during assembly.
Next, create the flying geese blocks. This component consists of two smaller triangles sewn to a larger triangle, forming a flying geese shape. You will need to create several of these blocks, as they will surround the central star.
Once your flying geese blocks are complete, begin assembling the star’s outer “feathers.” These feathers are made up of triangles and other shapes, which are pieced together to form the pointed edges of the star.
After the outer feathers are complete, sew the center of the star. This section will often require careful piecing to ensure the points align correctly. Take your time and double-check measurements as you go.
Once the central star and surrounding feathers are pieced together, sew the rows together to complete the star section. You may need to add small pieces of background fabric to ensure the entire star is framed correctly.
Finally, press all seams carefully, making sure to press towards the darker fabrics when possible. This will help create a crisp and neat finished quilt top.
After completing the star block, it’s time to assemble the quilt top. This step involves adding borders and any additional design elements to frame the Feathered Star.
Consider adding a contrasting border around the quilt top to highlight the Feathered Star. A solid color works well to frame the intricate design, or you can use a patterned fabric to add a layer of visual interest.
Once the quilt top is fully assembled, layer it with batting and backing fabric. The batting provides warmth and thickness, while the backing fabric creates a clean and polished finish for the quilt.
Baste the layers together using safety pins, a basting stitch, or a temporary adhesive spray. Make sure the layers are secure before quilting begins.
Quilt the layers together using your preferred quilting method. Many quilters choose to stitch around the edges of the star to emphasize its shape, or use free-motion quilting to add texture.
Finally, bind the quilt to finish the edges. Choose a binding fabric that complements the colors in your quilt and provides a clean, polished look.
1. How difficult is the Feathered Star Quilt to make?
The Feathered Star Quilt is an advanced pattern that requires precise cutting and piecing. However, with patience and practice, even experienced quilters can successfully complete it.
2. What fabrics should I use for the Feathered Star?
Choose fabrics that contrast well with each other. Solid fabrics work well for the background, while prints and various colors can be used for the star itself.
3. How do I ensure that my points are sharp?
Accurate cutting, consistent seam allowances, and pressing seams carefully are all important steps in achieving sharp points. Using a rotary cutter and mat helps maintain accuracy.
4. Can I make a smaller version of the Feathered Star?
Yes, the Feathered Star Quilt can be scaled down for smaller projects like pillows or table runners. Simply reduce the size of the components while maintaining the pattern’s proportions.
5. How do I quilt the Feathered Star?
You can quilt the Feathered Star Quilt by hand or machine. Popular techniques include echo quilting around the star or using free-motion quilting to add texture.
6. How should I care for my Feathered Star Quilt?
Wash your quilt on a gentle cycle with cold water, and tumble dry on low heat or air dry. Avoid harsh detergents that could damage the fabric over time.
Join our VIP broadcast list and gain access to exclusive patterns, all for free. As a VIP member, you’ll receive the best patterns daily, delivered directly to your device. ✨📱 It’s a unique opportunity to stay up-to-date with the latest trends and designs, curated just for you. Don’t miss out on enhancing your projects and discovering new inspirations with the best patterns every day! 🎨🔝
The Feathered Star – Tutorial provides a detailed guide to creating one of the most intricate and beautiful quilt patterns out there. By carefully selecting your fabrics, following each step of the construction process, and taking your time with the details, you can create a stunning Feathered Star Quilt that will be a true masterpiece.
We hope this guide helps you in your quilting journey. Please share your thoughts, experiences, and any suggestions you have in the comments below. Happy quilting!


