
Pie Carrier Sewing Pattern

If you are looking to add a touch of charm and creativity to your home, a Folded Trees- Quilted Table Topper is a wonderful project that will bring a festive and sophisticated feel to any room.
This design, created by Geta’s Quilting Studio, combines the elegance of quilting with the beauty of folded fabric techniques, making it a unique and eye-catching addition to your table decor.
Whether you’re decorating for a holiday gathering, a special event, or simply adding a new seasonal touch to your home, a folded tree quilted table topper is the perfect way to showcase your quilting skills.
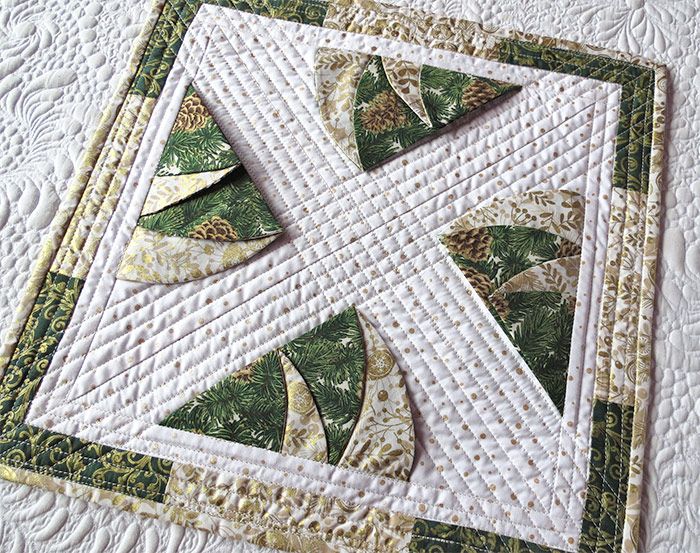
Image from google.
The concept behind the Folded Trees- Quilted Table Topper is simple yet stunning. The design features folded fabric elements arranged in a tree-like shape, adding depth and texture to the surface.
Using fabric folding techniques such as origami quilting, along with traditional quilting methods, creates a beautiful dimensional look that will impress any guest.
This design is versatile enough for all skill levels, making it suitable for beginners as well as experienced quilters who want to try something new.
In this article, we’ll guide you through the steps to create your own Folded Trees- Quilted Table Topper using easy-to-follow instructions.
You’ll also learn about the materials needed, tips for creating perfect folds, and how to finish the quilted topper beautifully. Let’s explore this creative and festive project from Geta’s Quilting Studio that will elevate your quilting skills and add elegance to your home.
Before you begin, it’s essential to gather all the materials for your Folded Trees- Quilted Table Topper project. The main components include fabric, quilting tools, and thread. For this project, choose fabrics in various shades that complement your room’s color scheme. Cotton fabric works best for this type of project, as it is easy to fold and manipulate, which is key for creating the dimensional tree shapes. You’ll also need fat quarters or small fabric cuts to make the folded elements, so choose colors that contrast nicely to highlight the folds.
Next, you’ll need basic quilting tools, including a rotary cutter, cutting mat, and ruler. These tools will help you accurately cut your fabric into the necessary shapes and sizes for the folded tree elements. You can also opt for a quilt template to ensure your tree design comes out perfectly symmetrical.
Finally, make sure you have a sewing machine for the quilting process. The machine will be used for both the piecing of the table topper and the final quilting of the design. If you prefer hand quilting, you can certainly do so, but a machine will speed up the process. You’ll also need some quilt batting for the inside of your topper to give it a soft, cushioned feel. Finally, choose a coordinating thread to match your fabrics and create clean, even stitches.
Once you’ve gathered all your materials, it’s time to start making your Folded Trees- Quilted Table Topper. The first step is to cut the fabric into the correct shapes for the tree. Using your rotary cutter and ruler, cut squares or rectangles that will be folded into the tree shapes. The size of your squares will depend on the size of the table topper you want to create, but 4-inch squares work well for this design.
To create the folded fabric trees, fold each fabric piece according to the origami quilting technique. This technique involves folding the fabric in specific ways to form a three-dimensional shape. Begin by folding the fabric square into triangles, and then continue folding it into smaller sections until you have a compact, tree-like shape. The key to perfect folds is to press the fabric with an iron to keep the creases in place. You may want to use a small amount of fabric starch to ensure the folds stay crisp.
Once you have all your folded tree shapes, arrange them on the quilt top in a pleasing layout. The trees can be placed in rows, randomly scattered, or even layered for added dimension. Once you are happy with the arrangement, pin each folded element in place, ensuring that the folds are facing outward for maximum effect. Then, sew each piece to the quilt top using a straight stitch, carefully securing the folded elements.
After all the trees are attached, it’s time to quilt the entire table topper. Layer the quilt top, batting, and quilt backing fabric, and then quilt as desired. You can quilt simple straight lines, curves, or even intricate patterns depending on your skill level. Use a coordinating thread color to sew through all the layers, ensuring everything stays in place.
Achieving crisp, perfect folds is one of the most important steps in creating your Folded Trees- Quilted Table Topper. Here are some tips to help you perfect the folds and make your project look polished. First, always use a pressing cloth when ironing the fabric to avoid scorching. Starch or spray starch can be a great way to keep the fabric stiff, especially when creating multiple folds. Gently press the fabric after each fold to maintain the crispness and prevent any unwanted wrinkles.
When folding the fabric, take your time to ensure each fold is neat and even. If you are new to origami quilting, practice on a scrap piece of fabric first to familiarize yourself with the process before moving on to your actual project. You may also want to use a fabric glue stick to help hold the folds in place temporarily before sewing them.
Another tip for making your Folded Trees- Quilted Table Topper even more stunning is to add a contrasting border around the quilt. A border can help frame the design and bring attention to the folded trees. Choose a fabric that complements your trees, or opt for a bold, contrasting fabric to make the border stand out.
For the quilting process, don’t be afraid to experiment with different quilting patterns. Free-motion quilting can create beautiful, organic designs, while straight-line quilting offers a more structured and modern look. Remember, your quilting stitches should not distract from the folded tree elements but instead enhance the overall design.
Once you’ve quilted your Folded Trees- Quilted Table Topper, it’s time to finish the edges and bind the quilt. The binding is the final touch that gives the quilt a clean, professional look. To create the binding, cut strips of fabric and fold them into a double-folded strip, then sew them along the edges of the quilt. Be sure to carefully miter the corners for a smooth, polished finish.
Another option is to use bias tape for the binding, which can be a great way to add extra color and texture. You can also choose to machine stitch or hand-stitch the binding depending on your preference. After attaching the binding, trim any excess threads and press the quilt once more to set the seams.
Your quilted table topper is now ready for display! Place it on your dining table, coffee table, or even use it as a wall hanging to showcase the beauty of the folded trees. Not only will this quilted table topper add a festive touch to your home, but it will also become a cherished piece of art that reflects your quilting skills.
1. What is the best fabric to use for a Folded Trees Quilted Table Topper?
The best fabric for this project is cotton fabric, as it holds folds well and is easy to work with. Choose fabrics with a bit of structure and avoid stretchy materials.
2. How do I create the folded tree design?
The folded tree design is made by folding fabric squares using the origami quilting technique. Each piece is folded into smaller sections to form a triangular or tree-like shape.
3. Can I use a sewing machine to make the folded trees?
Yes, a sewing machine is ideal for attaching the folded fabric elements to the quilt top. Use a straight stitch to secure each fold in place.
4. What type of batting should I use for this project?
For the Folded Trees- Quilted Table Topper, cotton batting is a great choice. It provides a soft texture and helps the quilt maintain its shape.
5. How do I finish the edges of my quilt?
You can finish the edges of your quilt by attaching a binding or bias tape around the perimeter. This adds a clean, polished finish and helps the quilt hold together.
Join our VIP broadcast list and gain access to exclusive patterns, all for free. As a VIP member, you’ll receive the best patterns daily, delivered directly to your device. ✨📱 It’s a unique opportunity to stay up-to-date with the latest trends and designs, curated just for you. Don’t miss out on enhancing your projects and discovering new inspirations with the best patterns every day! 🎨🔝
Creating a Folded Trees- Quilted Table Topper is a fun and rewarding quilting project that combines beautiful folded fabric techniques with traditional quilting methods. By following the steps outlined in this article, you can create a stunning quilted topper that will add elegance and charm to your home. With careful attention to detail, you can master the art of origami quilting and bring this festive design to life.
We hope you enjoyed this tutorial and are inspired to create your own Folded Trees- Quilted Table Topper. Feel free to share your thoughts, experiences, and suggestions in the comments below! We’d love to hear about your projects and how you’ve personalized your topper. Happy quilting!


