
Pie Carrier Sewing Pattern

The Four Corner Spinwheel Quilt Pattern is a delightful and dynamic design that brings movement, symmetry, and a touch of vintage charm to your quilting projects. Ideal for both beginners and experienced quilters, this pattern creates a visual spin effect that draws the eye into the center of the block and radiates outward.
If you’re seeking a fresh and engaging pattern for your next quilt, the Four Corner Spinwheel Quilt Pattern may be the perfect choice.
This pattern not only offers a unique aesthetic but also allows quilters to experiment with color placement and contrast. The “spinwheel” illusion is formed by careful piecing and alignment, making every finished block look impressive and full of motion.
It’s an excellent way to show off your fabric stash or play with a new palette, while maintaining a structured layout that looks more complex than it is.
Whether you’re making a baby quilt, a wall hanging, or a full-sized bedspread, the Four Corner Spinwheel Quilt Pattern adapts well to different sizes and layouts. You can create multiple spinwheels within a single quilt or showcase a single large block for dramatic impact.
In the steps ahead, you’ll learn how to build your blocks, select colors, sew with precision, and finish your quilt with confidence.
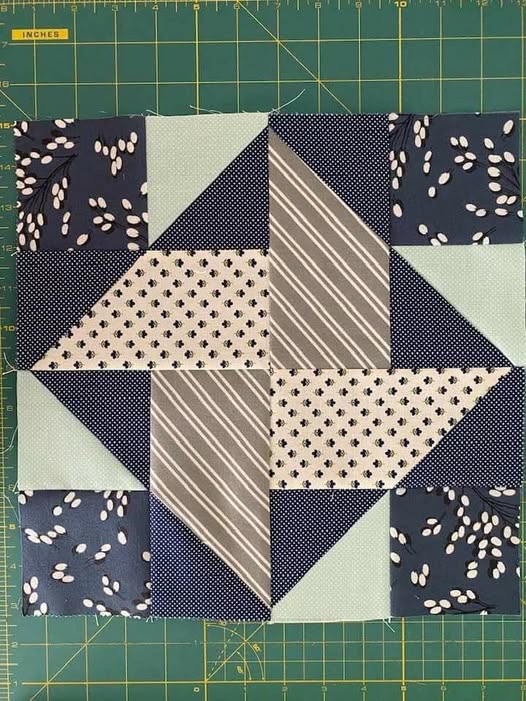
The Four Corner Spinwheel Quilt Pattern is built around a central square, which spins visually due to the angles and colors used in each quadrant. Each quadrant is a triangle that combines with three others to form the illusion of rotation.
Start by choosing two or more contrasting fabrics to create strong visual definition between the sections. Light and dark tones work especially well.
Cut your fabrics into squares and then diagonally into half-square triangles. Each block will use these half-square triangles to create the “blades” of the spinwheel.
Arrange four of the half-square triangles in a pinwheel layout, ensuring that the angles are consistent for all blocks.
Sew the half-square triangles into pairs, press seams to one side, and then combine into a four-patch configuration.
The finished block should look like it’s spinning. Be sure to double-check alignment before moving on to ensure symmetry.
Once you’ve completed individual blocks of the Four Corner Spinwheel Quilt Pattern, it’s time to assemble them into your quilt top. Precision in layout at this stage ensures a smooth final quilt.
Lay out your blocks in rows on a flat surface. Consider alternating the direction of the spinwheel for visual variety or keep them aligned for a cohesive flow.
Pin the blocks together row by row, matching points carefully. Use a quarter-inch seam allowance and press the seams open or to one side depending on your preference.
Join the rows with equal attention to seam matching. You can use pins or clips to keep the seams aligned during sewing.
After assembling all rows, iron the quilt top flat. This will make it easier to sandwich with batting and backing later on.
Consider adding a border or sashing between blocks to frame the spinwheel design or give breathing room between dynamic patterns.
The magic of the Four Corner Spinwheel Quilt Pattern lies in how you use color to amplify the illusion of motion. Thoughtful selection of fabric can completely transform the look and mood of your quilt.
Use monochrome shades for a minimalist, modern quilt or bright, contrasting colors for a cheerful, high-energy piece.
Patterns with small prints, solids, or batiks work well to keep focus on the spinning effect instead of overwhelming it with too much visual texture.
If using scraps, consider grouping similar tones together in each quadrant to preserve some uniformity while celebrating color diversity.
Consider seasonal or theme-based palettes, like autumn oranges and browns, or pastels for springtime quilts.
Audition your fabric choices by laying out a few blocks before committing to sewing. This will help you fine-tune the layout for maximum impact.
After your quilt top is pieced and pressed, it’s time to bring your Four Corner Spinwheel Quilt Pattern to life with batting, backing, and quilting.
Layer your quilt top, batting, and backing in a sandwich. Baste using pins, spray, or hand stitching to keep everything in place.
You can quilt in-the-ditch along the spinwheel seams, echo the curves of the blades, or use free-motion quilting to add texture and movement.
Select a thread color that blends with the dominant fabric or contrasts for a pop of dimension. Quilting can enhance the spinwheel effect.
After quilting, square up your edges and prepare for binding. Bias binding works well for quilts with curved edges or borders.
Finally, hand-stitch or machine sew the binding, and add a label to commemorate your creative work. Your quilt is now ready to be gifted, displayed, or loved.
What is the Four Corner Spinwheel Quilt Pattern best used for? This pattern works well for decorative wall hangings, baby quilts, throws, or even large bed quilts. Its design is eye-catching and adaptable to various sizes.
Is this a beginner-friendly quilt pattern? Yes, the block construction is relatively simple, relying mostly on half-square triangles. As long as you’re comfortable with basic piecing, you can make this pattern.
Can I use pre-cuts for this pattern? Absolutely. Charm packs or layer cakes can be cut into half-square triangles, making the prep work faster and easier.
What is the best fabric type for this quilt? Cotton quilting fabric is ideal. It presses well, sews easily, and comes in a wide range of colors and prints to suit your design.
How should I press my seams for this pattern? You can press seams open for flatness or to one side to lock seams together. Choose the method that gives you the most accurate block assembly.
Do I need special tools to make this quilt? A rotary cutter, quilting ruler, and cutting mat are helpful. A sewing machine with a 1/4-inch foot will ensure accurate seams.
In this guide, we explored the Four Corner Spinwheel Quilt Pattern, from its captivating structure to color selection, piecing techniques, and finishing methods. This pattern offers an ideal balance between simplicity and visual appeal, making it a great choice for quilters of all levels. By carefully arranging half-square triangles and playing with contrast, you can create a quilt that’s full of motion and personality.
If you enjoyed this tutorial or have tried this pattern before, please leave your honest feedback below. We’d love to hear your experiences, suggestions, or even see photos of your finished spinwheel quilt!


