
The Herringbone Haul-It-All Tote with Jelly Rolls – Pattern is a fantastic and functional quilting project that combines style, practicality, and creative joy. Whether you’re a beginner quilter or a seasoned sewing enthusiast, this project gives you a perfect opportunity to use up those jelly roll strips sitting in your fabric stash.
With its eye-catching herringbone design, this tote is both sturdy and fashionable—ideal for shopping trips, library books, or crafting supplies.
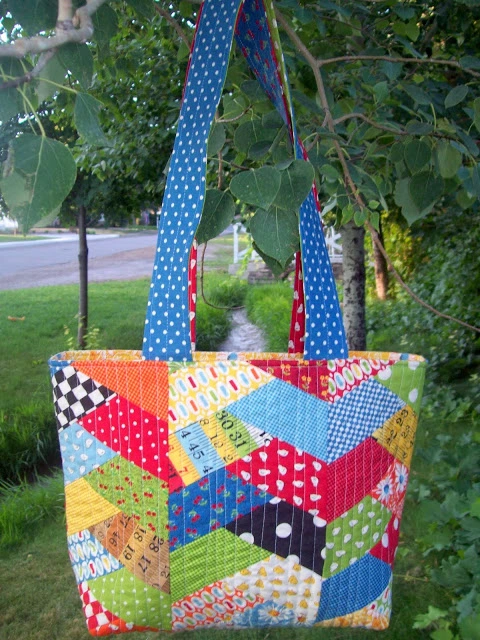
Using jelly rolls (pre-cut strips of fabric, typically 2.5 inches wide), the pattern simplifies the cutting process and adds a lovely mix of coordinated prints to your work. The herringbone layout offers a dynamic texture, making your finished tote stand out with a modern flair.
It’s a great project to learn basic patchwork skills while creating something truly useful and gift-worthy.
In this article, we’ll guide you through everything you need to know to make your own Herringbone Haul-It-All Tote with Jelly Rolls – Pattern. We’ll explain materials, techniques, assembly steps, and even how to adapt the pattern. The tutorial is designed to be both clear and inspiring, so you’ll enjoy the process from start to finish.
1. Preparing Your Materials and Jelly Rolls
The first step in creating your Herringbone Haul-It-All Tote with Jelly Rolls – Pattern is gathering your supplies. Choosing the right fabric makes a big difference, especially for a bag that will be used often and possibly carry some weight.
Start by selecting a jelly roll pack that speaks to your style. Look for fabrics that coordinate well, but don’t be afraid to play with contrast. A herringbone pattern shines when alternating dark and light strips. You’ll need approximately 20–25 strips depending on the desired size.
In addition to the jelly rolls, gather your other essential materials. These include batting or fusible fleece for structure, cotton fabric for the lining, interfacing if you want extra durability, and coordinating thread. Don’t forget a rotary cutter, ruler, and cutting mat for precise strip alignment.
Plan your layout before you start sewing. Arrange the jelly roll strips on your work surface and try different herringbone combinations until you’re happy with the design. This is where your creativity gets to shine and set the tone for the finished tote.
Once your layout is ready, you’ll cut your strips to length and begin piecing them together at a diagonal to form the herringbone shape. Make sure to iron as you go to keep everything crisp and clean. Accuracy here will ensure the final tote looks polished.
Finally, take care when trimming your panels. The herringbone effect means you’ll need to square up the edges, and it’s important not to lose the beautiful symmetry. A long ruler helps, and slow, deliberate cuts will give you professional-looking results.
2. Assembling the Tote Bag Panels
Now that your herringbone panels are ready, it’s time to turn them into a fully functional tote bag. Assembly starts by adding batting or fusible fleece to your front and back panels to give the bag strength and structure.
Quilt your panels by stitching along the seams or doing light diagonal quilting to emphasize the herringbone pattern. This step not only secures the layers but also adds texture and durability to your finished tote.
Prepare the lining by cutting two rectangles the same size as your outer panels. If you’d like pockets, now is the time to add them. A slip pocket or a zippered one can add great functionality to your tote.
Next, sew the front and back exterior panels together, right sides facing, and stitch the side and bottom seams. Repeat the process with the lining, but remember to leave a small gap in the bottom seam to turn the bag later.
Create boxed corners by pinching each bottom corner flat and sewing across to give the bag depth. Do this for both the outer fabric and the lining. These corners are what make the tote spacious enough to “haul it all.”
With both sections prepared, place the outer bag inside the lining (right sides together) and sew around the top edge. Turn the bag right side out through the gap, press the top edge, and topstitch for a neat finish.
3. Adding Handles and Personal Touches
The finishing touches of your Herringbone Haul-It-All Tote with Jelly Rolls – Pattern are what make it uniquely yours. Handles are both functional and decorative, so choose a material that’s sturdy and complements your fabrics.
You can create your own handles using extra jelly roll strips, or you can use pre-made cotton or leather handles for a refined touch. If you’re making your own, consider interfacing or batting inside to add comfort and strength.
Attach the handles by measuring equal distances from the side seams, ensuring symmetry. Sew them down with a reinforced box stitch for added durability, especially if you plan to carry heavier items.
For personalization, consider adding a magnetic snap or zipper to close the bag. You could also include a key fob, a tag with your name, or embroidery on the lining for an extra touch of love.
Don’t forget about labeling your project if you’re a crafter who sells or gifts items. A small woven label inside the bag can elevate your handmade tote to look boutique-quality.
You might even line the bottom of the tote with cardboard or a plastic insert covered in fabric to give the base more stability and shape. This is optional but helpful if the tote will be heavily used.
At this point, your tote is complete! Take the time to admire your work, photograph it, and maybe even start planning the next one—this pattern is so versatile, you’ll want to make more.
4. Customization Ideas for Every Style
One of the best things about the Herringbone Haul-It-All Tote with Jelly Rolls – Pattern is its flexibility. Once you’ve made it once, you can adapt it endlessly to fit your needs or personal aesthetic.
Change the size of the tote by adding more strips or adjusting the dimensions of the panels. This lets you create a smaller purse or a larger market bag using the same basic techniques.
Switch up your jelly rolls. Go from bold florals to neutral solids, or mix batiks with cottons for a textured effect. Each new fabric choice gives the bag an entirely different personality.
Try using denim or canvas as a backing for the herringbone panels for an even sturdier tote. This makes it great for grocery shopping or carrying heavy books without losing shape.
Add seasonal flair with themed fabrics. Make a fall-themed tote with autumn colors, or a beach bag with nautical prints. Your fabric choices can follow holidays, seasons, or gift recipients.
Experiment with the herringbone layout. While the traditional diagonal look is stunning, you might enjoy playing with chevrons, offset rows, or color blocking within the pattern.
Lastly, use scraps instead of full jelly rolls if you’re trying to be eco-conscious or reduce fabric waste. Piecing together leftover fabric strips adds character and charm to your creation.
FAQ – Herringbone Haul-It-All Tote with Jelly Rolls – Pattern
What is a jelly roll in quilting?
A jelly roll is a bundle of pre-cut fabric strips, usually 2.5 inches wide by the width of the fabric (typically 42 inches). They’re great for quick and easy quilting projects and come in coordinated fabric collections.
Is this tote pattern suitable for beginners?
Yes! The Herringbone Haul-It-All Tote with Jelly Rolls – Pattern is beginner-friendly, especially if you’re familiar with basic sewing and quilting techniques. The step-by-step layout makes it easy to follow.
How long does it take to make this tote?
Depending on your experience and setup, you can complete the tote in 4–6 hours. If you’re adding custom elements like pockets or zippers, plan for a bit more time.
Can I use fabric scraps instead of jelly rolls?
Absolutely! Just cut your scraps into 2.5″ wide strips and coordinate them into your herringbone pattern. This is a great way to reduce fabric waste.
How can I wash the tote bag once it’s finished?
Machine wash on gentle cycle using cold water. Air drying is preferred to keep the shape, especially if you’ve added structure to the base or handles.
What is the best batting to use for this project?
Lightweight fusible fleece or cotton batting works well. If you want a firmer bag, consider foam interfacing or layering two types of stabilizers.
Conclusion
The Herringbone Haul-It-All Tote with Jelly Rolls – Pattern is a rewarding and functional quilting project that allows you to explore color, design, and utility in one beautiful bag. It’s a practical way to use jelly rolls while creating a personalized item that you or a loved one can use every day. This project is a blend of creativity, precision, and fun—all wrapped in one tote.
We hope this guide inspired you to try your own herringbone tote! If you do, please leave a sincere comment below with your thoughts, suggestions, or even photos of your finished work. Your feedback helps us grow and share more beautiful ideas with the crafting community. Happy sewing!


