
The Hexagonal Quilt Pattern for Christmas – TUTORIAL is a perfect project to get into the holiday spirit. This pattern combines traditional quilting techniques with a modern geometric twist, making it ideal for both beginner and advanced quilters.
If you’re looking for a way to add a cozy, festive touch to your home this holiday season, this hexagonal quilt pattern will create a beautiful, eye-catching piece that will elevate any room.
Creating a Hexagonal Quilt Pattern for Christmas involves using vibrant fabrics, and the geometric shape of the hexagon adds a fun and visually pleasing design element to your quilt.
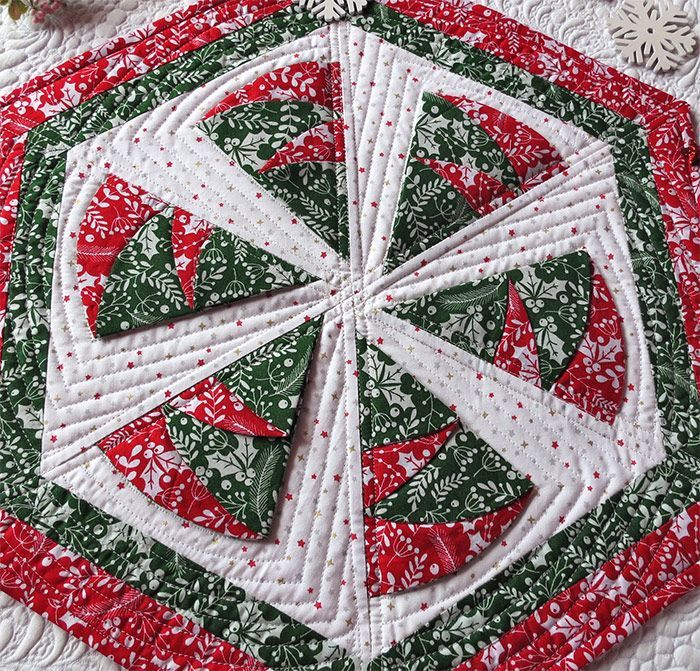
The intricate pattern can be customized to fit your style, from bright reds and greens for a classic Christmas look to more subtle tones for a contemporary vibe.
With this step-by-step tutorial, you’ll learn how to piece together the hexagons, sew the quilt top, and finish the quilt with a professional touch.
Whether you’re gifting this quilt or keeping it for yourself, the Hexagonal Quilt Pattern for Christmas is sure to be a cherished addition to your holiday décor. Let’s dive into the tutorial and get started with the quilting process!
1. Gathering Materials for the Hexagonal Quilt Pattern for Christmas
Before you start sewing your Hexagonal Quilt Pattern for Christmas, it’s important to gather the necessary materials. Having everything ready will make the process smoother and more enjoyable.
- Fabrics: Choose a selection of fabrics that represent the Christmas theme. Think of rich reds, greens, whites, and metallic golds or silvers. You’ll need at least three different fabrics: one for the background, one for the hexagon pieces, and another for the quilt border or backing. Consider adding some festive patterns like snowflakes or holly for extra charm.
- Hexagon Template: You can either purchase a hexagon template or create your own by drawing the shape on cardboard or plastic. A standard hexagon will have six equal sides, and the size of the hexagon will depend on how large you want your quilt.
- Rotary Cutter and Mat: A rotary cutter will allow you to cut your fabric pieces quickly and precisely. Make sure to use a self-healing cutting mat to protect your work surface.
- Sewing Machine: A reliable sewing machine with a quarter-inch foot is ideal for piecing together the hexagon units. Make sure it’s in good working order before starting your project.
- Quilt Batting: Quilt batting adds warmth and structure to your quilt. Choose a batting that suits the weight and feel you want for your quilt.
- Thread: Use high-quality cotton thread for piecing and quilting. Select a color that complements the fabric choices you’ve made, either matching or blending with the overall color scheme.
2. Cutting Your Hexagonal Quilt Pattern for Christmas Pieces
Once your materials are gathered, the next step is to cut your fabric into hexagonal pieces. This is one of the most important steps in creating a successful quilt, as accurate cutting ensures the quilt pieces will fit together perfectly.
- Cutting the Hexagons: Using your hexagon template, cut out the number of hexagons you’ll need for your quilt. For a standard quilt, you’ll need multiple hexagons, but you can adjust the number based on the size of your quilt. If you’re using multiple fabrics, cut different sets of hexagons to create the desired pattern.
- Cutting the Quilt Border: To frame your quilt, you’ll need fabric strips for the border. Measure the length and width of your quilt top once it’s assembled to ensure you cut enough fabric to go around the edges.
- Cutting the Quilt Backing: In addition to the quilt top, you will also need a piece of fabric for the quilt backing. Make sure the backing fabric is slightly larger than the quilt top to allow for any shrinkage during quilting.
- Pressing Your Fabric: Once your pieces are cut, press the fabric pieces with an iron to remove any wrinkles. This will make piecing them together much easier and ensure the seams are neat and crisp.
- Organizing Your Pieces: Lay out the hexagon pieces on a flat surface and experiment with different arrangements before starting to sew. This will give you a better idea of how the colors and patterns flow together.
- Cutting the Batting: Don’t forget to cut a piece of quilt batting to match the size of your quilt top. This will be placed between the quilt top and backing for added warmth and texture.
3. Assembling the Hexagonal Quilt Pattern for Christmas
With your pieces cut, it’s time to assemble the hexagonal quilt top. This step involves sewing the hexagon pieces together to form rows and eventually the entire quilt top.
- Sewing Hexagons Together: Begin by pairing up two hexagons with right sides together. Use a quarter-inch seam allowance to sew them along one edge. Press the seam to one side to create neat and flat seams.
- Forming Rows: Continue sewing hexagons together to form rows. Once you have completed a row, press the seams to ensure they’re straight and flat. Be sure to match the edges precisely for a clean, professional finish.
- Joining the Rows: After completing all the rows of hexagons, begin sewing the rows together. Pin the rows in place and sew them with a quarter-inch seam allowance. Press the seams between each row as you go.
- Adding the Border: Once the quilt top is assembled, add the quilt border. Cut fabric strips to the desired width and sew them around the edges of your quilt top. This will frame the quilt and give it a finished look.
- Ensuring Evenness: As you sew the rows and borders, check that everything aligns properly. If necessary, trim any excess fabric to keep the edges even and smooth.
- Final Pressing: After all the rows and borders are sewn together, give the quilt top one final pressing to ensure everything is neat and in place before moving on to the next steps.
4. Quilting and Finishing the Hexagonal Quilt Pattern for Christmas
Once your quilt top is ready, it’s time to quilt and add the final touches. This step transforms your quilt into a functional, beautiful piece that’s ready for use or display.
- Layering the Quilt: Lay your quilt backing on a flat surface, followed by the quilt batting. Finally, place the quilt top on top of the batting. Pin the layers together to prevent shifting as you quilt.
- Basting the Quilt: Use basting pins or spray basting to temporarily hold the quilt layers together. This will make quilting much easier and prevent the fabric from shifting during sewing.
- Quilting the Layers: Using your sewing machine or by hand, quilt the layers together. You can choose to quilt along the seams or create your own free-motion quilting design. Make sure to stitch through all three layers for added durability.
- Trimming the Edges: Once the quilting is finished, trim the excess batting and backing fabric to match the quilt top. This will give your quilt a clean and polished edge.
- Binding the Quilt: For a finished look, add quilt binding around the edges. This can be made from the same fabric as the quilt or a complementary color. Fold the binding over the edges and sew it in place to secure it.
- Final Pressing: After attaching the binding, give the quilt one final press to smooth out any wrinkles and ensure that all seams are flat and neat.
FAQ About the Hexagonal Quilt Pattern for Christmas
1. Can I use a different shape for my quilt?
Yes, you can experiment with different shapes like squares or triangles, but the hexagonal shape gives a unique and modern look to your quilt.
2. How many hexagons do I need to make for a quilt?
The number of hexagons will depend on the size of the quilt you want to make. For a lap quilt, you might need around 30-40 hexagons, while a larger bed quilt will require many more.
3. Can I use pre-cut fabric for this project?
Absolutely! Pre-cut fabric like charm packs or fat quarters can make this project faster and more convenient.
4. Do I need a longarm quilting machine for this project?
No, you can quilt this quilt on a regular sewing machine. A longarm quilting machine is not necessary for this project.
5. How do I make sure my hexagons line up perfectly?
Use precise cutting and sewing techniques to ensure your hexagons line up evenly. Pinning and pressing the seams carefully will help achieve a neat, aligned quilt.
6. Can I make this quilt pattern for other holidays or occasions?
Definitely! While this pattern is perfect for Christmas, you can adapt the colors and fabrics to suit any holiday or event, such as Thanksgiving, birthdays, or springtime quilts.
Join our VIP broadcast list and gain access to exclusive patterns, all for free. As a VIP member, you’ll receive the best patterns daily, delivered directly to your device. ✨📱 It’s a unique opportunity to stay up-to-date with the latest trends and designs, curated just for you. Don’t miss out on enhancing your projects and discovering new inspirations with the best patterns every day! 🎨🔝
Conclusion
The Hexagonal Quilt Pattern for Christmas – TUTORIAL is a fun, festive, and rewarding project to try this holiday season. With a few simple materials and some patience, you can create a beautiful quilt that will be cherished for years to come.
PATTERN HERE
We hope this step-by-step guide has helped you get started on your quilting journey. Don’t forget to share your progress with us, and feel free to leave any comments or suggestions! Happy quilting!


