
Pie Carrier Sewing Pattern

The Hidden Wells Quilt Pattern Tutorial is a delightful guide for quilters who want to explore dynamic designs with minimal stress. Known for its mesmerizing, woven appearance, this quilt block gives the impression of intricate piecing while actually being built through clever strip arrangements and cutting techniques.
The best part? It’s beginner-friendly, fun, and can be completed using fabric you may already have in your stash.
This pattern is often described as “magic in motion” because of how the layout transforms once you make just a few strategic cuts.
The Hidden Wells Quilt Pattern Tutorial shows you how to achieve a vibrant, complex look without needing to sew dozens of tiny pieces together. That’s the magic of the method—ease meets elegance.
Throughout this Hidden Wells Quilt Pattern Tutorial, you’ll learn how to select fabrics, prepare your strips, assemble the blocks, and lay out your quilt for a visually captivating finish.
Whether you’re new to quilting or have years of experience, this tutorial offers something new and satisfying for everyone who wants a bold, modern quilt style with classic roots.
The Hidden Wells Quilt Pattern Tutorial is built on a smart yet simple technique. It begins by sewing strips of fabric together, much like the beginning of a traditional strip quilt. But the magic happens when these strip sets are rotated, cut, and reassembled.
The original method for Hidden Wells quilts was designed to maximize fabric usage while creating an optical illusion of depth and movement. This creates a layered look that seems more complex than it is. The results are impressive, and the process is incredibly satisfying.
To start, you’ll sew together several strips of different fabrics—usually four to six strips per set. You can play with color contrast, gradients, or even use all scrappy fabrics for a charming, eclectic finish.
After pressing your strip sets, you’ll cut them into squares, then rotate the squares at different angles. By sewing them back together in a certain order, a striking “woven” effect appears as if by magic. It’s this unexpected result that makes the Hidden Wells Quilt Pattern Tutorial so exciting to follow.
The technique encourages experimentation. Even if you follow the tutorial precisely, your fabric choices will make your quilt look completely unique. That’s part of the joy of quilting—no two creations are exactly alike.
Many quilters fall in love with this block because it offers immediate gratification. From the first set of cuts to the final layout, you’ll see your design come to life quickly, which keeps the creative energy high.
Color choice is a key part of the Hidden Wells Quilt Pattern Tutorial, as it can dramatically change the final appearance of your quilt. For the most striking results, you’ll want to mix lights, darks, and mediums in a way that enhances contrast and depth.
Solid fabrics are a safe and striking choice, especially for beginners. They help emphasize the geometric shapes and movement within the blocks. On the other hand, using small prints or batiks can add texture and interest without overwhelming the design.
Choose fabrics that work together but have distinct differences. For instance, you might select a range of blues, from navy to pale sky, then add in a contrasting pop of coral or mustard to bring vibrance.
It’s helpful to lay your fabric strips next to each other before sewing to get a preview of how the colors interact. Rearranging them until you find the right order can make a big difference in the end result.
Many quilters use pre-cut fabric bundles such as jelly rolls or fat quarters for this pattern. That can make prep work faster and ensure that the fabrics coordinate well without much guesswork.
No matter what palette you choose, remember that pressing and consistent seam allowances will help your final quilt look clean and professional. The Hidden Wells Quilt Pattern Tutorial highlights how even bold color choices can feel harmonious when the structure is crisp and well-pressed.
Following the Hidden Wells Quilt Pattern Tutorial means breaking the project into manageable steps. Begin by selecting four to six fabrics and cutting them into strips, usually around 2.5 inches wide. Sew these strips together lengthwise to form a single unit.
Once your strip set is complete, press the seams all in one direction for consistency. Then, square the edges and cut the strip set into equal-sized squares—usually around 8.5 inches, depending on your original strip length.
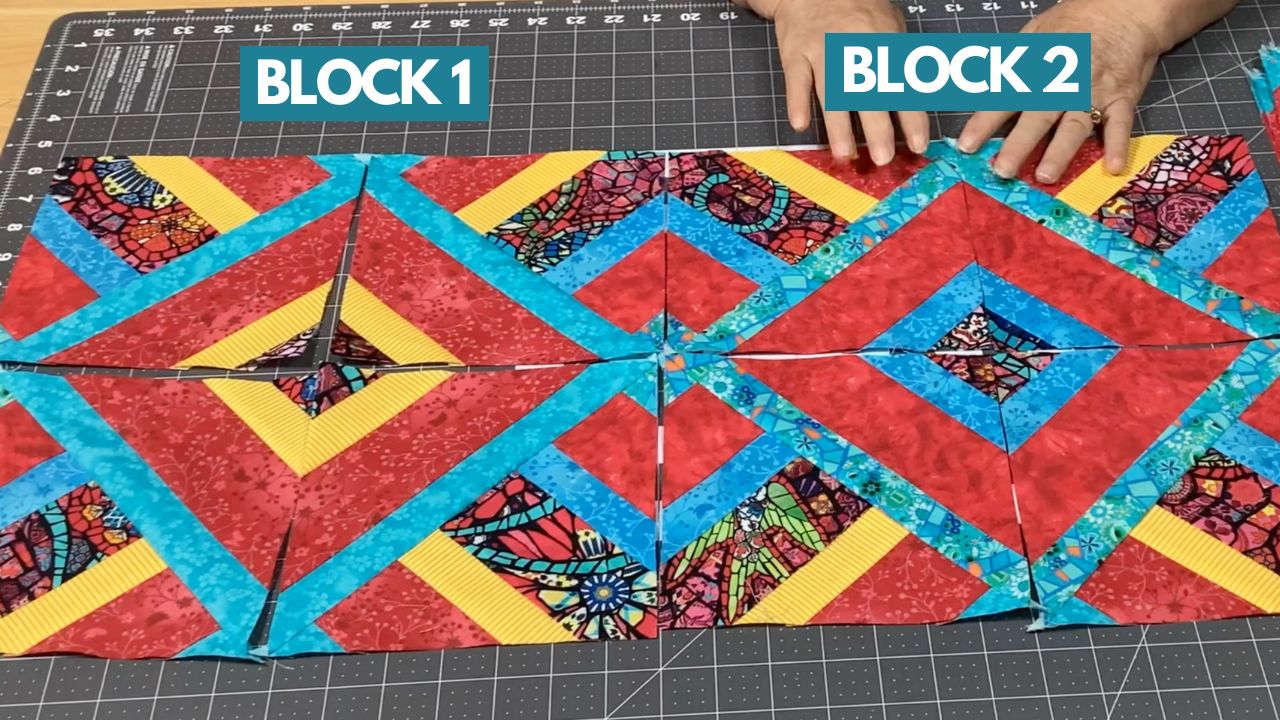
Now comes the exciting part. Rotate each square according to the tutorial’s instructions. Common arrangements include turning some pieces 90 or 180 degrees. This rearrangement is what gives the pattern its illusion of movement.
After rotating the squares, sew them together into rows, and then sew the rows into a full block. Press seams carefully to ensure a flat, smooth finish. You’ll begin to see the “woven” look appear immediately.
Repeat the process with more strip sets and different fabric arrangements to add variety across your quilt. Each set creates a new pattern depending on the rotation and layout, giving the project endless versatility.
As your blocks come together, you can begin planning your quilt top layout. Consider alternating block directions or adding sashing for extra visual interest. The Hidden Wells Quilt Pattern Tutorial allows for creativity at every step, making it perfect for personal expression.
After assembling your quilt blocks, the next step in the Hidden Wells Quilt Pattern Tutorial is to arrange and piece your final quilt top. Lay the blocks on a design wall or floor to test out different configurations. This helps balance colors and create a harmonious overall effect.
Once you’re satisfied with the layout, begin sewing the blocks together row by row. Press seams as you go, nesting them when possible to reduce bulk and ensure accurate alignment.
Next, add borders if desired. Borders can frame the quilt and give it a finished look. A narrow inner border and a wider outer border work well for most Hidden Wells quilts, though this is entirely up to your taste.
Prepare your quilt sandwich by layering the backing, batting, and quilt top. Baste using your preferred method—safety pins, spray baste, or hand basting all work depending on your comfort and tools available.
For quilting, consider using straight-line stitching to emphasize the geometry of the pattern. Stitch-in-the-ditch, diagonal lines, or echo quilting all complement the design without overwhelming it.
Finally, bind your quilt using double-fold binding for durability. Choose a fabric that complements your quilt top or adds a bold edge. After binding, label your quilt with your name and date—then step back and admire your stunning creation, thanks to the Hidden Wells Quilt Pattern Tutorial.
What makes the Hidden Wells Quilt Pattern special?
The Hidden Wells technique gives a visually complex result with a simple method. It’s ideal for quilters who want to create dynamic designs with easy strip piecing and clever block rotation.
Is the Hidden Wells Quilt Pattern suitable for beginners?
Yes! This pattern is very beginner-friendly. As long as you can sew straight seams and cut accurately, you can make a beautiful quilt using this tutorial.
Do I need special tools to complete this quilt?
Basic quilting tools like a rotary cutter, ruler, and sewing machine are all you need. A design wall or large surface can help with layout, but it’s not required.
How much fabric will I need?
The exact yardage depends on your desired quilt size, but generally, six ¼-yard cuts (or one jelly roll) are enough for a lap-size quilt. Additional fabric is needed for backing, batting, and binding.
Can I use scraps instead of new fabric?
Absolutely! This is a great scrap-busting project. Just be sure your fabric strips are consistent in width and long enough for even square cuts.
What quilting style works best for this pattern?
Straight-line or echo quilting tends to enhance the design. However, free-motion quilting can also add texture if done with care around the block lines.
The Hidden Wells Quilt Pattern Tutorial offers an inspiring, approachable way to create a quilt that looks far more complex than it is. With just a few fabric strips and smart cutting techniques, you can achieve a stunning woven effect that brings your fabric choices to life. We explored how to understand the pattern, choose the right fabrics, follow the step-by-step process, and finish your quilt with care.
This tutorial empowers quilters of all skill levels to dive into a creative, rewarding project. If this guide helped you or sparked new ideas for your quilting journey, please leave your honest opinion and any suggestions you may have. Your feedback helps us improve and keeps the quilting community warm, creative, and inspiring.


