
Pie Carrier Sewing Pattern

How to make a crossbody bag – Pattern is an exciting and creative project for anyone who loves sewing and crafting. Learning how to make a crossbody bag – Pattern allows you to design a functional accessory that fits your personal style perfectly.
Unlike store-bought bags, a handmade crossbody bag reflects your choices in color, fabric, and detail, making it unique and special. This guide is tailored to help both beginners and experienced crafters understand every step in creating a beautiful, durable crossbody bag.
Understanding the components of a crossbody bag is essential before starting your project. A crossbody bag typically includes an adjustable strap, multiple compartments, and a secure closure like a zipper or magnetic snap.
By following how to make a crossbody bag – Pattern, you will learn to assemble these components efficiently, ensuring a polished final product. The process also strengthens your sewing skills, from stitching straight seams to working with various fabrics.
Making your own bag is not only a cost-effective solution but also a fun way to express creativity. While many people buy ready-made bags, creating your own gives you complete control over the design and functionality.
When learning how to make a crossbody bag – Pattern, you can experiment with different shapes, pocket placements, and even decorative details. This hands-on experience results in a stylish, personalized accessory that stands out.
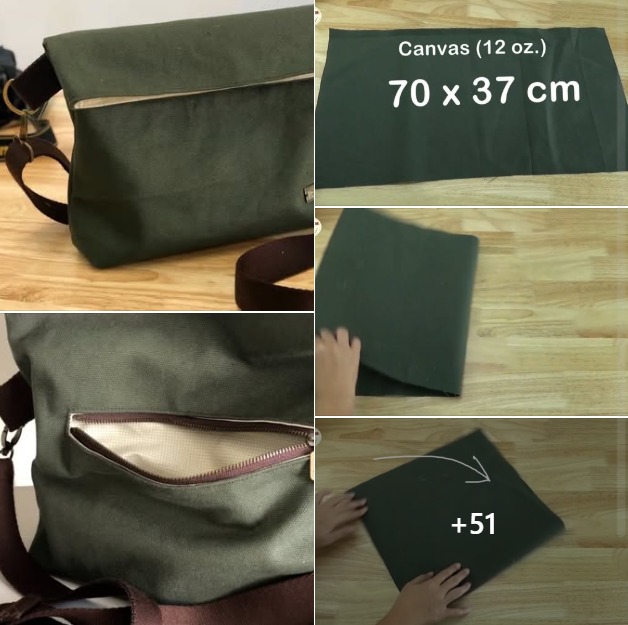
Selecting the correct materials is a crucial first step in how to make a crossbody bag – Pattern. Start with a durable fabric for the exterior, such as canvas, denim, or faux leather. These fabrics support the weight of everyday items and maintain the bag’s shape over time.
The lining is equally important because it affects the bag’s durability and appearance. Choose a strong yet smooth fabric like quilting cotton or polyester blends. A high-quality lining protects the contents of your bag and provides a professional finish.
Hardware also plays a big role. Zippers, buckles, and adjustable straps must be both functional and durable. Metal hardware tends to last longer, while plastic alternatives can work for lighter bags. Proper hardware ensures your bag remains secure and easy to use.
Thread selection affects the strength of your seams. Heavy-duty cotton or polyester thread is recommended. The needle type should match the fabric; for example, a leather needle is ideal for faux leather or thick canvas. Proper sewing supplies are critical to successful bag construction.
Choosing colors and patterns adds personality to your crossbody bag. Solid colors create classic looks, while patterns or prints can make your bag more eye-catching. Mixing fabrics or textures can give your design a unique flair.
Consider additional elements like pockets or decorative stitching. These details enhance functionality and aesthetic appeal. By paying attention to these materials and accessories, you set a strong foundation for learning how to make a crossbody bag – Pattern.
Accurate cutting is essential in how to make a crossbody bag – Pattern. Start by measuring twice and cutting once. Proper measurements ensure your bag pieces align perfectly when sewn together, avoiding uneven edges or warped shapes.
Marking the fabric with chalk or a washable marker helps guide your sewing. It is especially important for placement of pockets, straps, and closure elements. Clear markings prevent mistakes and save time during assembly.
Pre-washing some fabrics prevents shrinkage later. Cotton fabrics, in particular, may shrink after the first wash. Preparing your fabric beforehand ensures your finished bag maintains its intended size and shape.
Interface or stabilizer may be needed for added support. This is especially important for thin fabrics or for areas like the bag base. Interfacing gives structure to your bag and prevents sagging over time.
Pay attention to the direction of patterned fabrics. Align designs consistently to maintain a professional appearance. Symmetry and consistency are key in creating visually appealing bags.
Label your pieces before sewing. This simple step prevents confusion when assembling multiple layers, ensuring that each piece is used in the correct position. Proper preparation is a key part of mastering how to make a crossbody bag – Pattern.
Start sewing by attaching pockets and other small components first. These should be secured before assembling the main bag pieces. Correct placement is essential for both functionality and style.
Assemble the main body by sewing side seams and bottom edges. Ensure your seams are straight and even for a professional look. Pressing seams open with an iron improves the bag’s appearance and durability.
Attach the lining to the exterior fabric. This step provides a finished inside look while adding structural support. Take your time to align edges accurately for a neat result.
Install the hardware, including zippers and strap attachments. Ensure zippers are straight and functional, and straps are securely fastened to avoid wear and tear. This step is crucial for usability and longevity.
Topstitching adds durability and a professional finish. Stitch along the edges and key seams to reinforce the structure. This detail enhances both appearance and strength.
Finally, inspect all seams and components. Make any necessary adjustments or reinforcements. By carefully sewing each part, you ensure your bag is both beautiful and practical, completing the essential steps of how to make a crossbody bag – Pattern.
Finishing touches elevate your bag from basic to stylish. Add decorative stitching, embroidery, or fabric appliques for a personal touch. Customization allows you to make the bag truly your own.
Consider interior organization. Adding multiple pockets or compartments can improve usability. Think about how you will use the bag daily and design features accordingly.
Secure all hardware and check closures. Zippers, snaps, and buckles should function smoothly and be reinforced for durability. Proper finishing ensures your bag lasts for years.
Edge finishing prevents fraying. Use bias tape or overlocking stitches where necessary. Clean edges maintain a professional look and improve the bag’s overall quality.
Experiment with strap styles. Adjustable, braided, or padded straps add comfort and versatility. Custom strap design is an opportunity to enhance both functionality and aesthetic.
Final ironing or pressing of the bag removes wrinkles and gives a polished appearance. Your bag is now ready to use, showcasing your craftsmanship and the skills learned in how to make a crossbody bag – Pattern.
Q1: How long does it take to make a crossbody bag?
The time depends on skill level, fabric choice, and bag complexity. Beginners may take several hours, while experienced sewers can complete a simple bag in 2-3 hours.
Q2: Can I use recycled fabric for my bag?
Yes! Using recycled fabric is eco-friendly and often adds unique textures and patterns. Make sure it is durable enough to support daily use.
Q3: What type of thread is best for sewing a crossbody bag?
Heavy-duty polyester or cotton thread is recommended for strength. Choose a color that matches or contrasts with your fabric for design purposes.
Q4: How do I prevent the bag from sagging?
Using interfacing or stabilizers on the main body and bottom of the bag provides structure and prevents sagging.
Q5: Can I add adjustable straps to my bag?
Absolutely. Adjustable straps improve comfort and allow you to customize the length to suit your needs.
Q6: Is it necessary to pre-wash fabric?
For natural fabrics like cotton, pre-washing prevents shrinkage and color bleeding. Synthetic fabrics usually don’t require pre-washing.
Q7: How do I make my bag more professional-looking?
Pay attention to straight seams, precise cutting, proper lining, and clean edge finishing. Topstitching also enhances the professional appearance.
In this article, you learned the complete process of how to make a crossbody bag – Pattern, from choosing materials to adding finishing touches. You now understand the importance of fabric selection, accurate cutting, proper sewing techniques, and thoughtful customization.
Following these steps ensures a stylish, functional, and durable bag. Your handmade crossbody bag reflects your creativity, skill, and personal style. We would love to hear your honest opinion about this tutorial and any suggestions for future bag patterns. Share your experience and inspire others to create their own unique crossbody bags.


