
If you’ve been searching for the perfect solution to organize your crafting supplies, this guide on how to make a large craft storage tote bag with multiple pockets is exactly what you need.
Whether you love sewing, quilting, crochet, or any other craft, having a spacious and functional storage tote makes your creative journey smoother and more enjoyable.
A large craft storage tote bag with multiple pockets is more than just a bag. It’s a personalized organization system designed to hold everything from scissors, threads, fabrics, and hooks to glue, rulers, and even your portable projects.
The best part? You can design it to fit your unique needs with as many compartments and pockets as you like.
In this comprehensive guide, you’ll learn how to make a large craft storage tote bag with multiple pockets step by step.
We will cover the materials needed, cutting and assembly tips, sewing techniques, and creative ways to personalize your bag. This tutorial is suitable for beginners and seasoned crafters alike.
1. Materials Needed for How to Make a Large Craft Storage Tote Bag with Multiple Pockets
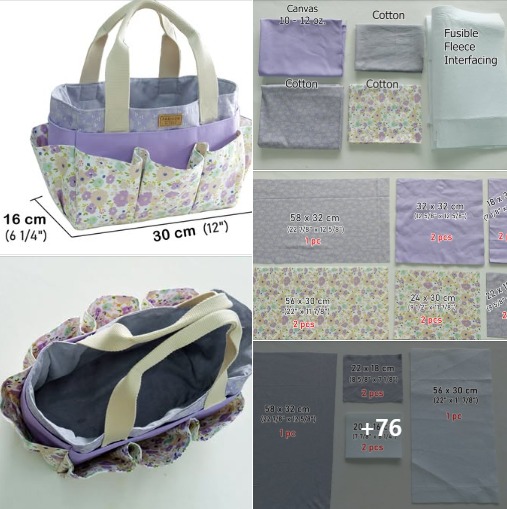
To start how to make a large craft storage tote bag with multiple pockets, gathering the right materials is key. Your choice of fabric, stabilizers, and notions will determine the durability and appearance of the finished tote.
Begin with sturdy fabric. Canvas, denim, duck cloth, or quilting cotton with interfacing are excellent choices. These materials provide the necessary structure and durability for a large craft bag.
You’ll also need a lining fabric. Cotton is ideal for linings as it’s easy to work with, lightweight, and comes in many colors and prints to suit your style.
Stabilizers are essential for giving your bag strength. Fusible fleece or foam stabilizer will make the tote stand upright and hold its shape, especially when it’s loaded with crafting tools.
Gather zippers, velcro, or magnetic snaps depending on how you want the pockets to close. Open pockets are quicker to sew, but zippered or snapped pockets provide extra security.
Don’t forget sturdy webbing or fabric for the handles. If you plan on carrying heavy supplies, reinforced handles are a must to ensure comfort and durability.
Additional notions include thread, scissors, a rotary cutter, cutting mat, pins or clips, and a sewing machine with a heavy-duty needle if using thick fabrics.
2. Cutting and Preparing Fabrics – Step-by-Step
The next step in how to make a large craft storage tote bag with multiple pockets is cutting and preparing your fabrics. Precision at this stage makes assembly smoother later on.
Start by determining the size of your tote. A common size is 18 inches wide, 14 inches tall, and 6 inches deep. Adjust these measurements based on how large you want your tote to be.
Cut two panels for the exterior and two panels for the lining using the main tote measurements. Also, cut two pieces of stabilizer the same size as your exterior panels to reinforce the bag.
For the pockets, decide how many you want and whether they are internal or external. Cut rectangles for each pocket, adding 1 inch to both width and height for seam allowances and hems.
Prepare the bottom and side panels if your design has a boxed base. This helps give the bag depth and allows it to stand on its own. Cut these accordingly with matching stabilizers.
Fuse the stabilizer to the wrong side of the exterior fabric pieces using an iron, following the manufacturer’s instructions. This step adds structure to the tote.
Fold and press the top edge of each pocket down by 1/2 inch twice to create a neat hem. Stitch the hem in place before attaching the pockets to the main panels.
3. Sewing the Tote – Assembly Process
Now it’s time to begin sewing in this guide on how to make a large craft storage tote bag with multiple pockets. Take it step by step for best results.
Start by attaching the pockets. Place them on the exterior panels where desired, pin them in place, and sew along the sides and bottom. If you want divided pockets, sew vertical lines to split them into sections.
With the pockets in place, sew the front and back exterior panels together at the sides and bottom. If your design includes side or bottom panels, sew those on now to form the bag’s box shape.
Repeat the same process with the lining fabric. Leave a 5- to 6-inch gap at the bottom of the lining for turning the bag right side out later.
Prepare the handles by folding the fabric or webbing, then sewing along the edges to reinforce them. Position the handles on the exterior tote, typically 4 inches from each side seam, and baste them in place.
Place the exterior tote inside the lining with right sides facing each other. Align the top edges, pin around, and sew all the way around the top.
Turn the tote right side out through the opening in the lining. Push the lining inside the tote, then stitch the lining closed either by hand or with a machine.
4. Adding Details and Personalization
The fun part of how to make a large craft storage tote bag with multiple pockets is adding custom details that make it truly yours.
Topstitch around the top edge of the tote for a finished look and added durability. This also helps the bag keep its shape after multiple uses.
Consider adding labels or tags. A personalized name tag or label with a fun phrase can make the bag special and unique to you.
Decorate the exterior with applique, embroidery, or fabric paint. These details can match your personality or the theme of your craft room.
If you want more functionality, add elastic bands inside the bag to hold spools of thread, scissors, or crochet hooks securely.
For extra durability, reinforce the bottom of the bag with a removable insert made from cardboard covered in fabric. This helps the tote hold heavier items without sagging.
Lastly, experiment with color combinations. Use contrasting fabrics for pockets, lining, and handles to make your tote visually interesting and joyful to use.
FAQ – How to Make a Large Craft Storage Tote Bag with Multiple Pockets
Is this project suitable for beginners?
Yes, the steps are straightforward, and it’s a great sewing project for beginners who want to practice basic sewing techniques while creating something useful.
What is the best fabric for a craft tote bag?
Sturdy fabrics like canvas, denim, or cotton with interfacing work best. They provide the strength needed to hold heavy craft supplies.
How many pockets should I include?
It depends on your needs. Most people include 4–8 pockets, both inside and outside, but you can customize based on the tools you use most often.
Can I wash my craft tote bag?
Yes, if you use washable fabrics and materials. Machine wash on a gentle cycle and air dry to keep the bag in good condition.
How long does it take to make this tote bag?
For beginners, it might take 4–6 hours. Experienced sewists can complete it in 2–3 hours, depending on the complexity and number of pockets.
Can I add zippers to the pockets?
Absolutely. Zippers are great for securing small items. You can add them to external or internal pockets for extra functionality.
Conclusion
Learning how to make a large craft storage tote bag with multiple pockets is not only a rewarding sewing project but also a practical solution for organizing your crafting essentials. From choosing durable fabrics to sewing functional pockets and adding personalized touches, this guide has walked you through every step.
VIDEO TUTORIAL
I hope this tutorial inspires you to create your own tote bag that fits your needs perfectly. Please leave your honest feedback in the comments and share any suggestions or ideas for future projects you would like to see!


