
Pie Carrier Sewing Pattern

If you’ve ever wondered how to make a little pouch bag with 3 compartments, you are in the right place. This practical and stylish pouch is perfect for organizing makeup, sewing supplies, craft tools, or everyday essentials. It’s small, versatile, and surprisingly simple to create—even if you’re new to sewing.
The beauty of learning how to make a little pouch bag with 3 compartments is that it offers a functional design while allowing you to play with fabrics, colors, and patterns. Whether you want something cute and colorful or sleek and minimal, this project can be customized to fit your personal style.
In this comprehensive tutorial, I’ll guide you step-by-step on how to make a little pouch bag with 3 compartments, including the materials you’ll need, the sewing process, and helpful tips to make your project successful.
This pouch is an excellent handmade gift or a useful addition to your own collection of accessories.
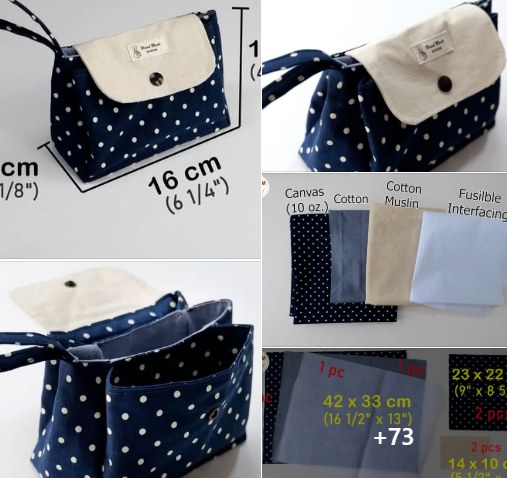
Before diving into the process of how to make a little pouch bag with 3 compartments, it’s important to gather all the materials needed. This ensures a smooth sewing experience without interruptions.
First, choose your fabric. You’ll need three different fabric pieces for the outer layers, lining, and internal compartments. Cotton fabric is highly recommended because it’s easy to work with and durable.
Next, you’ll need interfacing. Fusible interfacing helps give your pouch structure and stability, especially if you want the pouch to hold its shape over time.
Zippers are essential. For this pouch, you will typically need two or three zippers, depending on whether you prefer separate closures for each compartment or a single zipper for the main pouch.
A sewing machine is ideal for this project, but if you’re patient, hand sewing can also be done. Make sure your machine is equipped with a zipper foot to help sew the zippers neatly.
Basic sewing tools like scissors, fabric clips or pins, measuring tape, and a seam ripper are necessary. These tools make the process easier and more accurate.
Lastly, you might want optional embellishments such as fabric labels, buttons, or decorative stitching to personalize your pouch and make it truly one of a kind.
Now that you know how to make a little pouch bag with 3 compartments starts with good preparation, let’s begin cutting the fabric pieces accurately.
Start by measuring and cutting the outer fabric. For a standard pouch, each outer piece can be around 8 inches wide by 6 inches tall. You will need two outer pieces.
Cut the same size pieces for the lining. These will form the inside of your pouch and the divider sections.
For the compartments, cut additional fabric pieces the same size as the lining. You will need two pieces for the internal dividers.
Cut interfacing pieces for the outer fabric to add sturdiness. Iron the fusible interfacing onto the back of the outer fabric following the manufacturer’s instructions.
If using patterned fabrics, take a moment to align the design correctly. This ensures your finished pouch looks neat and professional.
The key to understanding how to make a little pouch bag with 3 compartments is mastering the assembly process. Here’s how to do it step by step.
Begin by sewing one zipper onto a lining piece and one divider piece, placing the zipper between them, right sides facing the zipper tape. Sew across the top edge using a zipper foot.
Open the fabric and topstitch along the zipper to hold the fabric flat and give a polished look. Repeat this process for the second divider and the remaining lining piece with another zipper.
Now you have two zipped compartments. Place them back to back with the wrong sides facing each other. This forms the inner double-compartment section of your pouch.
Align this double-compartment section with the outer fabric pieces. The outer pieces should be placed right sides together with the zipper edges matching the top.
Pin or clip the layers securely. Check that all edges align neatly, particularly around the zippers, as this will affect how the pouch looks when finished.
Sew around the edges, leaving an opening at the bottom for turning the pouch inside out. Carefully backstitch over zipper ends for extra durability.
As you continue learning how to make a little pouch bag with 3 compartments, it’s time to focus on assembling everything and adding the final touches.
Clip the corners of the pouch to reduce bulk when turning it right side out. Be careful not to cut through the stitching.
Turn the pouch inside out through the opening you left. Push out the corners gently using a blunt tool like a chopstick or the tip of scissors.
Once fully turned, stitch the opening closed using either a ladder stitch for an invisible finish or a simple straight stitch if it’s inside the lining.
Press the pouch with an iron to smooth out any wrinkles. Pay special attention around the zippers to ensure they lay flat and function correctly.
Test all the zippers to confirm that each compartment opens and closes smoothly. Make any adjustments now if needed before completing the pouch.
Add any decorative touches like sewing on a label, attaching a wrist strap, or using contrasting thread for a fun decorative topstitch around the edges.
1. Is this pouch suitable for beginners?
Yes! The project is beginner-friendly, especially if you have basic sewing skills and are comfortable using a sewing machine with zippers.
2. What fabric works best for this pouch?
Cotton fabric is ideal because it’s easy to sew and sturdy enough for daily use. You can also use canvas for a more durable pouch.
3. How many zippers do I need?
You will need two or three zippers depending on whether you want separate zippers for each compartment or one main zipper for the entire pouch.
4. Can I hand sew this pouch?
Yes, but it will take longer. A sewing machine is recommended, especially for sewing through multiple layers and zippers.
5. How do I make the pouch larger or smaller?
Simply adjust the measurements when cutting your fabric. Make sure all pieces (outer, lining, and compartments) are resized consistently.
6. Is the pouch washable?
Yes, if made with cotton or durable fabrics, it can be hand washed or machine washed on a gentle cycle. Always check if your interfacing is washable too.
Now you’ve learned step-by-step how to make a little pouch bag with 3 compartments, from choosing the right materials to assembling and finishing it beautifully. This pouch is not only functional but also a wonderful way to express your creativity with fabric and color.
Whether you’re organizing your essentials, gifting it to a friend, or adding it to your handmade craft collection, the skills you’ve learned today can be used again and again. I truly hope this tutorial has been helpful. Please leave your honest opinion in the comments and feel free to share suggestions or ideas for future projects. Your feedback is valuable and helps me continue creating useful and inspiring content for everyone who loves handmade crafts.


