
Pie Carrier Sewing Pattern

Learning how to make a small duffle bag – free pattern is a fantastic project for sewing enthusiasts of all levels. Whether you’re crafting it for travel, gym gear, or as a handmade gift, this pattern offers a practical and fun way to create something truly personal.
This guide will walk you through every step of the process, from gathering your materials to the final stitches.
The beauty of a small duffle bag is its versatility—compact yet spacious, lightweight but strong. And the best part? You don’t need to be a sewing expert to make one.
If you’re passionate about DIY or just looking for your next creative project, the how to make a small duffle bag – free pattern tutorial is the perfect way to sharpen your sewing skills while producing a useful and stylish accessory.
To begin learning how to make a small duffle bag – free pattern, you’ll first need to collect your materials. Choose a sturdy fabric like canvas, denim, or cotton duck. These materials are durable and easy to work with, perfect for carrying light or medium-weight items.
You’ll also need a lining fabric. This could be something lighter like cotton or polyester. A lining helps protect your items and gives the duffle bag a polished, professional appearance.
Don’t forget the zipper! A 14- to 16-inch zipper is usually ideal for a small duffle bag. Choose a strong, smooth-gliding zipper for the best results. If you want a pop of contrast, pick a bold color.
Other necessary items include thread that matches or contrasts your fabric, interfacing for structure, and basic sewing tools like scissors, pins, measuring tape, and a sewing machine. If you’re new to sewing, this project is a great chance to get familiar with these tools.
You may also want to add straps made from fabric, webbing, or even recycled belt material. The straps should be comfortable and securely stitched to hold the weight of your items.
Finally, consider adding optional touches like interior pockets, decorative patches, or embroidery to personalize your bag. Once everything is gathered, you’re ready to move on to cutting and constructing your duffle bag.
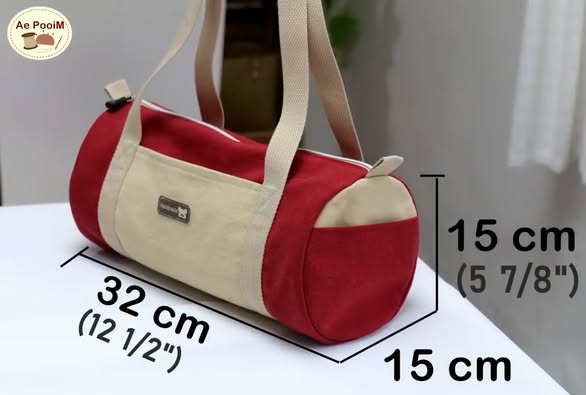
To make your small duffle bag, start by measuring and cutting your fabric. The basic pieces you’ll need include two rectangles for the main body, two small circles or ovals for the end panels, and two long strips for the straps.
Use a ruler and chalk or a fabric marker to mark your measurements before cutting. Accuracy is key here—clean, precise cuts will make your sewing process much smoother and help everything line up correctly.
After cutting your main body pieces, you’ll want to cut interfacing of the same size and fuse it to the wrong side of the fabric. This gives the bag structure and helps it keep its shape over time, especially around the zipper and straps.
Prepare your lining fabric by cutting the same pieces as your main fabric. This ensures your lining will fit perfectly inside the finished bag. If you’re adding any interior pockets, now is the time to sew them onto one of the lining pieces.
Next, prepare the zipper panel. If your pattern includes a separate zipper strip, sew the zipper between two narrow fabric strips, then attach that to the main panels. This step can feel tricky at first but adds a clean and secure finish to your bag.
Once all your pieces are cut and prepared, lay them out in the order they’ll be assembled. This helps visualize the finished product and ensures you haven’t missed any crucial parts.
Begin the assembly of your small duffle bag by sewing the zipper panel to the top edges of the two main body pieces. Make sure the zipper is centered and aligned properly. Topstitch along the seam for added strength and a neat look.
With the zipper in place, fold the fabric so the right sides are together and sew the bottom edge. Then, sew the side seams, leaving the zipper halfway open to allow for turning later.
Attach the circular or oval end panels next. Pin them to the open ends of your bag, aligning the edges carefully. Sew slowly around the curves, easing the fabric as needed to avoid puckering.
Once the outer bag is assembled, it’s time to prepare and insert the lining. Sew the lining panels together the same way as the outer shell, but leave a small gap at the bottom for turning. Do not insert end panels into the lining—it will conform to the outer shell later.
Place the outer bag inside the lining (right sides facing), aligning the top edges. Sew around the top opening, encasing the zipper seam. Then, pull the bag through the opening left in the lining and stitch it closed.
With your bag turned right-side out, press all the seams and topstitch around the opening to secure the lining and give a finished look. You’re almost done!
Now comes the fun part—customizing your small duffle bag! First, attach the straps. You can use premade webbing or sew your own using folded and topstitched fabric. Attach them securely with box or X stitches.
If you’d like to add a shoulder strap, sew D-rings into the side seams and make an adjustable strap with clips. This adds convenience and versatility to your duffle bag.
Personal touches make your project truly unique. Try adding an iron-on patch, custom embroidery, or a monogram to the front of the bag. These details turn your bag into a statement piece.
You can also experiment with the fabric choice. Denim gives a casual look, while faux leather offers something more chic. Mixing prints—like florals with stripes—can add a trendy and playful vibe.
For additional utility, add outer pockets for your phone or water bottle. Just be sure they’re sewn on securely and align with the overall design.
Take a moment to admire your finished project. You’ve followed the how to make a small duffle bag – free pattern guide and now have a handmade, functional, and beautiful bag you can use or gift proudly.
Is this small duffle bag suitable for beginners?
Yes! The pattern is straightforward, and the steps are broken down clearly. Even if you’re new to sewing, you can complete this project with a bit of patience.
What type of fabric is best for this duffle bag?
Canvas, cotton duck, or denim work great for durability. For a lining, use cotton or polyester.
Can I make this duffle bag without a sewing machine?
While it’s possible to hand sew, a sewing machine is highly recommended for strength and efficiency.
How long does it take to make a small duffle bag?
On average, it takes 2–4 hours depending on your skill level and any customizations.
Can I sell bags made from this pattern?
Yes! Since this is a free pattern, you’re welcome to sell handmade versions as long as they are your own work.
How can I make the bag waterproof?
Use waterproof canvas or add a water-resistant liner to help keep contents dry.
We’ve explored every step of how to make a small duffle bag – free pattern—from selecting fabric and cutting pieces to sewing and adding final custom touches. This project is perfect for building your sewing skills while creating something truly useful and stylish.
Whether you’re crafting a gym bag, an overnight pouch, or a personalized gift, this small duffle bag fits the bill beautifully. With endless customization options, it’s a pattern you’ll want to revisit again and again.
If you enjoyed this tutorial, please leave a sincere comment below. We’d love to hear about your experience, any modifications you tried, or what other patterns you’d like to see next. Your feedback helps us grow and serve the creative community better!


