
Creating a beautiful snowflake block is a rewarding and enjoyable project for quilters of all skill levels. Whether you’re making a winter-themed quilt or simply enjoy the beauty of snowflakes, learning how to make a snowflake block can open up a world of possibilities.
In this article, we’ll walk you through the step-by-step process of making your very own snowflake block, covering everything from fabric choices to stitching techniques. By the end of this guide, you’ll be able to confidently add snowflake blocks to your quilting projects.
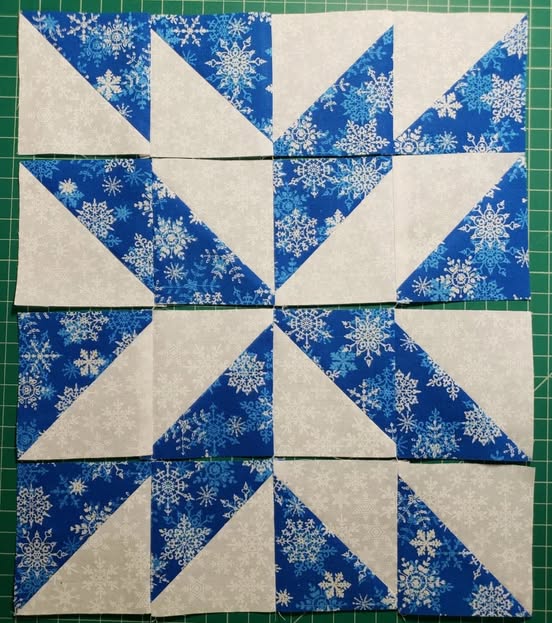
Snowflakes are intricate and delicate, making them a perfect motif for quilts, table runners, and other cold-weather décor. The symmetry and uniqueness of each snowflake inspire creativity, and quilting them allows you to explore different patterns and designs.
Whether you’re a beginner or an experienced quilter, how to make a snowflake block will be an exciting addition to your quilting skill set. With this guide, we aim to provide you with all the essential tips, tools, and techniques to make the process easier and more enjoyable.
While the snowflake block may seem complicated at first, breaking the process down into manageable steps makes it much more approachable.
From selecting the right fabrics to piecing and quilting, we’ll cover every detail necessary to create beautiful, snowflake-inspired designs. Keep reading to learn how to make a snowflake block that will be a stunning addition to your next quilt.
1. Materials Needed for Making a Snowflake Block
Before you dive into making your snowflake block, it’s important to gather the right materials. Here’s a list of essential tools and supplies to get started:
- Fabric: The most important material for your snowflake block is, of course, fabric. Choose fabrics that represent the winter theme, such as whites, blues, and silvers. You can also mix in some light pastel shades or even metallic fabrics for added sparkle.
- Rotary Cutter and Mat: A rotary cutter and mat are essential for cutting fabric accurately. The rotary cutter provides clean, straight cuts, while the mat protects your work surface and ensures precision.
- Ruler: A quilting ruler is crucial for measuring and cutting your fabric pieces accurately. It helps ensure that your snowflake block is symmetrical and well-constructed.
- Thread: Use a thread that matches or complements your fabric. Cotton thread is a popular choice for quilting, providing durability and a smooth finish.
- Sewing Machine: While you can hand-stitch a snowflake block, a sewing machine will speed up the process and allow for more precise stitching. Ensure your machine is properly threaded and ready to go.
- Quilting Pins: Quilting pins help hold your fabric pieces together as you stitch. They prevent shifting and ensure that your snowflake block pieces stay in place while you sew.
Once you’ve gathered these materials, you’re ready to start making your snowflake block. These tools will help ensure that your project goes smoothly and results in a stunning finished product.
2. Steps to Make a Snowflake Block
Making a snowflake block involves several steps, but by breaking the process down into stages, you’ll find it easy to follow. Here are the key steps for creating your block:
- Step 1: Cutting the Fabric
The first step in making your snowflake block is to cut your fabric into the correct shapes and sizes. Start by cutting your background fabric, which will form the base of the snowflake. Then, cut your snowflake pieces, which may include triangles, diamonds, or other shapes depending on the design you’re working with. Use a quilting ruler to measure and a rotary cutter for precision. - Step 2: Piecing the Snowflake
Once your fabric pieces are cut, it’s time to piece them together. Begin by aligning the edges of the snowflake pieces, and pin them in place. Use a quarter-inch seam allowance to stitch the pieces together, ensuring that they align perfectly. Repeat this process for each section of the snowflake design. - Step 3: Pressing the Seams
After each section is pieced together, press the seams open or to one side with an iron. Pressing helps set the stitches and ensures that your block lies flat, preventing puckers or wrinkles from forming. - Step 4: Assembling the Block
After piecing the individual components, it’s time to sew the sections of the snowflake together. Align the seams carefully, pinning the pieces in place. Stitch the sections together, making sure the points of the snowflake align. - Step 5: Adding Borders (Optional)
Some snowflake block patterns include a border to frame the design. If your pattern calls for a border, cut the fabric strips to size and sew them around the block, taking care to measure and sew evenly. - Step 6: Final Pressing and Trimming
Once the snowflake block is fully assembled, give it a final pressing to smooth out any wrinkles. Trim the edges of the block to ensure that it’s even and square. Your snowflake block is now complete and ready to be added to your quilt!
By following these simple steps, you can create a beautiful and precise snowflake block that will be the perfect addition to your winter-themed quilting projects.
3. Tips for Making a Snowflake Block
To help you make the best snowflake block possible, here are some helpful tips and tricks:
- Use a consistent seam allowance: Keeping your seam allowance consistent is crucial for ensuring that the snowflake block pieces fit together correctly. A quarter-inch seam allowance is standard for quilting, but make sure to check your pattern for specific instructions.
- Choose high-contrast fabrics: For a more striking snowflake block, choose fabrics that contrast with each other. A darker background with lighter snowflake pieces will create a bold, eye-catching design. You can also experiment with different color combinations to match the overall theme of your quilt.
- Work with small sections: If you’re new to quilting or working with intricate designs, consider breaking the snowflake block into smaller sections. This will make it easier to manage and help ensure that each part of the block aligns correctly.
- Double-check measurements: Before you begin cutting, always double-check the measurements for each piece. Accuracy is key to ensuring that your snowflake block turns out well and fits within your quilt design.
- Press as you go: Pressing your seams after each step may seem like an extra task, but it ensures that your block lays flat and that your seams are crisp. Don’t skip this step, as it will make a significant difference in the quality of your finished block.
- Experiment with fabric textures: If you want to add an extra layer of dimension to your snowflake block, experiment with different fabric textures. For example, try adding a touch of metallic fabric for a sparkle effect or a soft, flannel fabric for a cozy winter look.
By using these tips, you can create a snowflake block that is not only visually stunning but also perfectly crafted.
4. Common Mistakes to Avoid When Making a Snowflake Block
When learning how to make a snowflake block, it’s easy to make a few mistakes along the way. Here are some common errors and how to avoid them:
- Cutting fabric inaccurately: One of the most common mistakes is cutting fabric pieces incorrectly, which can throw off the entire block. Always use a rotary cutter and quilting ruler to ensure accurate cuts.
- Ignoring seam allowances: Not maintaining a consistent seam allowance can cause the block to be too small or uneven. Be sure to measure and stitch with a quarter-inch seam allowance to maintain accuracy.
- Not pressing the seams: Skipping the pressing step may result in a bulky or uneven block. Pressing each seam as you go ensures that the block stays flat and the edges are crisp.
- Forgetting to check the block’s size: After piecing the snowflake together, it’s important to measure the block to make sure it fits into your overall quilt design. If it’s slightly off, adjust the seam allowances or trim the edges.
- Not using enough pins: Sometimes, quilters skip pinning their fabric together before sewing, which can lead to misalignment. Be sure to pin the pieces in place to keep everything aligned during the stitching process.
By being mindful of these mistakes, you can avoid frustration and create a flawless snowflake block every time.
FAQ: Frequently Asked Questions about Making a Snowflake Block
1. What is the best fabric for making a snowflake block?
The best fabric for making a snowflake block depends on the look you want to achieve. Cotton fabric is a popular choice for quilting because it’s easy to work with and comes in a variety of colors and patterns. For a winter-themed block, consider using white, blue, or silver fabrics, and add metallic or glittery fabrics for extra sparkle.
2. How do I make sure my snowflake block is symmetrical?
To ensure that your snowflake block is symmetrical, take your time with cutting, measuring, and piecing. Use a quilting ruler and rotary cutter for accurate cuts, and always press your seams to keep the block flat and aligned.
3. Can I make a larger snowflake block?
Yes! You can make a larger snowflake block by adjusting the size of the individual pieces. Simply increase the measurements of the fabric pieces and adjust your seam allowances accordingly.
4. How do I add a border to my snowflake block?
To add a border to your snowflake block, cut fabric strips that are the desired width and sew them around the edges of the block. Make sure to measure carefully so that the border is even on all sides.
5. What if my snowflake block doesn’t turn out the right size?
If your snowflake block isn’t the right size, check your seam allowances and make sure your fabric pieces were cut accurately. You can also trim the block to fit into your quilt design.
Join our VIP broadcast list and gain access to exclusive patterns, all for free. As a VIP member, you’ll receive the best patterns daily, delivered directly to your device. ✨📱 It’s a unique opportunity to stay up-to-date with the latest trends and designs, curated just for you. Don’t miss out on enhancing your projects and discovering new inspirations with the best patterns every day! 🎨🔝
Conclusion
In this guide, we’ve covered everything you need to know about how to make a snowflake block, from gathering the materials to troubleshooting common mistakes. By following these steps and tips, you can create a beautiful and symmetrical snowflake block that will be a perfect addition to your quilt.
We hope this article has helped you gain confidence in your quilting skills. If you have any questions or would like to share your thoughts, please leave a comment below. We’d love to hear your feedback and any suggestions for future projects! Happy quilting!


