
Pie Carrier Sewing Pattern

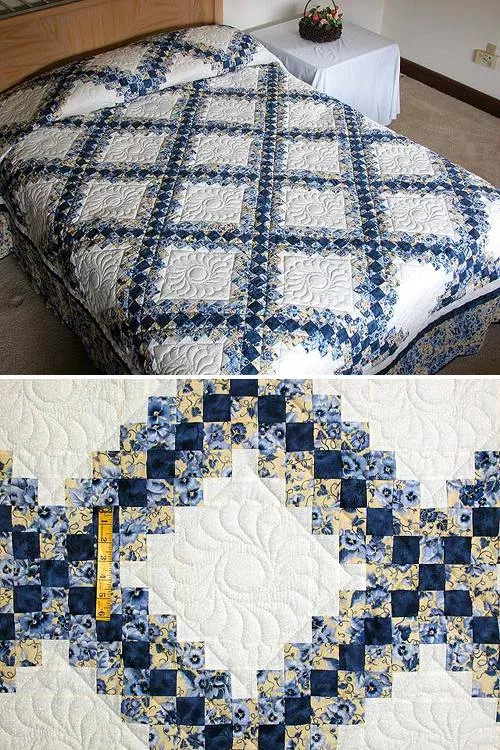
If you’ve been searching for a timeless quilting design to master, the Irish Chain Quilt – Tutorial is exactly what you need. This pattern is beloved for its classic elegance and surprisingly simple construction, making it a perfect project for both beginner and experienced quilters.
Whether you’re aiming to create a cozy heirloom piece or a modern twist on a traditional favorite, the Irish Chain delivers both beauty and versatility.
The Irish Chain Quilt – Tutorial introduces a pattern that plays with light and dark fabrics, creating a chain-like effect across the quilt top. It can be made in single, double, or triple chain variations, each adding a unique layer of depth and complexity.
The design may appear intricate, but it’s built using basic blocks and straightforward piecing techniques that anyone can learn with practice.
In this article, we’ll walk through every step of making an Irish Chain quilt—from selecting fabrics and cutting strips to assembling blocks and finishing your quilt. You’ll learn helpful tips to achieve clean lines and balanced layouts.
This guide is written in a friendly, human tone and is fully optimized for SEO while staying within Google’s AdSense content policies.
The charm of the Irish Chain Quilt – Tutorial lies in its structured simplicity. This pattern is made by alternating two basic blocks, resulting in a continuous chain that moves across the quilt top.
The most common version, the Single Irish Chain, uses one main block made from nine patches. These nine-patch units alternate with plain blocks, which help create the “chain” appearance diagonally across the quilt.
For a more intricate design, the Double Irish Chain adds a second layer of patchwork blocks. This version involves piecing more units and requires greater attention to alignment, but the result is visually stunning.
The Triple Irish Chain goes a step further with even more detailed blocks. While it may seem complex, it still uses basic square units that can be assembled with patience and precision.
No matter the variation, color selection plays a crucial role. High contrast between the chain fabric and background enhances the visual effect, while subtle changes in hue can add a soft, blended look.
This pattern is ideal for showcasing scraps or using up fabric stashes. It also works beautifully in coordinated color schemes, making it a flexible choice for quilters of all styles.
To get started with your Irish Chain Quilt – Tutorial, you’ll need a few essential materials and tools. Having everything ready before you begin will help the process go smoothly.
Choose high-quality quilting cotton in at least two contrasting colors—one for the chain and one for the background. You can add a third color if you’re creating a double or triple Irish Chain.
You’ll need a rotary cutter, quilting ruler, and cutting mat to ensure accurate cuts. Precision is key in this pattern, especially for maintaining the crispness of your chain lines.
Use a 1/4-inch presser foot if possible, as it helps maintain consistent seam allowances. This consistency ensures that your blocks fit together neatly.
Cotton thread in a matching or neutral color works best for piecing. Consider using a finer needle (size 80/12) for smoother stitching and fewer skipped stitches.
Plan for batting and backing fabric, too. Since the Irish Chain creates a strong visual effect, the quilting design can either be minimal or enhance the chain pattern with echoing or free-motion details.
Before you start cutting, press all your fabric to remove wrinkles. This small step can prevent misalignments and improve the overall look of your quilt.
Now let’s get into the hands-on portion of the Irish Chain Quilt – Tutorial—assembling your quilt blocks. This is where your pattern starts coming to life!
Start by cutting your strips. For a basic Single Irish Chain, cut 2.5-inch strips from both your chain and background fabrics. These strips will be used to make nine-patch units.
Sew together sets of three strips—two background strips on the outside and one chain fabric in the center. Press seams toward the darker fabric to avoid shadowing.
Subcut your strip sets into 2.5-inch segments. Then, rotate and sew three segments together to create a nine-patch block, making sure the chain fabric forms the cross pattern in the center.
Next, cut plain 6.5-inch squares from your background fabric. These alternate with the nine-patch blocks to complete the top. Layout the blocks on a flat surface to arrange them in a checkerboard layout.
Sew blocks into rows, pressing seams in alternating directions to help them nest properly. Then, sew the rows together to complete the quilt top.
If you’re making a Double or Triple Irish Chain, you’ll need additional block types. Just follow the same strip-piecing method, but adjust the number of segments and layout to match your version.
The final section of the Irish Chain Quilt – Tutorial focuses on finishing your quilt—layering, quilting, and binding it for a polished and professional look.
Start by layering your quilt top, batting, and backing fabric. Make sure everything is smooth and free from wrinkles. You can baste the layers using pins, spray adhesive, or hand basting stitches.
Choose a quilting design that complements your Irish Chain. Straight-line quilting works well for a minimalist look, while free-motion quilting adds a layer of texture and personality.
If you want to emphasize the chain, consider quilting within the chain blocks or outlining the design with echo quilting. This helps define the shapes and adds dimension to the quilt.
Once your quilting is complete, trim the edges of your quilt so they’re even and square. This step is important for achieving a clean and straight binding.
Make binding strips from coordinating fabric, typically cut at 2.5 inches wide. Fold and press the binding in half lengthwise, then sew it to the quilt’s front and wrap it to the back.
Hand-stitch or machine-sew the binding down to finish your quilt. Give it one final press, and your beautiful Irish Chain Quilt is ready to display or gift.
1. Is the Irish Chain Quilt suitable for beginners?
Yes! The Single Irish Chain is especially beginner-friendly. It uses basic nine-patch blocks and simple piecing techniques that are easy to learn.
2. What is the difference between Single, Double, and Triple Irish Chain?
Each version adds complexity. Single uses one chain block, Double adds another layer of chains, and Triple features even more intricate block combinations.
3. How long does it take to make an Irish Chain Quilt?
It depends on the size and version. A baby quilt might take a weekend, while a full-sized quilt could take several days to a few weeks.
4. Can I use scraps to make this quilt?
Absolutely. The Irish Chain pattern is perfect for scrap quilting. Just make sure there’s enough contrast between fabrics for the chain effect to show.
5. What size quilt can I make with this pattern?
You can adjust the block size and number of rows to make any quilt size—from baby to king. The pattern scales up very easily.
6. How should I quilt my Irish Chain?
Both straight-line and free-motion quilting work well. Choose a quilting style that either emphasizes the chain or adds soft texture across the surface.
The Irish Chain Quilt – Tutorial is a wonderful way to dive into traditional quilting while enjoying a satisfying creative process. With its timeless charm and straightforward construction, this pattern is suitable for all skill levels and adaptable to many fabric choices and styles.
We covered everything from understanding the different chain types to cutting, piecing, assembling blocks, and finishing your quilt. Whether you’re making your first quilt or your fiftieth, the Irish Chain is always a joyful project.
If you found this tutorial helpful or have ideas on how to improve it, please leave your honest opinion and suggestions in the comments. We’d love to hear about your quilting journey and see how your Irish Chain Quilt turned out!


