
Are you ready to bring a refreshing burst of creativity to your quilting projects? The Key Lime Pie Quilt Block – TUTORIAL is the perfect guide to creating a vibrant and versatile quilt design that captures the essence of its namesake dessert.
This quilt block’s geometric beauty, combined with its playful color scheme, makes it a delightful addition to any quilt.
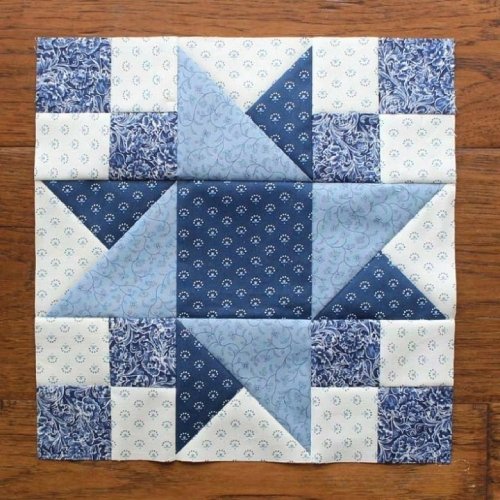
The Key Lime Pie Quilt Block is characterized by its crisp lines and symmetrical patterns, evoking the balance and simplicity of a classic key lime pie.
Whether you’re a seasoned quilter or just starting your journey, this block is a great way to experiment with colors and hone your piecing skills.
In this tutorial, we’ll walk you through every step, from gathering materials to finishing your block with precision.
By the end of this guide, you’ll not only have a beautiful quilt block but also the confidence to incorporate it into larger projects. Let’s dive into the process and explore the magic of creating a Key Lime Pie Quilt Block.
1. Why Choose the Key Lime Pie Quilt Block?
The Key Lime Pie Quilt Block – TUTORIAL isn’t just about creating a quilt block; it’s about exploring the reasons behind its popularity and versatility. Here’s why this pattern stands out among quilters:
- Geometric Elegance – The design’s clean lines and symmetrical layout create a visually appealing pattern that’s easy to admire. This block’s structured appearance ensures it fits seamlessly into both traditional and modern quilt designs.
- Color Customization – While green and white are the classic choices, inspired by key lime pie, this block looks stunning in various color combinations. Experiment with pastels, bold shades, or even monochromatic schemes.
- Skill Development – Working on this quilt block helps you practice essential skills like precise cutting, accurate seam alignment, and intricate piecing. It’s an excellent project for quilters looking to refine their techniques.
- Versatility – The Key Lime Pie block can be used to create full quilts, table runners, pillowcases, or wall hangings. Its adaptability makes it a favorite for many quilters.
- Seasonal Appeal – This design’s refreshing vibe makes it ideal for spring and summer projects, adding a lively touch to your home decor.
- Accessibility – Whether you’re using a sewing machine or hand-stitching, the Key Lime Pie Quilt Block – TUTORIAL provides clear steps for success, making it suitable for all skill levels.
2. Materials and Tools Needed for the Key Lime Pie Quilt Block
Before you begin your quilting adventure, gather the essential materials and tools to ensure a smooth and enjoyable process. Here’s what you’ll need:
- Fabric – Choose high-quality cotton fabrics in at least two contrasting colors. One should represent the vibrant “key lime” hue, while the other serves as a neutral background. Fat quarters or fabric scraps work perfectly.
- Rotary Cutter and Cutting Mat – Precision cutting is crucial for quilt blocks. A rotary cutter paired with a self-healing cutting mat ensures clean and accurate cuts.
- Quilting Ruler – A clear ruler helps measure and cut fabric pieces to the exact dimensions needed for your block.
- Sewing Machine – Use a sewing machine with a quarter-inch foot for consistent seam allowances. Alternatively, hand-stitching is an option if preferred.
- Thread – Choose a thread color that matches or complements your fabric selection. High-quality cotton thread is recommended.
- Iron and Pressing Surface – Pressing your fabric pieces and seams is essential for achieving a polished and professional-looking quilt block.
Having these tools ready ensures a hassle-free quilting experience, allowing you to focus on the creative aspects of your project.
3. Step-by-Step Guide to Crafting the Key Lime Pie Quilt Block
Creating the Key Lime Pie Quilt Block involves several steps, each contributing to the final masterpiece. Follow this detailed guide to bring your quilt block to life:
- Prepare the Fabric – Wash, dry, and press your fabric to remove any wrinkles and prevent shrinkage. Accurate preparation ensures clean cuts and smooth assembly.
- Cut the Pieces – Using your rotary cutter and ruler, cut the fabric into precise squares, triangles, and strips as specified in the pattern. Keep your pieces organized to avoid confusion.
- Assemble the Units – Begin by piecing together smaller units, such as half-square triangles or strips. Press the seams open or to one side for a flat finish.
- Join the Units – Arrange the completed units according to the pattern’s layout. Sew them together row by row, ensuring seams align perfectly.
- Press the Block – Once the block is fully assembled, give it a final press to ensure all seams lie flat. This step enhances the block’s overall appearance.
- Trim the Block – Use your ruler to square up the edges of the block, ensuring it measures the correct dimensions for your project.
Following these steps meticulously guarantees a beautiful and accurate Key Lime Pie Quilt Block.
4. Creative Uses for the Key Lime Pie Quilt Block
The possibilities for incorporating the Key Lime Pie Quilt Block into your projects are endless. Here are some creative ideas to inspire you:
- Full Quilts – Create a stunning quilt by repeating the Key Lime Pie block in a grid pattern. Experiment with different color arrangements for a dynamic effect.
- Table Runners – Use a row of Key Lime Pie blocks to craft a vibrant table runner that adds a pop of color to your dining space.
- Pillow Covers – Transform your block into a decorative pillow cover. Add a border and backing to complete the look.
- Wall Hangings – Frame a single block or a combination of blocks to create eye-catching wall art for your home.
- Baby Quilts – Use soft, pastel colors to design a charming baby quilt. The Key Lime Pie block’s simplicity makes it ideal for these smaller projects.
- Seasonal Decorations – Incorporate the block into seasonal decor items like placemats or festive banners. Bright greens and whites are perfect for spring.
These applications highlight the versatility and charm of the Key Lime Pie Quilt Block, making it a must-try for quilters.
FAQ
1. What skill level is required for the Key Lime Pie Quilt Block? The block is suitable for beginners and experienced quilters alike. The tutorial provides clear instructions, making it accessible to everyone.
2. Can I use scraps for this project? Yes! This block is perfect for using fabric scraps. Mix and match colors to create a unique design.
3. What size should the finished block be? The size depends on the pattern you’re following. Common dimensions range from 10 to 12 inches square.
4. How do I ensure my seams align perfectly? Use pins to secure seams before sewing and press them carefully. A quarter-inch foot on your sewing machine also helps.
5. Can I hand-stitch the block? Absolutely. While a sewing machine speeds up the process, hand-stitching adds a personal touch and works just as well.
6. Where can I find free patterns for this block? Free patterns are available on quilting blogs, forums, and crafting websites. Search online to explore various designs.
Join our VIP broadcast list and gain access to exclusive patterns, all for free. As a VIP member, you’ll receive the best patterns daily, delivered directly to your device. ✨📱 It’s a unique opportunity to stay up-to-date with the latest trends and designs, curated just for you. Don’t miss out on enhancing your projects and discovering new inspirations with the best patterns every day! 🎨🔝
Conclusion
The Key Lime Pie Quilt Block – TUTORIAL is a delightful way to enhance your quilting skills while creating something truly beautiful.
From selecting vibrant fabrics to piecing together intricate designs, this project is both rewarding and enjoyable.
Whether you’re making a full quilt or a single block for a specific purpose, the Key Lime Pie pattern offers endless creative possibilities.
We’d love to hear about your experience with this tutorial! Share your thoughts, suggestions, and photos of your finished blocks in the comments below. Happy quilting!


