
The Kitchen Door Quilt Block – Free Pattern is a charming and beginner-friendly design that adds a cozy, homey touch to any quilt. Whether you’re creating a table runner, wall hanging, or a full-size quilt, this pattern brings warmth and tradition into your sewing room.
Its structured layout and simple piecing make it perfect for quilters who enjoy clean lines with a vintage feel.
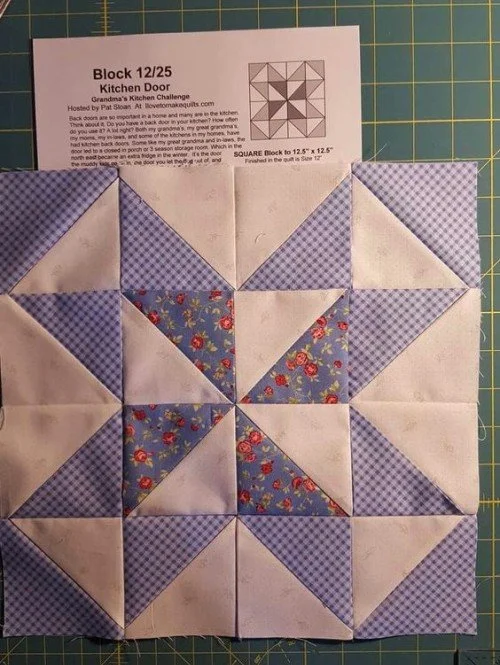
This Kitchen Door Quilt Block – Free Pattern evokes the feeling of a welcoming entrance to the heart of the home—the kitchen. The block features rectangular and square fabric pieces that resemble a door panel, offering a balanced aesthetic that’s both inviting and nostalgic. It’s a great choice if you’re looking to practice accurate piecing and color contrast.
In this article, we’ll guide you step-by-step through how to make the Kitchen Door Quilt Block – Free Pattern, including fabric selection, cutting instructions, piecing techniques, creative ideas, and troubleshooting tips.
Whether you’re a seasoned quilter or just starting your journey, this pattern offers the perfect blend of simplicity and style.
1. Materials and Cutting Instructions
To begin your Kitchen Door Quilt Block – Free Pattern, you’ll need a selection of quilting cottons in coordinating colors. Choose a mix of solids or small-scale prints for a clean and polished look. Traditionally, this block benefits from contrasting fabrics to help define the “door” effect.
You’ll need three different fabrics: one for the background, one for the “door,” and one for accent pieces. Pre-wash your fabric if you’re working with bold colors to prevent any dye bleeding during future washes.
Start by cutting your fabric into the required pieces. Typically, the block is made using rectangles and squares. A sample size might include two 4½” x 6½” rectangles for the main door panels, a 2½” x 4½” strip for the center bar, and two 2½” x 6½” strips for side panels.
Accuracy is key in quilting. Always use a rotary cutter and a clear quilting ruler to make clean, precise cuts. It’s a good habit to label your pieces with sticky notes or chalk to stay organized throughout the project.
If you’re making multiple blocks, consider cutting your fabrics assembly-line style. Stack fabrics and cut several pieces at once to save time and ensure consistency. This also makes it easier to mix and match colors for a scrappy effect.
Gather your sewing machine, thread, pins, and a pressing iron. You’re now ready to piece your Kitchen Door Quilt Block – Free Pattern with confidence and precision.
2. Piecing the Kitchen Door Quilt Block
Begin by assembling the smaller rectangles and center strips. Place two door panel rectangles on either side of the center bar and sew them together using a ¼” seam allowance. Press the seams toward the center to reduce bulk and help the block lay flat.
Next, attach the side strips. Position each 2½” x 6½” strip to the left and right sides of the unit you just sewed. Align the edges and pin in place if necessary. Stitch and press the seams outward for balance.
Now it’s time to add the top and bottom pieces, if your design includes framing borders. These additional strips help square up your block and enhance the door appearance. Make sure everything lines up properly before sewing.
Always press your seams after each step. A well-pressed block looks more professional and is easier to work with when assembling your quilt top. Use a dry iron or steam lightly, depending on the fabric’s response.
If you’re working with directional prints or want a symmetrical layout, double-check the orientation of your fabric before stitching. Minor adjustments can make a big visual difference in the final block.
At this stage, your Kitchen Door Quilt Block – Free Pattern should measure around 12½” x 12½”, depending on your chosen size. Trim any uneven edges to ensure your block fits smoothly into your quilt layout.
3. Creative Uses and Design Variations
The Kitchen Door Quilt Block – Free Pattern is incredibly versatile. While it looks beautiful as part of a traditional quilt, it also works well in modern quilting settings, offering endless opportunities for personalization and creative expression.
Use this block as a foundation for themed quilts. Try combining fabric prints that evoke a farmhouse kitchen, vintage cooking utensils, or warm country colors. This creates a cohesive, story-driven design perfect for gifts or seasonal décor.
You can also vary the size of your blocks for a fun visual effect. Try making a few oversized blocks for a bold wall hanging, or scale down the pattern for a quilted table runner or pillow cover. Just adjust the measurements accordingly and maintain accurate seam allowances.
Play with fabric placement to create a totally different look. For instance, using a dark fabric for the background and light fabrics for the panels gives a dramatic contrast. Add sashing between blocks to mimic the look of actual doors lined in a hallway.
Some quilters add embellishments to this block, such as buttons to mimic door knobs or embroidery for added detail. These little touches can turn a simple design into something truly memorable and unique.
If you’re confident in applique, consider adding a small heart, flower, or pet motif in the center of each door panel. This creates a personalized element, especially effective in memory quilts or family-themed projects.
This pattern also works wonderfully in quilt-alongs or group quilting bees. Each participant can contribute a block in their own color scheme, making for a beautiful and diverse final piece filled with meaning.
4. Tips for Beginners and Common Mistakes
The Kitchen Door Quilt Block – Free Pattern is beginner-friendly, but like all quilting projects, it comes with its own learning curve. Here are some helpful tips to ensure your success and avoid common pitfalls.
First, always use a scant ¼” seam allowance. Many blocks that seem “off” in the final size are simply caused by slightly wide seams. Practice on scrap fabric and measure your test block before starting your main project.
Second, starch your fabric before cutting if it’s particularly soft or stretchy. This gives it more structure and helps you achieve more accurate cuts and cleaner lines, especially in straight-edged blocks like this one.
Third, be mindful of your fabric grain. Always cut and sew with the grain in mind to prevent stretching or distortion. This is especially important for rectangular panels that need to line up precisely.
If your block doesn’t come out square, use a square ruler to trim the edges slightly. Make sure to trim evenly on all sides so the design remains centered. A square block ensures easy alignment when assembling your quilt top.
When sewing multiple blocks, chain piecing is a time-saving method that involves sewing one piece right after another without stopping. This keeps your pieces in order and speeds up the process while reducing thread waste.
Lastly, have patience with yourself! Quilting is a skill that grows with practice. The Kitchen Door Quilt Block – Free Pattern is a great way to build confidence while creating something beautiful and functional.
FAQ – Frequently Asked Questions
1. What is the finished size of the Kitchen Door Quilt Block?
The most common finished size is 12″ x 12″, but it can be scaled up or down by adjusting your fabric measurements. Always include seam allowance in your calculations.
2. Is the Kitchen Door Quilt Block good for beginners?
Yes! It’s simple, uses straight lines, and requires only basic piecing techniques, making it a great project for new quilters.
3. Can I use scraps for this block?
Absolutely. This block is perfect for scrap quilting. Just make sure the pieces are large enough and coordinate well together.
4. What kind of fabric should I use?
Quilting cotton is the best choice. It’s durable, easy to work with, and comes in a wide variety of colors and patterns to suit your design.
5. Do I need to pre-wash my fabric?
It’s recommended, especially if you’re using bright or dark colors. Pre-washing helps prevent shrinkage and color bleeding.
6. Can I mix this block with other quilt block patterns?
Yes! The Kitchen Door block pairs well with other traditional blocks like the Log Cabin, Nine-Patch, or Churn Dash for a sampler-style quilt.
Conclusion
The Kitchen Door Quilt Block – Free Pattern is a timeless design that’s both simple and visually striking. From selecting your fabrics to completing your block, this pattern allows for creativity while helping you improve essential quilting skills like cutting, piecing, and pressing.
Whether you’re creating a full quilt, a cozy pillow, or a fun wall hanging, this block offers endless possibilities. With practice and patience, you can transform even the simplest shapes into something warm, welcoming, and uniquely yours.
We hope you enjoyed learning about the Kitchen Door Quilt Block – Free Pattern and feel inspired to try it yourself. If you make this block or have questions, please leave a sincere comment below. We’d love to hear your suggestions, tips, or ideas for future quilting patterns. Happy quilting!


