
Pie Carrier Sewing Pattern

Creating a Lattice Baby Quilt is a delightful and rewarding project for quilters of all skill levels. This tutorial guides you through the process, helping you design a beautiful and practical quilt for a baby’s nursery or as a thoughtful handmade gift.
The lattice design offers a timeless appeal with its clean lines and charming geometric patterns, making it perfect for any baby’s room.
The Lattice Baby Quilt – Tutorial breaks down the project into manageable steps, ensuring success even for beginners. With just a few materials and some basic quilting techniques, you can create a quilt that is both visually stunning and functional.
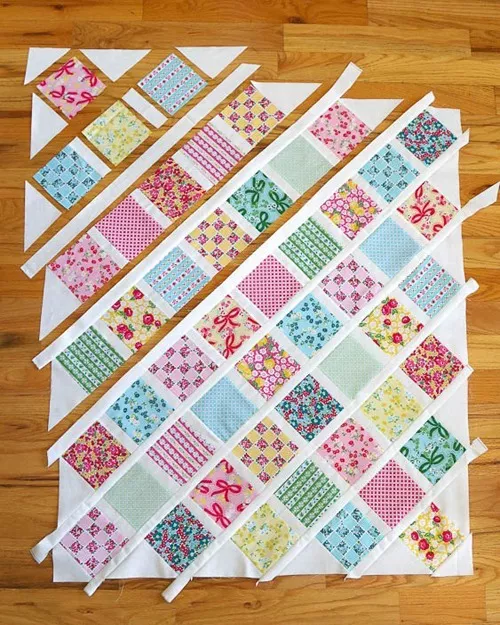
Image from google.
Whether you’re using pastel hues, bright colors, or a combination of patterns, this quilt is versatile and adaptable to your preferences.
In this guide, we’ll cover everything you need to know, from gathering your materials to piecing together the lattice design and finishing the quilt. Let’s begin by preparing the essentials and laying the foundation for your quilting journey.
Before starting your Lattice Baby Quilt, it’s essential to gather the right materials and tools. These items ensure a smooth quilting process and a professional-looking result.
Choose high-quality cotton fabric for the quilt top, lattice strips, and backing. Opt for soft, baby-friendly patterns or solid colors that complement each other. Prewash the fabric to avoid shrinkage later.
Select a lightweight, breathable batting material for the quilt’s middle layer. Cotton or bamboo batting works well for baby quilts due to their softness and ease of washing.
A rotary cutter and self-healing mat make cutting fabric strips precise and efficient. These tools are essential for achieving clean, straight edges.
A quilting ruler helps measure and cut fabric accurately, ensuring consistency throughout your quilt.
Use a reliable sewing machine with a quarter-inch presser foot for precise seam allowances. Choose a thread color that matches or contrasts nicely with your fabric.
These hold fabric pieces together during sewing, keeping layers aligned and secure.
Pressing seams as you sew ensures the quilt lays flat and looks professional.
Choose a coordinating fabric for binding the edges of the quilt. This step adds a polished finishing touch.
With these materials and tools on hand, you’re ready to dive into creating your Lattice Baby Quilt.
Properly cutting and preparing your fabric is a crucial step in making a Lattice Baby Quilt. This ensures the pieces fit together perfectly and form the desired lattice pattern.
Decide on the size of your quilt blocks based on the desired dimensions of the quilt. For example, 6-inch or 8-inch squares work well for baby quilts. Use your rotary cutter and ruler to cut the fabric into uniform squares.
Measure and cut fabric strips for the lattice. These are typically narrower than the quilt blocks, around 1-2 inches wide. Cut enough strips to create horizontal and vertical rows.
If you’re adding a border, cut strips from your chosen border fabric. Borders frame the quilt and provide a finished look.
Lay out your quilt blocks and lattice strips on a flat surface. Arrange them in the desired pattern, ensuring colors and prints are evenly distributed.
Use small sticky notes or pins to label each row. This helps you keep track of the layout as you sew.
Iron all pieces to remove wrinkles and ensure flat, smooth fabric. Pressing also makes sewing easier and more precise.
Once your fabric is prepped and organized, it’s time to start assembling your quilt top.
The lattice design is the highlight of the Lattice Baby Quilt. This step involves piecing together the quilt top using the blocks and lattice strips you’ve prepared.
Start by sewing a lattice strip between each quilt block to form rows. Use a quarter-inch seam allowance for consistency. Press the seams toward the lattice strips.
Once the rows are complete, sew a lattice strip between each row. Align the seams carefully to ensure the lattice design lines up perfectly.
If you’re including a border, sew the border strips to the edges of the quilt top. This frames the lattice pattern and adds extra dimension.
After assembling the quilt top, press all seams to ensure the top lays flat and neat.
Examine the quilt top for any misaligned seams or uneven edges. Make adjustments as needed to perfect the design.
Trim any excess fabric around the edges and prepare the quilt top for layering with the batting and backing.
With the quilt top complete, you’re ready to move on to the final steps: quilting and binding.
The final stages of making a Lattice Baby Quilt involve layering, quilting, and binding. These steps bring your project together and create a finished, usable quilt.
Lay the backing fabric right side down, then place the batting on top. Finally, position the quilt top right side up. Smooth out wrinkles and secure the layers with pins or basting spray.
Quilt the layers together using a simple straight-line or diagonal stitching pattern. Follow the lattice lines to enhance the design, or choose a free-motion quilting pattern for added texture.
Trim the excess batting and backing fabric to match the edges of the quilt top.
Sew the binding strips to the quilt’s edges, folding them over to encase the raw edges. Use a machine or hand-stitch the binding for a clean finish.
Check the quilt for loose threads or missed stitches. Wash and dry the quilt to soften it and remove any marks.
Your Lattice Baby Quilt is now complete! Gift it to a loved one or display it proudly in your home.
Q: Can beginners make a Lattice Baby Quilt?
A: Yes! The step-by-step tutorial makes it accessible for beginners. Start with simple fabrics and a smaller size to build confidence.
Q: What size should a baby quilt be?
A: A typical baby quilt measures around 36 x 52 inches, but you can adjust the size to fit your needs.
Q: Can I hand-sew the quilt?
A: Yes, hand-sewing is an option, but it may take longer. Use a sturdy needle and thread for durability.
Q: How do I choose colors for the quilt?
A: Pick soft, soothing colors for babies. Consider the nursery’s theme or use a mix of solids and prints.
Q: How long does it take to complete the quilt?
A: The time depends on your experience and the quilt’s complexity. Most projects take 8-12 hours spread over several days.
Q: Can I wash the quilt after finishing?
A: Yes, machine wash on a gentle cycle and tumble dry on low. Use baby-safe detergent for best results.
Join our VIP broadcast list and gain access to exclusive patterns, all for free. As a VIP member, you’ll receive the best patterns daily, delivered directly to your device. ✨📱 It’s a unique opportunity to stay up-to-date with the latest trends and designs, curated just for you. Don’t miss out on enhancing your projects and discovering new inspirations with the best patterns every day! 🎨🔝
The Lattice Baby Quilt – Tutorial provides a comprehensive guide to creating a beautiful, handmade quilt. By following the steps, gathering the right materials, and taking your time with each stage, you can craft a quilt that’s both functional and decorative.
We’d love to hear about your quilting journey! Share your feedback, photos, or suggestions in the comments below. Happy quilting!


