
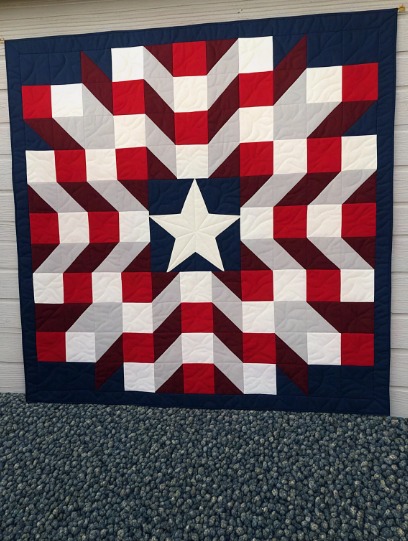
If you are passionate about quilting and love creating timeless pieces, this Liberty Star – Tutorial is perfect for you. The Liberty Star block is a beautiful, classic design that symbolizes freedom, creativity, and tradition.
Whether you are a beginner or an experienced quilter, learning how to create this stunning block can add elegance and meaning to your quilting projects.
In this complete Liberty Star – Tutorial, we will guide you step-by-step through the process of choosing the right fabrics, cutting with precision, sewing with confidence, and assembling a flawless Liberty Star block. This block is versatile and looks stunning in various color schemes, from patriotic tones to soft pastels or even scrappy designs.
By following this Liberty Star – Tutorial, you’ll gain new skills and inspiration to use this block in quilts, wall hangings, table runners, or any other creative sewing projects. Let’s get started on bringing this beautiful star to life!
1. Materials and Tools Needed for the Liberty Star Block
To start this Liberty Star – Tutorial, it’s essential to gather the right materials and tools. Preparing everything in advance will make the process smooth and enjoyable.
Begin by choosing your fabric. A Liberty Star block usually consists of three to four contrasting fabrics: one for the background, one for the star points, one for the center, and optionally one for accents. High-quality cotton fabric is recommended for crisp seams and durability.
You will also need a rotary cutter, a self-healing cutting mat, and a quilting ruler. These tools ensure your fabric pieces are accurate, which is crucial for achieving sharp points in your Liberty Star.
For sewing, a standard sewing machine with a 1/4-inch quilting foot is ideal. This foot helps maintain consistent seam allowances, which is key to keeping your block square and precise.
Gather basic sewing supplies like thread in a neutral color, pins or clips, an iron, and an ironing board. Pressing between steps is important for accuracy and a polished finish.
Some quilters like to use fabric markers or chalk to mark sewing lines, especially for techniques like half-square triangles or flying geese used in the Liberty Star.
Lastly, having a design wall or a flat surface where you can lay out your pieces helps visualize the block before sewing. This step ensures that color placement and pattern alignment are exactly how you want them.
2. Cutting Instructions and Layout Guide
In this part of the Liberty Star – Tutorial, we’ll cover how to cut your fabric pieces accurately and lay them out correctly before sewing. Cutting precisely is the foundation of a successful block.
Start by cutting the background fabric into squares and rectangles based on the desired size of your block. For example, if making a 12-inch block, you’ll typically need four larger squares for corners and smaller rectangles for edges.
Cut the star point fabric into triangles. These will form the sharp, striking points of the Liberty Star. You can use the traditional method of cutting squares and then slicing diagonally, or use specialty rulers for speed and accuracy.
The center of the Liberty Star is often a square or a feature fabric piece. This is where you can add a personal touch with a fussy-cut motif, a bold print, or a complementary solid.
If your design includes flying geese units for the star points, cut rectangles and smaller squares accordingly. These pieces come together to form the pointed shapes around the star center.
Lay out all pieces on your work surface in the correct placement. Arrange the background pieces around the edges, the center square in the middle, and the triangle units forming the star points radiating outward.
Double-check your layout against the pattern or your design plan before sewing. This prevents mistakes and helps ensure your Liberty Star block comes together exactly as envisioned.
3. Sewing the Liberty Star Block Together
Now we move to the sewing phase of the Liberty Star – Tutorial. Precision and attention to detail are key when assembling the Liberty Star block to achieve clean, sharp lines and balanced symmetry.
Start with the star points. Sew the triangle units or flying geese blocks, depending on your chosen method. Be sure to align edges carefully and press seams open or to the side for a flat finish.
Next, join the star points to the background rectangles or squares. This step forms the outer edges of your Liberty Star and begins to reveal the block’s iconic shape.
Once the star points are attached, sew them together in rows. Typically, you’ll have three rows: a top row with a background-star-background sequence, a middle row with a star-center-star sequence, and a bottom row that mirrors the top.
Join the rows together, aligning seams carefully to ensure that the star points meet perfectly at the intersections. Use pins at key points to hold the pieces securely in place while sewing.
After sewing the rows, give the entire block a good press. Press seams flat to reduce bulk and make the block easier to join with others in a quilt.
Check the final measurements of your Liberty Star block. Trim any slight uneven edges if necessary to ensure it’s the correct size and ready for assembly into your larger project.
4. Tips for Success and Creative Applications
This part of the Liberty Star – Tutorial is all about helping you succeed and exploring ways to use the Liberty Star block creatively in your quilting projects.
Always use a consistent 1/4-inch seam allowance. Even small variations can cause the points of your Liberty Star to misalign, so accuracy here is essential.
Press as you go. Taking the time to press after each step improves accuracy, helps seams nest together, and gives your block a clean, professional appearance.
Don’t be afraid to starch your fabric before cutting. Starch helps prevent fabric stretching and maintains crisp edges, especially useful when sewing triangles.
Test your color combinations with a mini mock-up before committing. Sometimes fabrics that look great together on the table behave differently when turned into patchwork.
The Liberty Star block isn’t just for quilts. Use it in pillows, tote bags, table runners, or wall hangings. Its bold, graphic style works beautifully in various home décor items.
If you enjoy hand quilting, the Liberty Star provides wonderful lines to stitch along, enhancing the star design with texture and highlighting your craftsmanship.
FAQ – Liberty Star – Tutorial
What is the easiest size to start with for the Liberty Star block?
A 12-inch finished block is beginner-friendly because the pieces are large enough to handle easily, reducing the chance of errors.
Do I have to use flying geese for the star points?
No, you can use half-square triangles or stitch-and-flip methods as alternatives. The look is slightly different but still forms a beautiful star.
How do I keep my star points sharp?
Accurate cutting, a precise 1/4-inch seam, and careful pressing are key. Pinning intersections also helps maintain sharp points.
Can I make a scrappy Liberty Star block?
Absolutely! A scrappy Liberty Star using different fabrics for each point or background section adds charm and a playful touch to the traditional design.
What is the best fabric type for this block?
100% cotton quilting fabric is ideal. It’s stable, easy to sew, and comes in endless color and pattern options suitable for the Liberty Star.
How can I use the Liberty Star block in other projects?
Beyond quilts, try incorporating the Liberty Star into throw pillows, tote bags, table runners, or wall hangings for a bold, handmade statement.
Conclusion
This complete Liberty Star – Tutorial has guided you through every step of making this classic and elegant quilt block. From choosing fabrics to cutting, sewing, and exploring creative applications, you now have the tools to create a Liberty Star that shines in any project.
The Liberty Star block not only offers beauty but also carries a sense of history and symbolism that makes it a meaningful addition to your quilting journey. Whether you’re making a single block or an entire quilt, the satisfaction of crafting something with your own hands is truly rewarding.
If you’ve enjoyed this Liberty Star – Tutorial, we would love to hear from you! Please leave a sincere comment sharing your experience, questions, or suggestions for future tutorials. Your feedback helps this community grow and inspires more creativity for everyone!


