
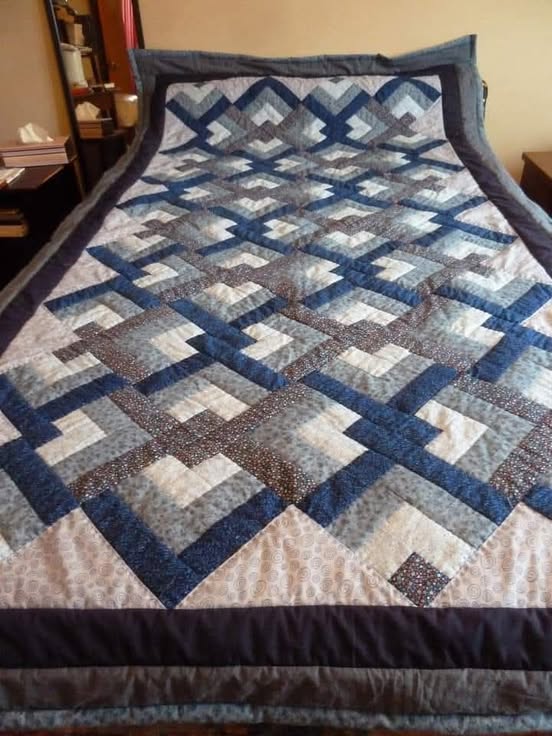
The Lovers Knot Quilt is a beautiful and intricate pattern that brings warmth and personality to any room. Whether you’re an experienced quilter or a beginner, this quilt design offers a fun and creative challenge.
The Lovers Knot Quilt tutorial will guide you through the essential steps, helping you achieve a stunning result that you’ll be proud to display. This classic pattern is versatile, and you can personalize it with your favorite fabrics and colors to match your style.
In this tutorial, we will walk you through the entire process, from selecting the right materials to assembling the quilt. You’ll find that the Lovers Knot Quilt is not only visually appealing but also practical in creating heirloom-quality pieces.
As we dive deeper, you will learn the technique behind the knotting, cutting, and stitching that makes this design truly unique. Whether you’re aiming for a traditional or modern look, this quilt pattern offers endless possibilities.
Quilting can be a therapeutic and rewarding craft. However, like any skill, it requires patience and practice. By following the steps outlined in this Lovers Knot Quilt tutorial, you can develop your quilting skills while creating a masterpiece that speaks to your creativity. Let’s begin this quilting journey together!
Materials Needed for the Lovers Knot Quilt
Before we begin with the Lovers Knot Quilt tutorial, it’s essential to gather all the materials you’ll need for this project. Having everything on hand will make the process smoother and more enjoyable.
Start by selecting your fabric. A typical Lovers Knot Quilt requires a combination of light and dark fabrics, often in contrasting colors to bring out the knotting effect. Choose a fabric with a pattern or solid color that speaks to you, keeping in mind that the color scheme will greatly influence the overall feel of the quilt.
Next, gather the following quilting supplies:
- Cotton quilting fabric (for the quilt top)
- Batting (to add thickness and warmth)
- Quilt backing fabric
- Rotary cutter and cutting mat
- Quilting ruler
- Thread in coordinating colors
- Needles (either hand quilting needles or machine needles depending on your preference)
- Quilting pins for holding the fabric in place
- Iron (to press the fabric)
Once you have your materials ready, it’s time to start cutting and preparing your quilt pieces. You’ll want to ensure that your cuts are accurate to maintain the precise angles and lines needed for the Lovers Knot Quilt pattern.
Step-by-Step Instructions for Creating the Lovers Knot Quilt
Now that you have your materials ready, it’s time to begin piecing together your Lovers Knot Quilt. The steps can be broken down into manageable sections, and we’ll guide you through each one. By following these instructions, you’ll create a beautifully intricate quilt that highlights the Lovers Knot design.
Start by cutting your fabric into squares. The size of the squares will depend on the size of the quilt you wish to create. Common dimensions are 6-inch squares for a medium-sized quilt. The key here is to keep your cuts precise to ensure everything lines up perfectly when you start piecing it together.
Once you have your fabric squares ready, begin with the first step of the knot. The Lovers Knot is built on a series of interlocking triangles, which can be a bit tricky to master initially, but with practice, it will become second nature. Sew two fabric pieces together, then cut them at a diagonal to create two triangles. These triangles will be combined in the following steps.
Now, take your triangle pieces and arrange them to form the knot. The goal here is to align the edges to create the signature “knot” shape. You may find it helpful to lay out the pieces on a flat surface before stitching them together, ensuring that the pieces fit together nicely.
Once the knot design is assembled, sew the individual triangle units into rows. Once your rows are ready, sew them together to form the full block. Repeat this process until you have enough blocks to complete your quilt top. Keep pressing your seams flat with an iron to help maintain sharp, clean lines throughout the process.
Quilting the Lovers Knot Quilt
After completing the quilt top, it’s time to quilt the layers together. This step requires some attention to detail, but the result will be a quilt that feels durable and professional.
Start by laying out your quilt top on a large, flat surface. Place the batting underneath and then add the quilt backing fabric on top. Be sure to smooth out any wrinkles as you go. Once the layers are aligned, pin them together with quilting pins to hold everything in place.
Next, it’s time to start quilting. You can quilt by hand or by machine, depending on your preference and experience. If you’re using a sewing machine, choose a quilting stitch that complements the design. A straight stitch is often used for this type of quilt, but you can experiment with decorative stitches for added flair.
As you quilt, make sure to sew in a pattern that complements the Lovers Knot design. You can stitch along the seams or opt for a more intricate pattern that enhances the quilt’s overall look. Be patient and take your time to ensure the quilting is even and neat.
After quilting, trim any excess batting and backing fabric around the edges of the quilt to give it a clean finish. Finally, add the quilt binding to the edges of your Lovers Knot Quilt. This step adds a polished look and also ensures that the quilt will hold together well for years to come.
Finishing Touches for Your Lovers Knot Quilt
With the quilt top, batting, and backing all quilted together, it’s time to add the finishing touches that will truly make your Lovers Knot Quilt shine. This includes adding the binding, which will frame the quilt and give it a clean, professional appearance.
To attach the binding, first cut strips of fabric to the desired width. Typically, quilt bindings are around 2 ½ inches wide, but you can adjust this to suit your preferences. Join the strips together to create a continuous strip of fabric. Fold the strip in half lengthwise, and press it to create a crease.
Pin the folded binding to the edges of the quilt, ensuring that it aligns perfectly with the edges. Begin stitching the binding along the quilt’s perimeter, making sure the fabric is securely attached. Once you reach the starting point, join the ends of the binding strip and stitch them together neatly.
After attaching the binding, press the quilt one last time to smooth out any wrinkles. This will give the Lovers Knot Quilt a polished and professional appearance. You can now display your quilt with pride or gift it to someone special.
FAQ – Lovers Knot Quilt Tutorial
Q1: What is the best fabric to use for a Lovers Knot Quilt?
A1: The best fabric for a Lovers Knot Quilt is cotton quilting fabric. It’s durable, easy to work with, and holds up well after multiple washes. Opt for high-quality fabric to ensure your quilt lasts for years.
Q2: Can I make a Lovers Knot Quilt by hand?
A2: Yes, you can absolutely make a Lovers Knot Quilt by hand. While using a sewing machine speeds up the process, hand quilting adds a personal touch and can be very rewarding.
Q3: How do I make my Lovers Knot Quilt unique?
A3: Personalize your Lovers Knot Quilt by experimenting with different color combinations and fabric patterns. You can choose modern fabrics, vintage prints, or even seasonal fabrics to give your quilt a unique look.
Q4: How long does it take to make a Lovers Knot Quilt?
A4: The time it takes to complete a Lovers Knot Quilt depends on your skill level and the size of the quilt. A beginner might take several days to a week, while experienced quilters may complete it in a few days.
Q5: Can I use the Lovers Knot Quilt pattern for other projects?
A5: Yes! The Lovers Knot design is versatile and can be adapted for many other quilting projects like wall hangings, table runners, or even clothing.
Q6: Is the Lovers Knot Quilt suitable for beginners?
A6: While the Lovers Knot Quilt might present a challenge to beginners due to its intricate design, it’s a great pattern for quilters looking to improve their skills. Beginners can start with smaller blocks and build up to the full quilt.
Join our VIP broadcast list and gain access to exclusive patterns, all for free. As a VIP member, you’ll receive the best patterns daily, delivered directly to your device. ✨📱 It’s a unique opportunity to stay up-to-date with the latest trends and designs, curated just for you. Don’t miss out on enhancing your projects and discovering new inspirations with the best patterns every day! 🎨🔝
Conclusion
In this Lovers Knot Quilt tutorial, we’ve walked through each step of the process, from selecting materials to adding the finishing touches. By following these instructions, you can create a beautiful, personalized quilt that will be cherished for years to come.
Quilting is a rewarding craft that allows you to express your creativity, and the Lovers Knot Quilt is a fantastic project for quilters of all levels. We hope you found this tutorial helpful and easy to follow.
VIDEO TUTORIAL
We’d love to hear your thoughts! Please leave a sincere review and share any suggestions you have for future quilting tutorials.
