
Pie Carrier Sewing Pattern

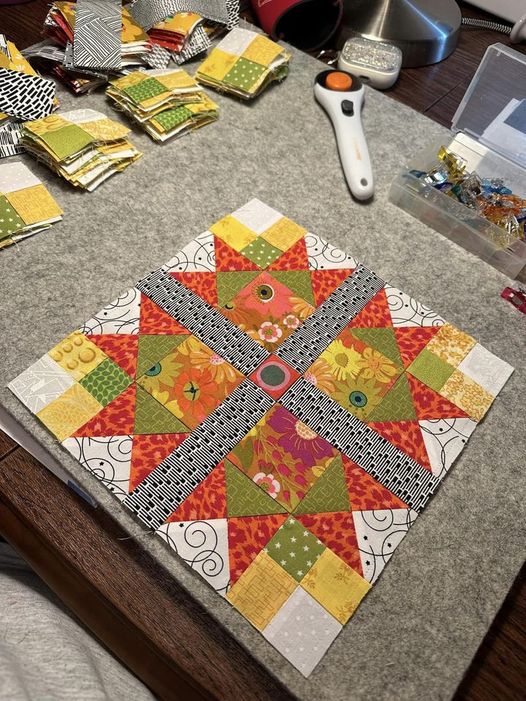
If you’re passionate about quilting and looking to create something both celestial and timeless, the Maia Star Block Pattern – FREE PATTERN is a perfect addition to your quilting journey.
This block design combines the elegance of a traditional star layout with a modern twist that shines beautifully in any quilt project.
Whether you’re a beginner or a seasoned quilter, this free pattern offers inspiration and a practical guide to creating your next masterpiece.
The Maia Star Block Pattern – FREE PATTERN is not only visually captivating but also incredibly versatile. It can be used as a focal block in larger quilts, repeated for a full-star quilt, or paired with solids and other blocks for a stunning sampler layout.
Its clean lines and symmetry make it a satisfying project for quilters who love precision and balance.
In this article, we’ll walk you through everything you need to know to get started with this pattern. From fabric choices and cutting tips to step-by-step construction and creative customization, you’ll find all the guidance you need to confidently complete your Maia Star Block Pattern – FREE PATTERN while ensuring your project is optimized for beauty and functionality.
Before starting your Maia Star Block Pattern – FREE PATTERN, it’s important to gather the right materials. Choosing the right fabric combinations and tools will set the tone for your entire project.
Select contrasting fabrics to make the star points stand out clearly. Solids or blenders work great for the background, while bold prints or deep tones highlight the star’s shape beautifully.
Cotton is the preferred fabric for quilting because it’s easy to handle, presses well, and holds its shape. Stick to 100% cotton quilting fabric for best results and longevity.
Basic tools you’ll need include a rotary cutter, cutting mat, quilting ruler, iron, and sewing machine. These tools ensure precise cuts and accurate seams, which are essential for the crisp points in the star block.
Use a 1/4-inch presser foot to help maintain consistent seam allowances. Accuracy here ensures your block turns out square and all points align neatly.
You may also want to use starch or a pressing spray to help your fabric stay crisp during piecing. This makes intricate blocks like the Maia Star Block Pattern – FREE PATTERN easier to assemble cleanly.
Print or download the pattern template to keep on hand. Some versions include paper piecing options, while others offer traditional piecing instructions, giving you the freedom to choose your method.
The heart of the Maia Star Block Pattern – FREE PATTERN lies in its structured construction. Let’s go step-by-step to make sure your block turns out polished and precise.
Start by cutting all your fabric pieces according to the pattern instructions. This typically includes squares and triangles of various sizes depending on the block’s size (commonly 12″ finished).
Begin assembling the star points. These are often created using half-square triangles (HSTs) or flying geese units. Follow the instructions closely to align each triangle carefully for symmetrical points.
Next, sew the corner units. These often include smaller triangle or square pieces that add to the star’s dimensional shape. Accuracy here helps the block’s corners match up cleanly when pieced together.
Assemble the central square or star core. This part varies slightly depending on the version of the Maia Star Block Pattern – FREE PATTERN, but often features a square-in-a-square or similar unit at the center.
Now it’s time to lay out all nine parts of the block: four corner units, four star point units, and the center square. Arrange them in a three-by-three grid, and double-check placement before sewing.
Finally, join the rows together, pressing seams as you go. For a cleaner finish, alternate pressing directions for each row to help seams nest and reduce bulk in the finished block.
One of the most exciting aspects of the Maia Star Block Pattern – FREE PATTERN is how adaptable it is. With just a few creative tweaks, you can make your quilt completely unique.
Try reversing the color scheme: make the star light and the background dark. This change in contrast gives the block a whole new visual depth and energy.
If you’re using scraps, you can make each star point a different color. This is a fun way to use up leftovers and create a vibrant, eclectic look.
Add sashing between blocks in a full quilt layout. This frames each Maia Star Block Pattern – FREE PATTERN individually and gives your quilt a more structured look.
Use alternating blocks with solid fabric or simpler block designs to give the star blocks room to breathe. This also helps stretch your main fabric and adds visual variety.
Consider creating a wall hanging with just a single Maia Star block, perhaps with a border and quilting that highlights the star shape. This is great for smaller projects or practice runs.
Add embellishments like embroidery or metallic thread quilting in the star center or points. These little details elevate the block and add personality to your quilt.
After piecing your Maia Star Block Pattern – FREE PATTERN, it’s time to think about quilting and finishing. This step brings texture and lasting durability to your project.
Choose a quilting pattern that enhances the star’s structure. Stitch-in-the-ditch is a good option for clean lines, while free-motion swirls can soften the geometric look.
Batting choice is important. Use low-loft batting if you want a flatter finish, or higher loft if you want the star to puff slightly for dimension.
For backing, choose a complementary print or color that echoes your star’s fabric. A light backing fabric also allows your quilting stitches to show more clearly.
Binding is the finishing touch. You can choose a bold fabric to frame your quilt or a subtle tone that blends with the rest of the quilt top.
Don’t forget to label your quilt! Include your name, the date, and the name of the pattern: Maia Star Block Pattern – FREE PATTERN. This adds a personal and historical touch.
Display your finished quilt proudly—on a wall, as a throw, or as a gift. Your star block will shine in any setting, celebrating both your craftsmanship and creativity.
1. What size is the finished Maia Star Block?
The most common size is 12″ x 12″ finished, but some free versions offer 6″ or 8″ options. Always check the pattern instructions for specific measurements.
2. Is this pattern suitable for beginners?
Yes, with patience. The Maia Star Block Pattern – FREE PATTERN uses basic units like half-square triangles and flying geese, which are great for learning precision.
3. Can I resize the block?
You can, but it requires careful recalculation of all pieces. Some pattern versions may offer resizing instructions—check before you begin.
4. Is this block good for scrap quilting?
Absolutely! The star points are perfect for using small scraps, especially if you want a colorful, varied look in your quilt.
5. What quilting design works best with this block?
Straight-line quilting or echo quilting around the star points works beautifully. Free-motion quilting is also a lovely option if you’re more advanced.
6. Where can I download the Maia Star Block Pattern – FREE PATTERN?
Many quilting blogs and designers offer it for free. Be sure to download from a reputable source to ensure quality and accuracy.
Creating the Maia Star Block Pattern – FREE PATTERN is a rewarding journey for any quilter. This design offers a balance of challenge and beauty, making it perfect for projects that you’ll treasure or gift with pride.
From fabric selection to block assembly, and all the way to quilting and display, we’ve covered everything you need to successfully complete this stunning block. The flexibility and timeless charm of the Maia Star make it a valuable addition to your quilting repertoire.
We’d love to hear your thoughts! If you’ve tried this pattern or plan to, please leave a sincere opinion and any suggestions in the comments. Let’s grow and inspire one another in this amazing quilting community.


