The Maple Leaf Quilt Block – Free Pattern is a popular and timeless design that quilters of all skill levels adore. Known for its classic appeal and versatility, this quilt block brings a touch of nature into any quilt.
Whether you’re a seasoned quilter or just getting started, creating a Maple Leaf Quilt Block is a rewarding and enjoyable experience. In this article, we will guide you through the process of making this beautiful block, offer tips, and give you ideas for how to incorporate it into your quilt projects.
The Maple Leaf Quilt Block is a great choice for those who want to explore traditional quilting patterns while also giving them a fresh, modern twist. This pattern is ideal for showcasing different fabrics and colors, allowing for creativity and individuality.
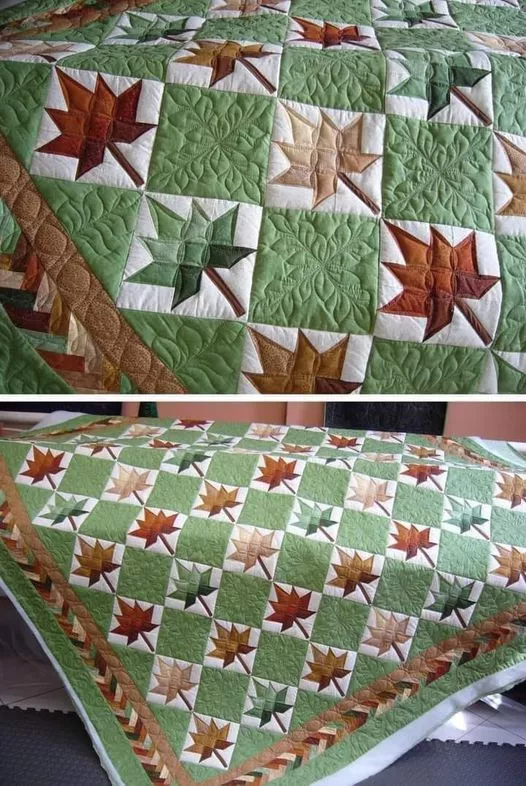
Image from google.
The symmetrical, flowing design of the maple leaf evokes the beauty of nature, making it perfect for seasonal quilts or just as a standout feature in any project.
SEE MORE PATTERNS
In this guide, we will break down the steps for creating the Maple Leaf Quilt Block and provide a free pattern that you can follow along with.
Whether you are creating a quilt with multiple blocks or using this design for a smaller project, you will find this guide easy to follow and full of helpful tips. By the end of this article, you will be ready to create a stunning Maple Leaf Quilt Block to add to your collection.
1. Materials Needed for the Maple Leaf Quilt Block
Before you start creating the Maple Leaf Quilt Block, it’s important to gather all the necessary materials. Having the right supplies will make the quilting process easier and more enjoyable. Here’s a list of what you’ll need:
- Fabric: Choose fabrics that will complement each other to highlight the maple leaf design. You’ll need a variety of fabrics for the leaf itself and the background. You can opt for autumnal colors like red, orange, and yellow for a fall-inspired quilt, or go for bold contrasts with brighter colors for a more modern look.
- Rotary Cutter and Cutting Mat: A rotary cutter is essential for precise fabric cutting. It will help you cut clean lines and sharp edges for your quilt block pieces. Using a cutting mat ensures that you don’t damage your work surface while cutting.
- Quilting Ruler: A quilting ruler helps you measure and cut fabric pieces accurately. It ensures that all your pieces are uniform in size and will fit together perfectly when pieced together.
- Sewing Machine: A reliable sewing machine is a must for piecing your quilt block. It allows you to sew fabric pieces together quickly and efficiently. Choose a machine that has a straight stitch and a quarter-inch seam allowance for accurate piecing.
- Pins or Fabric Clips: Use pins or fabric clips to hold your fabric pieces together before sewing. This will help prevent shifting while stitching and ensure that the pieces stay aligned.
- Iron: An iron is essential for pressing the seams as you go along. Pressing helps set the fabric and keeps the quilt block looking crisp and neat.
Once you have gathered your materials, you’re ready to begin creating your Maple Leaf Quilt Block. These basic tools and fabrics will help you achieve a professional-looking block with minimal effort.
2. Cutting the Fabric for the Maple Leaf Quilt Block
The next step in making your Maple Leaf Quilt Block is cutting the fabric. Accurate cutting is essential for ensuring that the pieces fit together perfectly. Here’s how you can cut the fabric for this block:
- Cut the background fabric: Begin by cutting the background fabric for the block. Typically, you’ll need a square that is around 12.5 inches, but be sure to check the pattern for the exact measurements. This square will be the base of your quilt block.
- Cut the leaf pieces: The next step is cutting the fabric for the maple leaf itself. For the leaf design, you’ll need to cut pieces into the shapes of triangles and squares. You will need four triangles for the points of the leaf, and two small squares for the central vein of the leaf. Be sure to cut these pieces accurately, as they will form the distinctive shape of the maple leaf.
- Cut the stem: The stem of the maple leaf is a simple rectangular piece. You can choose a color for the stem that contrasts with the leaf itself to make it stand out. Typically, the stem is around 1.5 inches by 4 inches, but check your pattern for precise measurements.
- Trim the edges: Once you have all the pieces cut, check to make sure they are all the correct size. You may need to trim the edges slightly to ensure everything fits together nicely when sewing.
- Organize the pieces: It’s a good idea to organize your pieces by type and color before you start sewing. This will make it easier to find the pieces you need as you begin to assemble your quilt block.
- Double-check your measurements: Accuracy is crucial when cutting your fabric pieces. Double-check each measurement to make sure everything is correct, as even a small mistake can affect how the quilt block comes together.
By cutting your fabric carefully and accurately, you’ll ensure that your Maple Leaf Quilt Block comes together beautifully.
3. Assembling the Maple Leaf Quilt Block
Now that you’ve cut all your fabric pieces, it’s time to start assembling the Maple Leaf Quilt Block. Follow these steps to piece the block together:
- Sew the leaf sections: Start by sewing the four triangle pieces together to form the points of the leaf. Take two triangles and sew them together along the edges, then repeat the process with the remaining two triangles. Once both sections are sewn, sew them together to form the full leaf shape.
- Add the stem: After the leaf is complete, sew the stem piece to the bottom of the leaf. This will complete the shape of the maple leaf, so make sure the seam is secure and even.
- Attach the background: Next, sew the leaf piece onto the background fabric. Line up the leaf in the center of the background square, and sew it in place. Be sure to use a quarter-inch seam allowance for a neat finish.
- Press the seams: After each section is sewn, press the seams flat with an iron. Pressing is an important step in quilting, as it helps set the fabric and ensures that the block lies flat.
- Trim the block: Once the leaf and background are sewn together, trim any excess fabric along the edges to ensure that the quilt block is the correct size. It’s important to keep the block square and even to make sure it fits well with other blocks in your quilt.
- Check for alignment: Before finishing, check that the leaf is centered properly in the block. If necessary, adjust the placement slightly so that it’s aligned perfectly. This will ensure that your Maple Leaf Quilt Block looks polished and professional.
Once the block is assembled, you will have a beautiful Maple Leaf Quilt Block ready to be incorporated into your quilt project.
4. Finishing the Maple Leaf Quilt
Now that your Maple Leaf Quilt Block is complete, it’s time to incorporate it into a full quilt project. Whether you’re making a full quilt or just using the block for a smaller project, here’s how you can finish your quilt:
- Arrange the blocks: Lay out your completed blocks in a grid pattern to determine the final arrangement. You can alternate the direction of the leaves or create a more uniform layout, depending on your preference.
- Sew the blocks together: Once you’re happy with the arrangement, sew the blocks together. Be sure to match the seams carefully as you join each block, and use a quarter-inch seam allowance to ensure consistency.
- Add borders: After assembling the quilt top, you can add borders around the entire quilt. This will frame the quilt and give it a finished look. Choose a fabric that complements the leaf pattern and enhances the overall design.
- Add quilt batting and backing: Lay your quilt top over quilt batting and backing fabric. You can either hand quilt or machine quilt to add texture to the quilt. Quilting stitches will hold the layers of the quilt together and add a decorative touch.
- Attach the binding: Finally, attach the binding around the edges of the quilt. This step completes the quilt and gives it a polished finish. Use a coordinating fabric for the binding to tie the quilt together.
- Press the quilt: After everything is sewn and bound, give your quilt a final press with an iron to remove any wrinkles and set the seams. Your Maple Leaf Quilt is now complete and ready to be displayed or gifted.
FAQ: Frequently Asked Questions
1. Can I make the Maple Leaf Quilt Block in different sizes?
Yes, you can adjust the size of the Maple Leaf Quilt Block by increasing or decreasing the size of the fabric pieces. Just be sure to maintain the proportions of the design so it still looks balanced.
2. What fabrics are best for the Maple Leaf Quilt Block?
Cotton quilting fabrics are the most commonly used for this pattern, as they are easy to work with and hold up well over time. You can also experiment with different textures and patterns to create unique effects.
3. How do I incorporate multiple Maple Leaf Quilt Blocks into a larger quilt?
To create a quilt with multiple Maple Leaf Quilt Blocks, arrange the blocks in a grid pattern, making sure the seams match up properly. You can also alternate the direction of the leaves to create a dynamic effect.
4. How can I make my Maple Leaf Quilt Block more colorful?
You can use a variety of fabrics in different colors to create a vibrant and colorful Maple Leaf Quilt Block. Mix and match fabrics for the leaf and background to create contrast and visual interest.
5. Can I hand quilt the Maple Leaf Quilt?
Yes, hand quilting is a great option for finishing your Maple Leaf Quilt. Use a quilting needle and thread to create a decorative design that enhances the maple leaf pattern.
Join our VIP broadcast list and gain access to exclusive patterns, all for free. As a VIP member, you’ll receive the best patterns daily, delivered directly to your device. ✨📱 It’s a unique opportunity to stay up-to-date with the latest trends and designs, curated just for you. Don’t miss out on enhancing your projects and discovering new inspirations with the best patterns every day! 🎨🔝
JOIN NOW
Conclusion
In this article, we’ve explored how to create the Maple Leaf Quilt Block – Free Pattern, from gathering materials to cutting, assembling, and finishing your quilt.
Whether you’re making a single block or creating a full quilt, this timeless design will add beauty and warmth to your project.
PATTERN HERE
Don’t forget to share your thoughts and suggestions in the comments below. We’d love to hear about your quilting journey! Happy quilting!


