
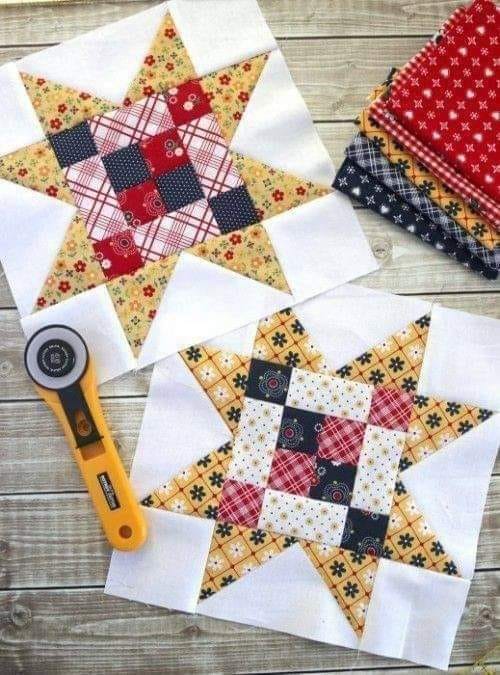
Pie Carrier Sewing Pattern

If you love quilting and want to explore a unique and meaningful design, the Meet the Makers Quilt Block – Tutorial is perfect for you.
This block is a tribute to the creativity and dedication of quilters around the world. Whether you are a beginner or an experienced quilter, this tutorial will guide you through the process of making this stunning quilt block step by step.
The Meet the Makers Quilt Block is not only beautiful but also a great way to showcase your skills with fabric combinations, precise stitching, and thoughtful design.
With the right tools and techniques, you can create a quilt block that is both visually appealing and durable. This tutorial will cover materials, cutting instructions, assembly steps, and customization options to help you create a masterpiece.
By following this Meet the Makers Quilt Block – Tutorial, you’ll gain valuable insights into quilting techniques and develop a deeper appreciation for the artistry behind quilting. Let’s get started on this exciting journey of creativity!
Before you begin, it’s essential to gather all the necessary materials. Having everything ready will make the quilting process smooth and enjoyable.
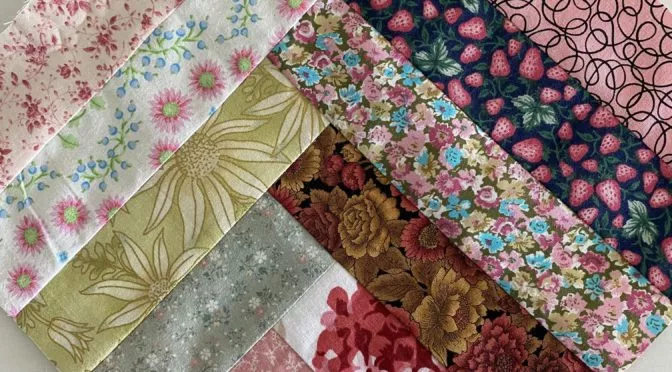
Having the right materials will ensure that your Meet the Makers Quilt Block turns out beautifully. Take your time to select fabrics that reflect your personal style and quilting goals.
Precise cutting is the foundation of a successful quilt block. Follow these steps to prepare your fabric pieces accurately.
Properly cutting your fabric pieces is crucial for assembling the Meet the Makers Quilt Block accurately. Take your time with this step to achieve the best results.
Now that your fabric pieces are ready, it’s time to sew them together and bring your quilt block to life.
By following these steps, your Meet the Makers Quilt Block will come together beautifully. Take your time to match seams accurately for a polished finish.
One of the most exciting parts of quilting is adding personal touches. Here are some ways to customize your Meet the Makers Quilt Block.
Customizing your quilt block makes it truly special. Don’t be afraid to experiment and have fun with your design choices!
1. What is the Meet the Makers Quilt Block?
It’s a quilt block pattern that celebrates quilting artistry and craftsmanship, often used in various quilting projects.
2. Can beginners make this quilt block?
Yes! This tutorial provides step-by-step instructions, making it accessible for beginners.
3. What fabric works best for this quilt block?
Cotton fabric is ideal due to its durability, ease of sewing, and variety of colors and patterns.
4. Can I hand-sew the quilt block instead of using a sewing machine?
Yes, you can hand-sew it using a strong needle and thread, although a sewing machine speeds up the process.
5. How do I make sure my quilt block is the right size?
Measure and cut fabric accurately, maintain a consistent seam allowance, and trim the block after assembling.
Join our VIP broadcast list and gain access to exclusive patterns, all for free. As a VIP member, you’ll receive the best patterns daily, delivered directly to your device. ✨📱 It’s a unique opportunity to stay up-to-date with the latest trends and designs, curated just for you. Don’t miss out on enhancing your projects and discovering new inspirations with the best patterns every day! 🎨🔝
The Meet the Makers Quilt Block – Tutorial provides a step-by-step guide to creating a stunning and meaningful quilt block. From gathering materials to assembling and customizing your design, this tutorial ensures a smooth quilting experience.
Quilting is a wonderful way to express creativity and craftsmanship. We hope this tutorial has inspired you to try this quilt block in your next project. If you found this guide helpful, please leave a comment with your thoughts and suggestions. Happy quilting!


