
Pie Carrier Sewing Pattern

If you’re looking for a creative way to add charm and whimsy to your holiday decorations, then No Sew Folded Star Ornaments with Samantha is the perfect DIY project for you.
This project allows you to create beautiful, intricate star ornaments without the need for sewing. No Sew Folded Star Ornaments are simple to make, even for beginners, and can be personalized in various ways to suit your style and holiday theme.
Whether you’re crafting for a Christmas tree, a winter celebration, or as gifts for friends and family, these folded star ornaments are a delightful addition to your home decor.
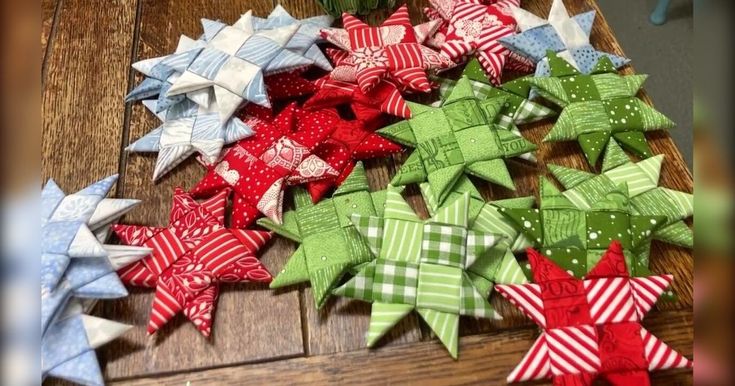
Image from google.
In this tutorial, we’ll guide you through the steps of making these beautiful No Sew Folded Star Ornaments with Samantha, including a free pattern that you can follow to get the perfect fold every time.
This is an excellent project for those looking for a quick and easy crafting session without the need for a sewing machine or complicated tools.
Best of all, it’s an eco-friendly project, as you can repurpose scrap fabric or paper that you have around your home. So, let’s get started and create these stunning folded star ornaments!
The great thing about No Sew Folded Star Ornaments is their versatility. You can make them with fabric, paper, or even felt. The beauty of these ornaments lies in their simplicity and the ability to customize them to your liking.
Whether you’re using festive red and green fabrics for Christmas or soft pastel shades for a spring-themed display, the possibilities are endless. In this guide, we’ll break down the materials, the step-by-step process, and give you tips for making these stars your own.
Before you start crafting your No Sew Folded Star Ornaments with Samantha, it’s important to gather all the materials you’ll need. Here’s a list of everything required for this project:
The primary material for creating the folded star shapes is fabric or paper. If you’re making fabric stars, choose lightweight cotton or felt for easier folding. Paper options like scrapbook paper or even old greeting cards work well for paper stars. Choose a material that complements your holiday theme or personal style.
A good pair of scissors is essential for cutting your fabric or paper into the required shapes. You’ll need to cut your material into squares, so make sure your scissors are sharp enough to handle different textures.
A ruler will help you measure and cut your fabric or paper into perfectly sized squares. Accuracy is key to ensuring that each fold is neat and even, so take your time with this step.
While you won’t be sewing anything, you will need a glue gun or craft glue to secure the folds of your stars. A hot glue gun is especially helpful as it dries quickly and holds the folds in place. If you don’t have a glue gun, regular craft glue will also work but may require extra drying time.
You can download a free pattern for the star template that will guide your folds. This template will help you create consistent, even stars and serve as a great reference throughout the process. If you prefer, you can also freehand the folds, but using a pattern is recommended for beginners.
Once your stars are folded, you can embellish them with ribbons, beads, buttons, or glitter for added flair. These decorations give the stars a personal touch and make them stand out as unique holiday ornaments.
To hang your star ornaments, you can use a piece of twine or thread. You can either glue this to the top of the star or create a loop with it to hang the ornament on a tree, doorknob, or anywhere you’d like to display your creation.
Once you have gathered all the necessary materials, it’s time to prepare your fabric or paper and start cutting it into the proper shapes for your No Sew Folded Star Ornaments.
Start by measuring and cutting your fabric or paper into squares. The size of each square will depend on the size of the star you want to create. A good starting size for paper stars is 4×4 inches, and for fabric, you can go up to 5×5 inches for a larger ornament. Using a ruler will help ensure that each square is uniform in size.
If you’re using a template for your folds, print or trace the star pattern onto your fabric or paper. This will serve as your guide and will help you create consistent, evenly folded stars. If you prefer, you can skip the template and fold the fabric or paper freehand, but using a template ensures a more uniform result.
Once you have your squares cut out, lay them out on your work surface in preparation for folding. Organize them by color or pattern so that you can easily access the pieces as you work. This will save you time and make the folding process smoother.
Before you start folding, plug in your hot glue gun and allow it to heat up. If you’re using regular glue, have it ready to go in a small container for easy application. Having your glue ready ensures a smoother crafting experience and allows you to focus on the folding process.
For fabric stars, you can lightly press each square with an iron to help set the folds better. This step is optional but can be especially helpful if you’re using cotton fabric, as it can help make the folds sharper and more defined.
If you plan to hang your star ornaments, cut a piece of twine or ribbon to the desired length for each ornament. You can always add the ribbon later, but it’s easier to prepare it in advance so that you’re ready to glue it into place once the star is completed.
Now that your materials are prepared, it’s time to start folding and assembling the No Sew Folded Star Ornaments with Samantha. This is where the magic happens as you create the beautiful star shapes.
Take your first square of fabric or paper and fold it in half diagonally to form a triangle. Make sure the edges line up evenly, and crease the fold firmly. This will create the base of your star.
Next, fold the triangle again, this time bringing the two pointed edges together to form a smaller triangle. Press the fold firmly and repeat with the remaining squares. Each square will form one section of the star.
Continue folding each square using the same process until you have all the pieces ready. Depending on the size of your star, you may need anywhere from 6 to 8 squares. The more squares you use, the fuller and more intricate your star will look.
Once your squares are folded, it’s time to start assembling them into a star shape. Apply a small amount of hot glue or craft glue to the edge of each folded triangle and press them together. Arrange them in a star pattern, with the points facing outward. Hold each piece in place for a few seconds to allow the glue to set.
After the points of the star are arranged, glue the center of the star to secure all the pieces in place. You can add a little more glue to make sure everything is tightly held together.
Once the star is assembled, attach a piece of ribbon or twine to the top of the star for hanging. Apply a small amount of glue to the ribbon and press it onto the top of the star. Hold for a few seconds to ensure it stays in place.
Once your No Sew Folded Star Ornaments with Samantha are complete, it’s time to show them off! These ornaments make wonderful decorations for your home, whether for the holidays or year-round.
These stars make perfect tree ornaments. Hang them on your Christmas tree using the ribbon loop you attached earlier. Their colorful patterns and intricate folds will stand out beautifully against the backdrop of your tree.
To make a stunning garland, simply string several of your folded star ornaments together with twine or thread. Drape the garland across your mantel, around windows, or along a staircase for a festive touch.
Place a few of these folded stars on your holiday table as part of your table setting. Pair them with candles or small decorative items to create a charming centerpiece.
You can also use these ornaments as wall decorations. Arrange them in a pattern on a blank wall or create a larger display to serve as a focal point in a room.
Handmade ornaments make thoughtful gifts. Package your No Sew Folded Star Ornaments in decorative boxes or gift bags to give to friends and family. They’ll appreciate the time and creativity you put into making them.
You can further personalize these stars by adding embellishments like glitter, beads, or buttons. These small details will give your ornaments a unique and custom touch.
Q: Can I use felt instead of fabric for this project?
A: Yes, felt is a great alternative to fabric. It holds its shape well and is easy to fold, making it ideal for this project.
Q: How do I make my stars more durable?
A: To make your stars last longer, consider coating them with a thin layer of Mod Podge or clear acrylic spray. This will protect the material and keep them looking great for years to come.
Q: Can I use paper instead of fabric?
A: Absolutely! Paper is a great option, especially for those who want to create more colorful or themed ornaments. Use scrapbook paper or any decorative paper you have on hand.
Q: How do I make my star shapes more even?
A: Use a ruler and pattern template to ensure your folds are consistent. This will help make your stars symmetrical and neat.
Q: What other ways can I use these folded stars?
A: These stars can be used in many ways! Hang them on your Christmas tree, use them for garlands, or give them as gifts to friends and family.
Q: How long does it take to make one ornament?
A: Each No Sew Folded Star Ornament can take about 30 minutes to an hour to make, depending on your experience and how many stars you want to create.
Join our VIP broadcast list and gain access to exclusive patterns, all for free. As a VIP member, you’ll receive the best patterns daily, delivered directly to your device. ✨📱 It’s a unique opportunity to stay up-to-date with the latest trends and designs, curated just for you. Don’t miss out on enhancing your projects and discovering new inspirations with the best patterns every day! 🎨🔝
In this tutorial, we’ve shown you how to make No Sew Folded Star Ornaments with Samantha using simple materials and steps. This free pattern is perfect for those who want to create festive, unique decorations without the hassle of sewing. Whether you choose to use fabric, paper, or felt, these ornaments are easy to make and add a special touch to your home. We hope you enjoy making these stars as much as we enjoyed sharing the tutorial with you!
Please leave a comment below and share your thoughts or any suggestions you have for this project. We’d love to hear how your stars turned out! Happy crafting!


