
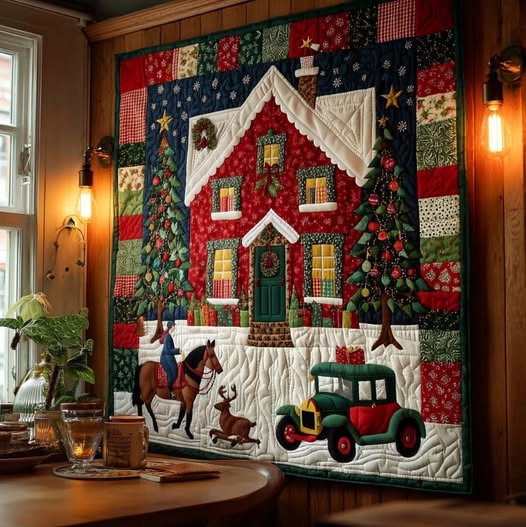
The Nostalgic Noel – Quilt Pattern brings the warmth, charm, and tradition of the holiday season into your quilting projects. This pattern beautifully captures the essence of Christmas, blending classic festive colors and timeless patchwork techniques to create a quilt that feels like a treasured heirloom.
Whether you are an experienced quilter or a beginner eager to try your hand at a seasonal project, this quilt pattern offers the perfect opportunity to express your creativity while celebrating the joy of handmade crafts.
The Nostalgic Noel – Quilt Pattern is designed to remind us of simpler times, where handmade gifts carried love, effort, and meaning. Its design usually combines reds, greens, creams, and golds to evoke the coziness of Christmas mornings and the glow of twinkling lights.
Working on this project allows you to slow down, enjoy the process, and create something that will be cherished for many years to come. It’s not just about sewing fabric together; it’s about stitching memories, warmth, and tradition into every block.
For quilters who enjoy classic aesthetics with a hint of vintage flair, the Nostalgic Noel – Quilt Pattern provides endless inspiration. The project is flexible enough to customize with modern fabrics, while still maintaining that timeless holiday look.
In this tutorial, you’ll learn how to select fabrics, plan your layout, and piece your quilt efficiently. Let’s dive into each step so you can create a masterpiece that adds comfort and nostalgia to your festive season.
1. Choosing the Perfect Fabrics for Your Nostalgic Noel Quilt
Selecting fabrics for your Nostalgic Noel – Quilt Pattern is one of the most exciting parts of the process. The right fabrics will determine the mood and overall visual impact of your quilt. Traditional choices include deep reds, forest greens, ivory whites, and metallic golds to create a luxurious and festive feel. However, you can also personalize your quilt using subtle patterns or modern tones for a more contemporary version of this classic holiday theme.
When shopping for materials, consider mixing textures to bring dimension to your design. Cotton prints, linen blends, and even touches of velvet or flannel can make your quilt look cozy and inviting. Don’t be afraid to experiment with fabric designs such as holly leaves, snowflakes, stars, or even vintage ornaments—these small details add personality to your quilt blocks.
Pre-washing your fabrics before cutting is highly recommended. It helps prevent color bleeding and shrinkage after washing your finished quilt. Once washed and ironed, you’ll notice that your fabrics become easier to handle, resulting in more accurate cuts and smoother stitching.
If you’re new to quilting, try starting with fat quarters or pre-cut bundles. These are great for beginners because they eliminate the need for extensive measuring and cutting while still offering beautiful color coordination. Choose fabrics that complement one another but maintain enough contrast to make each piece stand out in the final design.
A helpful tip is to lay out all your chosen fabrics together before cutting. This allows you to visualize how they will look as a cohesive whole. Adjust the balance between light and dark tones to achieve the traditional Christmas harmony that defines the Nostalgic Noel – Quilt Pattern.
Lastly, remember that quilting is an art of expression. Even though the Nostalgic Noel design is rooted in classic holiday themes, your fabric choices should reflect your personality and creativity. Whether you prefer subtle elegance or bold cheerfulness, your quilt will always tell your unique story.
2. Cutting and Piecing the Quilt Blocks
Once your fabrics are ready, it’s time to start cutting and piecing your Nostalgic Noel – Quilt Pattern. Accuracy is key in this step—clean cuts and consistent measurements ensure that all pieces fit together seamlessly. Use a rotary cutter, a self-healing cutting mat, and a clear acrylic ruler to achieve straight, precise lines.
Begin by cutting your fabrics into strips or squares according to your chosen layout. The classic Nostalgic Noel design often features simple yet elegant patchwork blocks that highlight color contrast. You can opt for a traditional nine-patch layout or create star-shaped motifs reminiscent of a Christmas night sky.
As you piece the blocks together, maintain consistent seam allowances—typically ¼ inch. Using a sewing machine with a quilting foot helps ensure your seams are even. Pin your pieces before stitching to keep them aligned and prevent slipping during sewing.
Ironing each seam as you go is essential. Press seams to one side to reduce bulk and maintain a smooth finish. Ironing not only gives your quilt a polished look but also helps you see if your blocks are coming together correctly.
After completing your blocks, arrange them on a flat surface or design wall. Play with the layout until you’re happy with the overall balance and color flow. This stage is where your Nostalgic Noel – Quilt Pattern truly starts to come alive, revealing its festive charm.
Finally, sew your blocks together row by row, ensuring corners match neatly. Once the top is complete, give it one final press before moving on to the next step—adding the batting and backing.
3. Quilting and Assembling Your Nostalgic Noel Creation
Now that your quilt top is complete, it’s time to assemble all the layers. You’ll need a quilt sandwich: the quilt top, batting, and backing fabric. Choose a soft, lightweight batting if you want a cozy throw, or a thicker one for a heavier, more luxurious feel.
Lay your backing fabric on a clean, flat surface, with the right side facing down. Smooth out any wrinkles before placing your batting on top. Then carefully position your quilt top, right side up. Make sure all layers are perfectly aligned before basting.
There are several basting methods you can use—pin basting, spray basting, or thread basting. For a project like the Nostalgic Noel – Quilt Pattern, pin basting is ideal because it holds the layers securely while allowing for adjustments as you quilt.
When choosing a quilting design, think about how it complements the festive theme. Simple straight-line quilting gives a modern touch, while free-motion quilting adds elegance and intricacy. You can even use metallic or gold threads for a sparkling finish that enhances the Christmas atmosphere.
Take your time quilting each section. Start from the center and work your way outward to prevent puckering. After completing the quilting, trim any excess batting and backing before attaching the binding.
Binding your quilt is the final touch that brings the whole project together. Choose a coordinating or contrasting fabric, fold it neatly, and stitch it along the edges to frame your creation beautifully.
4. Adding Finishing Touches and Display Ideas
Your Nostalgic Noel – Quilt Pattern is now complete, but there are plenty of creative ways to make it even more special. Consider adding embellishments such as embroidered snowflakes, appliqué stars, or delicate beadwork to give your quilt a festive sparkle.
If you intend to gift your quilt, personalize it by stitching the recipient’s name or the year onto one of the corners. Handmade gifts like this are cherished keepsakes that carry sentimental value for generations.
When displaying your quilt, you can use it as a wall hanging, a table cover, or a cozy throw for your sofa. Its vibrant holiday colors will instantly elevate your home décor and bring warmth to any space.
Proper care will ensure your quilt stays beautiful for many Christmases to come. Wash it gently using cold water and mild detergent, then air dry it flat to maintain its shape and color.
You can also create matching quilted pillows, placemats, or stockings using leftover fabric scraps from your Nostalgic Noel – Quilt Pattern. This way, your holiday decorations will have a cohesive and handmade charm.
Above all, enjoy the process and take pride in your creation. Each stitch represents time, love, and dedication—a reflection of the true spirit of Christmas.
FAQ
1. What fabric types work best for the Nostalgic Noel – Quilt Pattern?
Cotton fabrics are the most popular choice for this pattern because they are easy to work with, durable, and available in festive prints.
2. Can beginners make the Nostalgic Noel quilt?
Yes! The pattern can be simplified for beginners by using basic patchwork blocks, making it an excellent project for all skill levels.
3. How long does it take to complete this quilt?
Depending on your pace, the Nostalgic Noel – Quilt Pattern can take anywhere from a few days to a couple of weeks to finish.
4. Is pre-washing the fabric necessary?
Absolutely. Pre-washing prevents color bleeding and shrinkage after the quilt is finished, ensuring a clean and professional result.
5. Can I customize the colors?
Yes, you can choose modern color palettes or stick to traditional Christmas tones—it’s completely up to your creative vision.
6. How should I store my quilt after the holidays?
Store it in a cool, dry place away from direct sunlight, and avoid plastic bags to allow the fabric to breathe.
Conclusion
The Nostalgic Noel – Quilt Pattern is a delightful blend of creativity, tradition, and festive joy. Through careful fabric selection, precise piecing, and thoughtful finishing, you can create a timeless quilt that celebrates the holiday spirit in every stitch.
Whether you make it for yourself or as a heartfelt gift, this quilt will surely become a cherished part of your Christmas tradition. Leave a comment below sharing your thoughts, experiences, or suggestions—I’d love to hear how your Nostalgic Noel – Quilt Pattern turned out!


