
Pie Carrier Sewing Pattern

If you’re always on the go and need a safe, stylish way to carry your essentials, this Padded Travel Bag – Free Pattern is the perfect solution. Whether you’re heading on a weekend getaway, a business trip, or just commuting to work, a padded bag offers protection, convenience, and charm—all in one handmade piece.
Creating your own travel bag might sound complex, but with the right pattern, it’s a highly rewarding and beginner-friendly project.
Plus, with padding added to the lining, you can keep electronics, makeup, accessories, or other fragile items safe in transit.
In this article, you’ll learn everything you need to make your own padded travel bag, including materials, construction steps, creative customizations, and tips for long-lasting results. Ready to travel handmade? Let’s dive into this free pattern guide.
There are many reasons why crafters are turning to DIY solutions when it comes to travel gear. Store-bought bags are often expensive, poorly padded, and lack personal charm. That’s where making your own comes in handy.
First, the cost. With just a few materials—many of which you may already have—you can make a custom travel bag at a fraction of retail prices. All you need is some fabric, batting, zippers, and thread.
Second, personalization. When following a padded travel bag – free pattern, you can select your favorite fabrics, add interior pockets, use contrast stitching, or even embroider your initials.
Third, protection. The padded structure is key. It keeps your items secure, especially when carrying electronics like tablets or cameras. It also protects against bumps and compression inside luggage or carry-ons.
Lastly, it’s eco-conscious. By choosing durable, washable materials and avoiding mass-produced options, you’re contributing to a more sustainable lifestyle.
A handmade padded bag reflects not just your creativity but also your commitment to quality and personal style.
To create a stylish and functional padded travel bag, it’s essential to have the right materials on hand. The good news is that this project doesn’t require any special tools beyond what’s common in most sewing kits.
Basic materials:
Optional extras:
Tools needed:
You’ll also want a flat surface to cut and press your pieces. With all these materials ready, you’re set to begin crafting your very own padded travel bag using the free pattern instructions.
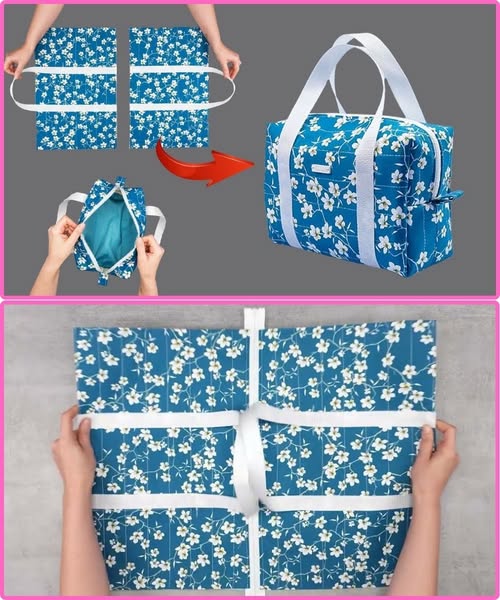
Follow these simple steps to bring your padded travel bag – free pattern to life. The measurements can be adjusted depending on your needs, but this guide outlines a basic zippered travel pouch with handles.
Step 1: Cut your fabric pieces.
Cut your outer fabric, lining, and fusible fleece to the same size. A good starting point for a medium bag is 16″ x 12″ rectangles (2 each for front and back). Also, cut two strips 4″ x 16″ for the sides/bottom.
Step 2: Fuse the fleece.
Using an iron, fuse the fleece or foam padding to the wrong side of the outer fabric. This gives your bag its padded, protective structure.
Step 3: Assemble the main body.
With right sides together, sew the side/bottom strip to the front and back panels, forming a box shape. Clip curves if needed and press seams open.
Step 4: Sew the lining.
Repeat the above step with the lining fabric—but leave a 4″ opening in the bottom seam. You’ll use this to turn the bag right side out later.
Step 5: Add the zipper.
Align the zipper with the top edge of the outer fabric (right sides together), then place the lining on top (right side down). Sew all layers together using a zipper foot. Repeat for the other side.
Step 6: Final assembly.
With the bag inside-out, match up outer and lining layers and sew around the edges, making sure to keep the zipper open. Turn the bag through the hole in the lining, press, and topstitch to close the gap.
Step 7: Add straps or handles.
Cut your webbing or fabric straps and sew them securely to the outer body. Reinforce with box stitches or X-stitches for durability.
Voilà! You now have a handmade, stylish, and functional padded travel bag—crafted from a free pattern and entirely customized to your taste.
Once you master the padded travel bag – free pattern, you’ll find endless ways to tweak it for new projects or uses.
1. Add Interior Pockets
Stitch small zipper or slip pockets into the lining for extra organization—ideal for storing chargers, makeup, or toiletries.
2. Waterproof It
Use PUL (polyurethane laminate) or vinyl fabric inside to protect against spills and leaks, especially when carrying cosmetics or snacks.
3. Make it a Backpack or Crossbody
Add D-rings and adjustable straps to convert your travel bag into a backpack or crossbody for hands-free carrying.
4. Try Quilting
Quilt the outer panels before construction to give your bag more texture and a touch of luxury. Match your thread color or choose contrasting hues.
5. Monogram It
Use embroidery or iron-on letters to personalize your bag with initials or custom motifs—great for gifts!
6. Make a Set
Create matching bags in different sizes for toiletries, electronics, or clothing. Perfect for travel or organizing your suitcase.
A handmade padded bag isn’t just a sewing project—it’s a practical, beautiful accessory that reflects your creativity and makes travel easier.
Is this padded travel bag pattern suitable for beginners?
Yes! The instructions use basic sewing skills and straight stitching. With careful attention to steps like inserting the zipper, even beginners can make a great bag.
What’s the best fabric for making a padded travel bag?
Sturdy fabrics like canvas, denim, or twill are ideal for the outer layer. For the lining, choose cotton or waterproof material. Pair with foam or fusible fleece for structure.
Can I make a padded bag without a zipper?
Absolutely! You can substitute with Velcro, magnetic snaps, or button flaps, though zippers offer the most secure closure.
How do I wash a handmade padded travel bag?
Hand wash in cold water or machine wash on gentle cycle if your materials allow. Air dry and avoid high heat.
Can I resize this pattern to make smaller or larger bags?
Yes, you can adjust the dimensions of your fabric pieces to create anything from a coin purse to a weekender bag using the same construction method.
This Padded Travel Bag – Free Pattern offers everything a maker could want: functionality, creativity, protection, and style. From choosing your fabric to stitching the final seam, you’re crafting not just a bag, but a trusted travel companion that’s built to last.
We hope this guide has inspired you to grab your sewing kit and start stitching! If you enjoyed this pattern or tried it out, leave us a comment below with your honest feedback and suggestions. We love hearing from makers like you and seeing how you bring these ideas to life!


