
The Patchwork Coasters Sewing Tutorial is the perfect project for anyone who wants to combine creativity, functionality, and style in a small yet meaningful sewing craft.
Whether you are a beginner eager to learn basic patchwork techniques or an experienced sewer searching for a quick, relaxing project, making patchwork coasters is an excellent choice. These handmade coasters not only protect your tables but also add a warm, cozy, and artistic touch to your home décor.
When you follow a Patchwork Coasters Sewing Tutorial, you get the opportunity to use fabric scraps you already have at home. This makes the project eco-friendly, budget-conscious, and highly customizable.
The beauty of patchwork lies in mixing and matching colors, textures, and prints to create unique pieces that reflect your personal style. A simple set of patchwork coasters can also make a thoughtful handmade gift for friends and family, perfect for holidays, birthdays, or housewarmings.
In addition to being decorative, these coasters are practical. Because they are layered with batting or interfacing, they protect furniture surfaces from moisture, heat, and scratches.
With the step-by-step guidance in a Patchwork Coasters Sewing Tutorial, you will learn the techniques of piecing, pressing, and finishing that can be applied to larger patchwork projects such as quilts or table runners. Starting with small items like coasters is a fun way to gain confidence in your sewing skills.
1. Materials Needed for Patchwork Coasters Sewing Tutorial
Before starting, you’ll want to prepare the right materials to ensure your coasters are durable and visually appealing. A good Patchwork Coasters Sewing Tutorial always emphasizes how important it is to gather supplies beforehand. You don’t need a lot to get started, which makes this project even more beginner-friendly.
The main requirement is fabric, and here is where creativity truly shines. You can use leftover quilting cotton, scraps from previous sewing projects, or even repurpose fabric from clothing. Since coasters are small, you won’t need large pieces, making this a perfect scrap-busting project. Choosing complementary or contrasting fabrics will help give your coasters a polished and eye-catching look.
Batting or interfacing is another crucial element. It adds body, thickness, and absorbency to your coasters. A thin cotton batting works best for durability while still keeping the coaster flexible. If you prefer a flatter finish, fusible interfacing can be used instead. This inner layer is what ensures your coasters don’t feel flimsy.
Thread selection is also important. Using high-quality thread in a color that matches or contrasts with your fabric can enhance the overall design. Since coasters are meant to withstand frequent use and washing, strong polyester or cotton thread is recommended.
You will also need basic sewing tools such as scissors or a rotary cutter, a cutting mat, a sewing machine, and pins or clips. While the project can be hand-stitched, a sewing machine makes the process quicker and ensures stronger seams. Finally, having an iron on hand is essential for pressing seams, which keeps your patchwork neat and professional.
Optional embellishments can make your coasters extra special. Consider adding decorative stitching, embroidery, lace trims, or even a personalized fabric label. These small details make each coaster truly one-of-a-kind and showcase your craftsmanship.
By preparing these materials in advance, you ensure your Patchwork Coasters Sewing Tutorial runs smoothly and becomes an enjoyable, stress-free experience.
2. Step-by-Step Instructions for Patchwork Coasters Sewing Tutorial
The process of making coasters involves simple steps that beginners can master quickly while still providing room for creativity. A Patchwork Coasters Sewing Tutorial usually begins with preparing the fabric pieces and ends with finishing touches that give your project a clean, polished appearance.
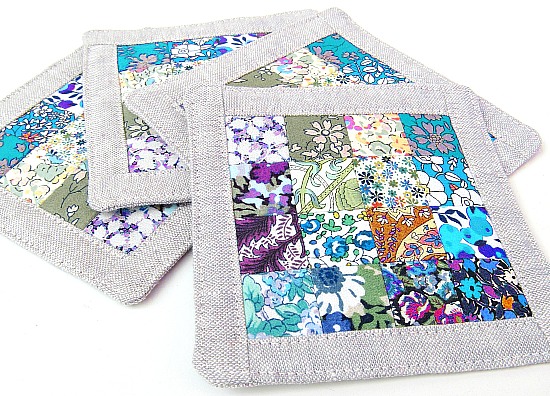
First, start by cutting your fabric scraps into uniform squares or rectangles. The size depends on how big you want your coasters to be, but typically, each finished coaster measures around 4 to 5 inches. Accuracy in cutting ensures your patchwork pieces fit together nicely without gaps or uneven edges.
Once your fabric pieces are ready, arrange them into a design you like. This step is where you can experiment with colors and prints. Try alternating light and dark fabrics, or create a pattern with stripes, diagonals, or random placements. Laying everything out before sewing helps you visualize the final product and make changes if needed.
Next, sew the pieces together using a quarter-inch seam allowance, which is standard in patchwork projects. After stitching, press the seams open or to one side with an iron. Pressing is key to achieving crisp lines and preventing bulky seams. At this stage, you should already see your patchwork design taking shape.
Once the patchwork top is complete, cut a piece of batting and a fabric backing of the same size. Layer the three pieces together—backing on the bottom, batting in the middle, and patchwork top on top. Secure them with pins or clips to prevent shifting while sewing.
Sew around the edges, leaving a small opening for turning. Trim excess fabric from the corners to reduce bulk, then turn the coaster right side out. Press again for smooth edges. Finally, close the opening with an invisible ladder stitch or by topstitching around the entire coaster.
The last step is optional quilting or decorative stitching. Stitching across the coaster not only secures the layers but also adds a stylish finish. You can sew straight lines, zigzags, or even free-motion designs depending on your preference and skill level.
3. Creative Design Ideas for Patchwork Coasters Sewing Tutorial
One of the best aspects of following a Patchwork Coasters Sewing Tutorial is the freedom to customize your project. With countless fabric combinations and design approaches, you can create coasters that perfectly suit your taste or match the theme of any occasion.
For a classic look, consider using coordinated quilting cotton in shades that complement your home décor. Neutral tones like beige, gray, and soft pastels are timeless choices that blend well in most settings. These make excellent everyday coasters for your living room or dining table.
If you want something more festive, holiday-themed fabrics are a great option. For example, red and green prints are perfect for Christmas, while orange and black patterns work well for Halloween. Making seasonal patchwork coasters allows you to refresh your décor throughout the year in a budget-friendly way.
You can also create themed sets for special occasions. Wedding or bridal shower coasters in elegant white and gold, or baby shower coasters in soft blues and pinks, make thoughtful keepsakes. Handmade coasters are always appreciated gifts because they combine utility with personal effort.
Experimenting with shapes is another fun idea. While squares are the most common, you can create round, hexagonal, or even heart-shaped coasters by adjusting your template. Unconventional shapes instantly make your coasters stand out and showcase your creativity.
For a modern and artistic touch, consider improvisational patchwork. Instead of cutting uniform squares, use irregular shapes and arrange them randomly. This approach results in abstract, eye-catching designs that are truly one of a kind.
Lastly, don’t hesitate to add embellishments. Embroidery, appliqué, and decorative stitches can turn a simple coaster into a miniature work of art. Personalizing your coasters with initials or meaningful symbols makes them even more special.
4. Benefits of Learning Through Patchwork Coasters Sewing Tutorial
Making coasters might seem like a small project, but the benefits are significant. Following a Patchwork Coasters Sewing Tutorial helps you grow your sewing skills, boosts creativity, and gives you useful handmade items at the same time.
One major benefit is skill-building. Coasters allow you to practice essential sewing techniques such as accurate cutting, consistent seam allowances, and neat pressing. These are the same skills required for larger patchwork projects like quilts. By working on a small scale, you gain confidence without feeling overwhelmed.
Another advantage is the opportunity to use fabric scraps effectively. Instead of letting leftover pieces accumulate, you can transform them into something functional. This not only reduces waste but also encourages sustainability in your sewing practice.
Creating coasters also brings a sense of accomplishment. Because they are quick to make, you see results in just a short time. Finishing a project boosts motivation and inspires you to take on more challenging sewing tasks.
On a practical level, patchwork coasters are highly useful. They protect your furniture from stains, moisture, and heat while adding charm to your home. Having a set of handmade coasters around makes everyday routines, like enjoying coffee or tea, feel more special.
Additionally, sewing patchwork coasters can become a social activity. Many sewing groups and online communities share tutorials, photos, and ideas. Engaging in these spaces allows you to connect with others who share your passion for crafting.
Finally, there’s the emotional benefit. Sewing is known for its therapeutic qualities. The repetitive motions, creativity, and focus involved in making coasters provide relaxation and reduce stress. Completing a Patchwork Coasters Sewing Tutorial is as good for your well-being as it is for your home.
FAQ About Patchwork Coasters Sewing Tutorial
1. Do I need a sewing machine to follow a Patchwork Coasters Sewing Tutorial?
No, you can sew by hand, although a sewing machine will make the process faster and more durable.
2. What is the best fabric to use for patchwork coasters?
Quilting cotton is the most popular choice because it is easy to work with, durable, and comes in a wide variety of prints and colors.
3. Can beginners make patchwork coasters easily?
Yes, coasters are one of the most beginner-friendly projects since they are small, straightforward, and forgiving of minor mistakes.
4. How do I wash and care for patchwork coasters?
Most can be machine washed in cold water on a gentle cycle. Air drying is recommended to maintain shape and durability.
5. Can I make coasters without batting or interfacing?
Yes, but they may feel flimsy. Batting or interfacing adds thickness and makes the coasters more absorbent and protective.
6. How many coasters should I make in a set?
Typically, a set includes four or six coasters, but you can adjust depending on your needs or the occasion.
Conclusion
In this article, we explored the Patchwork Coasters Sewing Tutorial, from the materials you need to creative design ideas and the many benefits of making these charming handmade items. With simple steps, affordable supplies, and endless customization possibilities, this project is perfect for sewers of all levels.
If you’ve never tried patchwork before, starting with coasters is a wonderful way to gain confidence while creating something beautiful and practical. I’d love to know what you think—please share your opinion and suggestions in the comments. Your feedback inspires new ideas and helps improve future tutorials!


