If you’re a fan of quilting, there’s nothing quite like creating a festive and cozy patchwork project.
One of the most beloved designs for the holiday season is the Patchwork Santa Claus. In this tutorial, we will guide you through the process of making a Patchwork Santa Claus using the Log Cabin method, a popular quilting technique that is both versatile and visually striking.
The Log Cabin method is a traditional quilting technique that involves sewing strips of fabric around a central square, creating a design that resembles a log cabin.
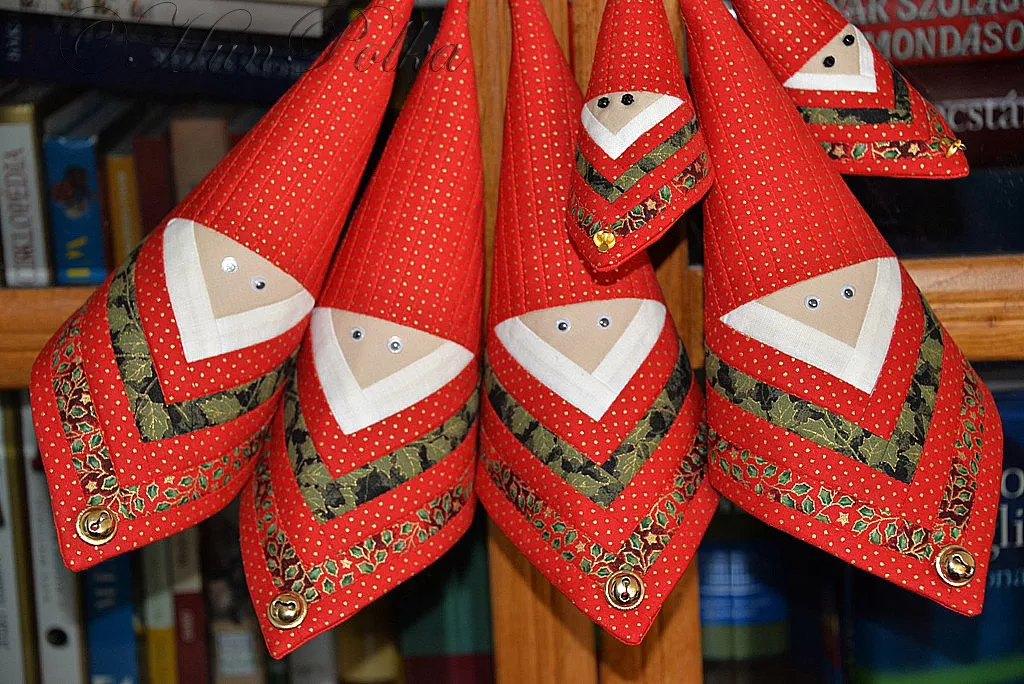
Image from google.
This method allows for beautiful, geometric patterns and is a great way to create a variety of projects, including the Patchwork Santa Claus.
SEE MORE PATTERNS
With its charming appeal, this method gives Santa’s face, beard, and outfit the perfect patchwork look. It’s a wonderful way to add a handmade touch to your Christmas decorations.
In this Patchwork Santa Claus using the Log Cabin Method – Tutorial, you will learn step-by-step how to create this holiday masterpiece. Whether you’re a beginner or an experienced quilter, you’ll find the process easy to follow and fun to execute.
Let’s get started and transform your fabric stash into a delightful Santa Claus using the Log Cabin method.
1. Materials Needed for the Patchwork Santa Claus
Before we dive into the Patchwork Santa Claus using the Log Cabin Method, it’s important to gather all the materials you’ll need for the project. Having everything ready will ensure a smooth and enjoyable quilting experience.
Fabric
For this project, you’ll need several different fabric pieces to create Santa’s face, beard, hat, and outfit. Choose fabrics in Christmas-themed colors like red, white, black, and pink. You’ll also need a light skin-tone fabric for Santa’s face and a white fabric for his beard. It’s ideal to use cotton fabrics as they are easy to work with and give the patchwork a clean finish.
Rotary Cutter and Mat
To cut your fabric accurately, a rotary cutter and cutting mat are essential tools. They will help you achieve precise measurements, which is crucial for quilting. If you don’t have a rotary cutter, a good pair of fabric scissors will also work.
Quilting Ruler
A quilting ruler will help you measure and cut straight lines, ensuring that your patchwork pieces are uniform in size. This will help your Log Cabin method pattern remain tidy and neat.
Thread
Choose a color of thread that blends well with your fabrics. For example, if you’re using red fabric for Santa’s coat, use red thread. For the skin-tone and white areas, use matching or neutral thread colors.
Needle
A good quilting needle will make it easier to sew through multiple layers of fabric. Make sure to choose the right needle size based on the thickness of your fabric.
Iron
Ironing your fabric pieces before cutting and sewing is important for creating crisp and smooth edges, which will make your Patchwork Santa Claus look professional.
2. Preparing the Patchwork Pieces
Now that you have all your materials ready, it’s time to prepare the fabric pieces for your Patchwork Santa Claus. The Log Cabin method involves sewing fabric strips around a central square, so you’ll need to cut your fabric into strips of different sizes.
Step 1: Cutting the Fabric
Start by cutting your fabric into strips. The size of the strips will depend on the size of your finished project. Typically, for a traditional Log Cabin method block, the strips range from 1 to 2 inches wide. For Santa’s face, cut a square from your skin-tone fabric (approximately 4×4 inches).
Step 2: Lay Out Your Design
Once you have your central square cut, it’s time to lay out the other strips. Arrange the strips in a circular pattern around the central square, starting with the top and bottom strips. Work your way around the square, adding fabric strips one at a time. For Santa’s face, be sure to choose fabric that will form the outline of his features, such as his beard and hat.
Step 3: Pressing as You Go
As you sew the strips onto the central square, press each piece with an iron to ensure the seams are flat. This is especially important in the Log Cabin method, as pressing helps the quilt blocks stay square and even.
Step 4: Add Santa’s Details
As you work through the quilt block, be sure to add Santa’s details, such as his beard and hat. You can use white fabric for the beard and a contrasting color, like red, for his hat. Make sure each strip is carefully sewn and pressed to maintain the clean lines of the design.
3. Assembling the Patchwork Santa Claus Block
Once your individual quilt block is finished, it’s time to assemble the pieces to create the full Patchwork Santa Claus. This step involves combining the various sections you’ve made to form Santa’s face, body, and other elements.
Step 1: Join the Blocks
Once you’ve completed the Log Cabin method block for Santa’s face and beard, it’s time to join the blocks together. Use a quarter-inch seam allowance to sew each block together. You can create a large patchwork design by combining several blocks or keep it as a single block for a smaller project.
Step 2: Add Additional Details
At this point, you can add extra details like buttons or a little embroidery for Santa’s eyes and mouth. You might even consider using fabric paint to add highlights to the design for more depth.
Step 3: Assemble the Whole Santa Claus
To assemble the full Patchwork Santa Claus, sew together all the pieces you’ve created for his face, body, and other details. If you’ve made multiple blocks for Santa’s body or hat, join them using the same technique as before.
Step 4: Trim and Square the Block
After joining all the pieces, use a rotary cutter and quilting ruler to square up your block. This ensures that your final patchwork piece will have clean edges and the correct dimensions.
Step 5: Add the Backing Fabric
Once your Patchwork Santa Claus block is completed, you can add a backing fabric of your choice. Use a fabric that complements your design and adds contrast to the front. Cut the backing fabric to match the dimensions of your patchwork piece.
Step 6: Quilting and Finishing
For the final step, quilt your project by adding stitches through all layers. You can quilt by hand or use a sewing machine, depending on your preference. Once quilted, trim any excess fabric and bind the edges to finish off your Patchwork Santa Claus.
4. Tips for Creating a Perfect Patchwork Santa Claus
Creating the perfect Patchwork Santa Claus using the Log Cabin method requires patience and attention to detail. Here are some helpful tips to ensure your project turns out just as you envisioned.
Tip 1: Choose Fabrics Carefully
Select fabrics that complement each other in terms of color and pattern. Traditional holiday fabrics, such as red, white, and green, work well for a Patchwork Santa Claus, but don’t be afraid to experiment with other colors or patterns to create a unique look.
Tip 2: Use Accurate Measurements
Accurate measurements are essential for the Log Cabin method. Be sure to measure your fabric strips carefully and use a quilting ruler to ensure uniformity throughout the project.
Tip 3: Don’t Rush the Process
Take your time with each step of the project. The Log Cabin method involves multiple rounds of sewing and pressing, and rushing through these steps can result in uneven blocks. Patience will yield a beautifully finished piece.
Tip 4: Press Frequently
Pressing your fabric at each step is crucial for a smooth, flat finish. Press each seam open after sewing to avoid any lumps or bumps in your quilt block.
Tip 5: Experiment with Layouts
Don’t be afraid to experiment with the layout of your blocks. You can arrange the blocks in different orientations to create various patterns or keep it simple with a traditional design.
Tip 6: Add Personal Touches
For a more personalized Patchwork Santa Claus, add little embellishments like buttons for his coat or tiny embroidery stitches for his eyes. These little details will make your project truly unique.
FAQ: Patchwork Santa Claus using the Log Cabin Method
Q: Can I use this method for other holiday designs?
A: Absolutely! The Log Cabin method is versatile and can be used to create other festive designs, such as reindeer, snowmen, or Christmas trees. The technique is not limited to Santa Claus.
Q: How do I make sure my quilt blocks are even?
A: Make sure to measure your fabric strips carefully and use a quilting ruler to keep your strips straight. Press your seams after every step to ensure that the blocks stay even.
Q: Can I hand-quilt my Patchwork Santa Claus block?
A: Yes! You can hand-quilt your project if you prefer. Hand-quilting gives a unique texture to your design, though it can take longer than machine quilting.
Q: How do I add a border to my Patchwork Santa Claus?
A: After completing your quilt block, measure and cut strips of fabric to create a border. Attach the strips to the edges of your block to add a finished, framed look.
Join our VIP broadcast list and gain access to exclusive patterns, all for free. As a VIP member, you’ll receive the best patterns daily, delivered directly to your device. ✨📱 It’s a unique opportunity to stay up-to-date with the latest trends and designs, curated just for you. Don’t miss out on enhancing your projects and discovering new inspirations with the best patterns every day! 🎨🔝
JOIN NOW
Conclusion
In this Patchwork Santa Claus using the Log Cabin method – Tutorial, we’ve covered everything you need to create a festive and charming Santa Claus quilt block. From selecting materials to pressing and joining the blocks, you now have all the knowledge you need to make this beautiful holiday piece. We hope this tutorial has inspired you to start your own quilt, and we’d love to hear how it turned out!
PATTERN HERE
If you have any questions or suggestions for future tutorials, please leave a comment below. Happy quilting, and may your creations bring warmth and joy to your holiday season!


